
Set Up Data Connectors
Learn how to set up Visier's data connectors.
Access requirements
Custom profile with these capabilities: Data (Write, Detailed)
Reach out to your administrator for access.
Overview
Visier's data connectors load a portion of the analytic model using data that Visier retrieves from your data storage systems like human capital management systems (HCMs) and data lakehouses. Connectors generate new sources and load data from the data providers you connect to our solution.
Note: You can create up to 50 data connectors and data connector credentials per project, except free trial tenants, which have a maximum of 10 data connectors per project. These maximums are the default, however, contact Visier Technical Support to request limit adjustments.
Tip: Watch this video to learn how to configure connector credentials.
To set up data connectors in Visier, do the following:
- In your source system, create a service account. The service account gives Visier the ability to retrieve data from your source system. For more information, see Set up a service account.
- In Visier, provide connector credentials for the service account. The credentials authenticate the service account in Visier so that we can retrieve data from your source system. For more information, see Add connector credentials in Visier.
- In Visier, create a connector. The connector defines the data tables and attributes to retrieve from your source system, and any attribute filters to apply to the data. For more information, see Create a connector.
- In the connector, configure the tables and attributes to include in the connector extraction job. For more information, see Include or exclude tables.
- Optional: In the connector, generate objects related to the connector data. This generates data categories, mappings, sources, and rules that organize and transform your data from the source system to Visier's expected schema. Only generate objects if it's the first extraction for this type of data. For more information, see Generate objects.
- When finished, run a data connector extraction job. The extraction job retrieves data from your source system and processes the data in Visier. For more information, see Run a Data Connector Extraction Job.
Set up a service account
To start using Visier's data connectors, you must first create a service account in your source system that enables Visier to connect your data to our solution.
When creating a service account, Visier recommends using an integration user for integration with third-party systems like Visier.
Caution: We do not recommend running integrations with an employee's user account because:
- All operations performed by the user will be logged under this employee instead of a user account dedicated to integration.
- If the security profile of the employee changes, or if the employee exits the organization, integrations that depend on this user will no longer function.
Please refer to your source system's documentation to create an integration user and provide the integration user with all the required permissions to perform integration actions.
Depending on the source system, the required permissions may be different. For more information, see Supported connectors and requirements.
Add connector credentials in Visier
Note: This feature is also available through Visier's public APIs. For more information, see Data and Job Handling API.
Your service account must be connected to Visier to allow us to retrieve data for use in the solution.
If you're also creating a new connector, we recommend you start in a project because you can add connector credentials and create the connector at the same time. For more information, see Create a connector. If you're creating an additional credential for an existing connector, start in the global workspace.
- On the global navigation bar, click Data > Connector Credentials.
- Click Add Connector Credential.
- Select a data provider and click Next.
- Type a display name and description. Click Next.
- Enter the connector credentials. This differs by provider.
- If the connector supports table sources, select a source type for the connector:
- File sources: Updates require reprocessing and overwriting entire files. For more information, see Sources.
- Table sources: Supports incremental updates and SQL transformations during sync. For more information, see Use SQL with Table Sources.
- Click Authenticate to ensure your credentials work as intended.
- Click Create.
You can review the data access granted to the service account. In Data > Connector Credentials, select the credential and then click Access summary.
Note: Administrating tenants can enable credential inheritance, a toggle that allows you to share a set of credentials to your analytic tenants. Credential inheritance enables extraction jobs to run on analytic tenants from the inherited connector.
Your analytic tenants will have view-only access to the credential; they cannot edit inherited credentials.
To enable credential inheritance, do the following:
- On the global navigation bar, click Data > Connector Credentials.
- Select an existing connector credential. Make sure that the credential is appropriate for your analytic tenants; tenants will be able to use the credential to create data connectors.
- In the credential, click Settings.
- In Settings, turn on the Credential inheritance toggle.
- Click Save.
After a set of user credentials are provided in Visier, the extract, load, and transform (ELT) process is managed by the Visier Professional Services Team.
Create a connector
Create a connector to enable data extraction from your data source system. You can create multiple connectors per source system, such as if you want to retrieve your Payroll data less frequently than other data.
- In a project, on the navigation bar, click Data > Connectors.
- Click Create Connectors.
- Do one of the following:
- If you've added a connector credential, click Use existing, select the credential from the list, and then click Next.
- If you want to add a connector credential, click Add new, select a data provider, and then click Next.
- Enter the connector credentials. This differs by provider.
- Click Authenticate to ensure your credentials work as intended.
- Click Next.
- In Basic Information, type a display name and description for the connector.
- Click Create.
After creating a connector, you can modify the connector's imported tables, attributes and filters, and other settings, as described next.
Customize a connector
To customize a data connector, you can:
- Select the data table that Visier retrieves from your source system. For more information, see Include or exclude tables.
- Configure each included table. For example, configure whether to generate a source for the connector and which attributes from your source system to bring into Visier. For more information, see Configure tables.
- Change the settings for the connector, such as including the connector in data load tasks or updating the connector credentials. For more information, see Change the connector settings.
- If the connector supports real-time data streaming, turn on streaming and configure its settings. For more information, see Enable near real-time data.
When you're done modifying the connector, run an extraction job to retrieve data from the source system. For more information, see Run a Data Connector Extraction Job.
Include or exclude tables
A data connector provides imported tables from your source system. Each table represents an analytic object in Visier's analytic model, such as Employee or Compensation. In this section, select the data tables from your source system to bring into Visier.
If you're using the connector for the first time, you can try quick onboarding to automatically include tables that are recommended for a selected topic. As part of this workflow, all the necessary data loading and data processing objects, such as data categories, sources, and mappings will be created. Then an extraction job will run to retrieve data through the connector.
Note: Quick onboarding is only available for Workday, Salesforce, ServiceNow, SAP SuccessFactors, and Oracle Fusion Service connectors.
- In a project, on the navigation bar, click Data > Connectors.
- Select a data connector.
- Do one of the following:
- If the connector doesn't have any selected tables, click Select Tables.
- If the connector already contains selected tables, in Tables, click Edit.
- In the dialog, in Imported Tables, select the data tables to retrieve from your source system into Visier.
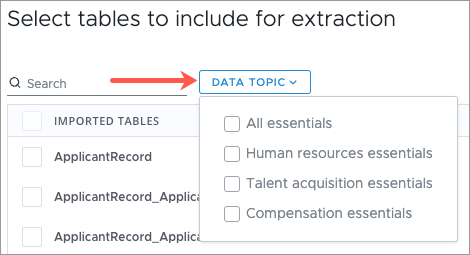
Note: In some connectors, you can filter the list of tables to specific data topics, as shown next. For example, let's say you only want to load compensation data. In the Workday V2 connector, you can filter the tables to Compensation essentials to more easily find and select compensation data tables.
- Click Done.
Configure tables
After selecting a table from the Included Tables list, you can configure the table using a variety of options, as shown in the following screenshot.
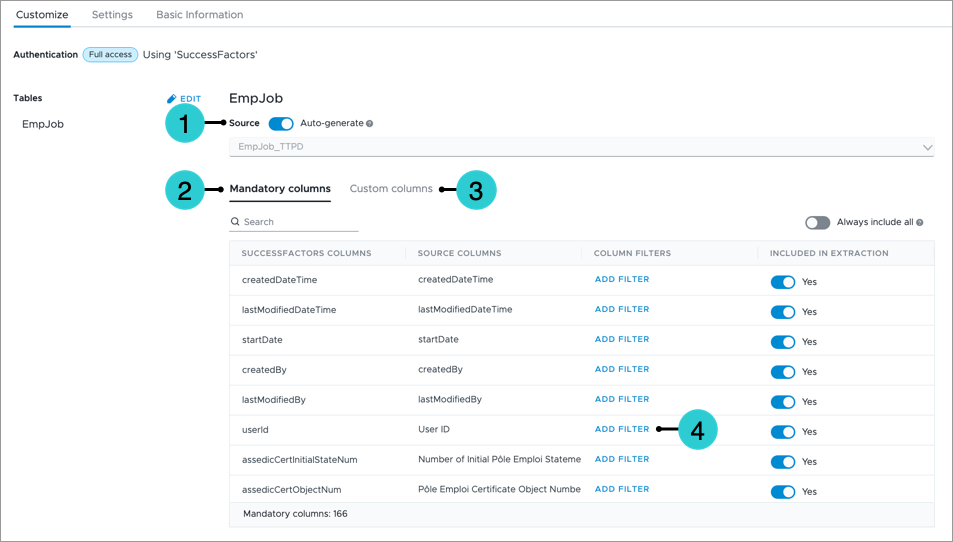
- Auto-generate source toggle: Creates a source for the table during connector setup or first extraction. This is enabled by default. For more information about sources, see Sources.
- Mandatory columns: Attributes from your source system that connect directly to attributes in Visier's Blueprint. All mandatory attributes are included by default. To exclude specific attributes from the connector, disable Always include all and then individually disable Included in Extraction for the attributes to exclude.
- Custom columns: Attributes that aren't available in Visier's out-of-the-box Blueprint; for example, parking spot data. To use custom attributes in Visier, you must create a new attribute in Visier and then map the custom attribute from your source system to the new attribute in Visier. For more information about attributes, see Attributes. All custom attributes are excluded from the extraction by default. To include custom attributes, enable Always include all or individually enable Included in Extraction for the attributes to include.
- Column filters: Retrieve specific data from your source system using an attribute filter. The filter expression is a comma separated list of attribute values. For example, if you want to retrieve data for specific business units from the table, you can add a filter to the Business Unit column. To extract data for the Product (PROD) and Marketing (MKT) business units, enter PROD, MKT in the Input IDs to filter dialog.
Note:
- Column filters are only available if the connector allows filtering against the data table. If a connector doesn't support this option and you need it, please contact your Customer/Partner Success Manager.
- Exclude filter logic is not supported.
Change the connector settings
You can change settings for the connector in the Settings tab.
- Enable data extraction: Includes the connector in data load tasks to make the data available when the project is published to production.
- Update connector credential: Changes the credential associated with the connector. You must first create another connector credential to use in the data connector. For more information, see Add connector credentials in Visier.
Note: The credential must be from the same data provider. For example, if using a UKG data connector, you can only change the credential to another UKG credential.
Enable near real-time data
If the connector supports near real-time data streaming, you can enable or disable near real-time streaming per credential. The connector credential must use table sources. For more information, see Use SQL with Table Sources.
Near real-time data is available with the following connectors:
- In a project, on the navigation bar, click Data > Connectors.
- Select a data connector.
- Click Credentials.
- Enable Real Time Streaming.
- Click the Click to open settings button
 .
. - In the Real-time streaming settings dialog, do any the following:
- To select the tables that Visier monitors for changes, click Edit, then select the tables and click Done. New tables must be added manually.
- To set the frequency that Visier checks for changes, set Batch latency. The default is 30 seconds.
Generate objects
If it's the first time loading a specific type of data, such as Employee data, in your Visier tenant, you can click Generate Objects in a connector. Generate Objects tells Visier to create all the necessary data loading and data processing objects, such as data categories, sources, and mappings.
Note: Generating objects is only available for Workday, Salesforce, ServiceNow, SAP SuccessFactors, and Oracle Fusion Service connectors.
After successfully generating objects, you can click View Objects to see a list of generated objects. Alternatively, you can visit the project's Changes room to review the added objects. To see a project's changelist, on the navigation bar, click the Home button ![]() > Changes.
> Changes.
Next steps
Now that your connector is set up, you can start retrieving data from your source system. To start retrieving data, run a data connector extraction job. For more information, see Run a Data Connector Extraction Job.