
Mapping Settings
Learn how to configure your mappings.
Overview
Ensure users see the correct data when using Visier by correctly configuring your mappings. Choosing the right mapping configuration depends on how your data is structured and how you want to load your data on an ongoing basis.
Note:
- When loading data in Visier, mappings dictate how your data should be extracted, transformed, and loaded. For more information, see Mappings and Add a Mapping.
- You should create a mapping for each source containing data you want to extract, transform, and load in to Visier. For more information, see Sources. Depending on how your data is structured, the number of mappings you need can vary. For example, you can have your employee and employee performance data in one or multiple CSV files.
- A single source can be used for multiple mappings.
Data file type
Data file type determines how Visier treats your file uploads. For example, you can configure your mapping to treat each file upload as a snapshot of all your data at a point-in-time or an incremental update that only includes new and updated data.
Temporal
Choose temporal when taking the snapshot approach and uploading files that contain all your data at a point-in-time.
Example:
Let's say you work at an organization with three employees and you want to load all employees in April, capture a promotion that occurs for your IT Manager in May, and capture a resignation that occurs by your Finance Manager in June.
Your file for April may look like:
|
Snapshot date (mm-dd-yyyy) |
Employee ID (EID) |
Department |
Job name |
|---|---|---|---|
|
04-30-2024 |
EID101 |
HR |
HR Manager |
|
04-30-2024 |
EID102 |
IT |
IT Manager |
|
04-30-2024 |
EID103 |
Finance |
Finance Manager |
Your file for May may look like:
|
Snapshot date (mm-dd-yyyy) |
Employee ID (EID) |
Department |
Job name |
|---|---|---|---|
|
05-31-2024 |
EID101 |
HR |
HR Manager |
|
05-31-2024 |
EID102 |
IT |
IT Director |
|
05-31-2024 |
EID103 |
Finance |
Finance Manager |
Your file for June may look like:
|
Snapshot date (mm-dd-yyyy) |
Employee ID (EID) |
Department |
Job name |
|---|---|---|---|
|
06-30-2024 |
EID101 |
HR |
HR Manager |
|
06-30-2024 |
EID102 |
IT |
IT Director |
Since you're using the temporal data file type, each of the files must contain the updated records for all employees even if there are no changes to the records.
After loading the above data into a temporal mapping, the records would reflect the following:
- April headcount metric is three (EID101, EID102, and EID103).
- The May headcount is three (EID101, EID102, and EID103).
- The June headcount is two (EID101, EID102).
In the above example, the removal of EID103 is implicit in the data, and not a result of explicit removal from the source. Temporal data is snapshot-style data comprising a set of records at a point in time. This data is wide and includes all the columns in the schema for each record.
Typically, temporal data is loaded period-to-period. Visier compares the incoming data and infers if members of the subject need to be removed for periods of time. For the best performance, we recommend a minimum of monthly periods.
Transactional profile
Choose transactional profile when you plan to upload files that only contain new or changed records.
Let's say you work at an organization with three employees and you want to load all employees in April, capture a promotion that occurs for your IT Manager in May, and capture a resignation that occurs by your Finance Manager in June.
Your file for April may look like:
|
Event date (mm-dd-yyyy) |
Employee ID (EID) |
Department |
Job name |
Status |
|---|---|---|---|---|
|
04-30-2024 |
EID101 |
HR |
HR Manager |
Active |
|
04-30-2024 |
EID102 |
IT |
IT Manager |
Active |
|
04-30-2024 |
EID103 |
Finance |
Finance Manager |
Active |
Your file for May may look like:
|
Event date (mm-dd-yyyy) |
Employee ID (EID) |
Department |
Job name |
Status |
|---|---|---|---|---|
|
05-15-2024 |
EID102 |
IT |
IT Director |
Active |
Your file for June may look like:
|
Event date (mm-dd-yyyy) |
Employee ID (EID) |
Department |
Job name |
Status |
|---|---|---|---|---|
|
06-16-2024 |
EID103 |
Finance |
Finance Manager |
Inactive |
Since we're using the transactional profile data file type, each file only contains employee records that have changed since the load. To remove an employee from the application completely, send the data again without the employee record. Transactional data persists indefinitely, reflecting changes in state even when not included in files.
A transactional profile combines elements of both temporal and transactional log data. It excludes unchanged records while fully capturing each modified record. The data structure is wide, meaning a row is included only if at least one attribute has changed, with the corresponding change timestamp recorded.
Transactional log
Choose transactional log when you plan to upload files that are structured to be tall rather than wide and where each row represents a single property value change.
Let's say you work at an organization with three employees and you want to load all employees in April, capture a promotion that occurs for your IT Manager in May, and capture a resignation that occurs by your Finance Manager in June.
Your file for April may look like:
|
Event date (mm-dd-yyyy) |
Employee ID (EID) |
Attribute |
Value |
|---|---|---|---|
|
04-30-2024 |
EID101 |
Department |
HR |
|
04-30-2024 |
EID101 |
Job name |
HR Manager |
|
04-30-2024 |
EID102 |
Department |
IT |
|
04-30-2024 |
EID102 |
Job name |
IT Manager |
|
04-30-2024 |
EID103 |
Department |
Finance |
|
04-30-2024 |
EID103 |
Job name |
Finance Manager |
|
04-30-2024 |
EID101 |
Status |
Active |
|
04-30-2024 |
EID102 |
Status |
Active |
|
04-30-2024 |
EID103 |
Status |
Active |
Your file for May may look like:
|
Event date (mm-dd-yyyy) |
Employee ID (EID) |
Attribute |
Value |
|---|---|---|---|
|
05-15-2024 |
EID102 |
Job name |
IT Director |
Your file for June may look like:
|
Event date (mm-dd-yyyy) |
Employee ID (EID) |
Attribute |
Value |
|---|---|---|---|
|
06-16-2024 |
EID103 |
Status |
Inactive |
Since we're using the transactional log data file type, each file only contains employee records that have changed since the load and each record consists of a column value pair. To remove an employee we had to remove their record from all previous file uploads and re-upload those files. Similar to transactional profile data, you will need to filter out any data in the metrics.
A transactional log is a journal-style record that captures data changes over a specified interval. It follows a tall format, listing only the attributes that have changed along with their new values. Each entry includes a timestamp indicating when the change occurred.
This file type simplifies tracking modifications by directly recording changed values, reducing the number of records that need to be processed. Since changes are explicitly logged rather than inferred, additional extraction rule formulas are required when importing data in mappings.
With file sources, the keepSuccessOnly and skipNone rules are used when importing data for transactional logs to keep source data rows distinct when assigning them to different attributes. For more information, see Visier Extraction Language (VEL). The extraction formulas needed to correctly import data in mappings differ according to which data type is being extracted. The following examples use the keepSuccessOnly rule, but the column data type designations match those used with skipNone:
keepSuccessOnly(if (column("Attribute") = "Contract_Type") column("Value"))keepSuccessOnly(if (column("Attribute") = "FTE_Factor") doubleColumn("Value")keepSuccessOnly(if (column("Attribute") = "Birth_Date") date(column("Birth_Date"), dateFormat("MM/dd/yyyy")))With table sources, transactional log tables skip null values or empty strings by default. You can use the following custom function to change the default behavior:
- skip_null: Doesn't emit events with None values when null is observed after extraction. This is the default for transactional log tables.
// Source data:
ID,EventDate,Attribute,Value
Employee-1,Jan 14,Job,Manager
Employee-1,Jan 14,Name,Bob

// 'Job' mapped as
CASE WHEN `Attribute` = 'Job' THEN `Value` else null end

// 'Name' mapped as
CASE WHEN `Attribute` = 'Name' THEN `Value` else null end

// Emits the following events:
ProfileChangeEvent(Jan 14, EmployeeID='Employee-1')
ProfileChangeEvent(Jan 14, Job='Manager')
ProfileChangeEvent(Jan 14, Name='Bob')
For more information about table sources, see Use SQL with Table Sources.
Validity range
Choose validity range for data that has a known start and end date. The end date on a validate range mapping is considered exclusive. For example, in a record with an end-date of December 31, 2023, you will need to shift it to January 1, 2024 in your mapping for a valid record on December 31, 2023.
Example:
Let's say you load employee performance data for the year 2023. Your file for may look like:
|
Event date (mm-dd-yyyy) |
Employee ID (EID) |
Performance Rating |
Start date (mm-dd-yyyy) |
End date (mm-dd-yyyy) |
|---|---|---|---|---|
|
01-01-2023 |
EID101 |
4 |
01-01-2023 |
12-31-2023 |
|
01-01-2023 |
EID102 |
4 |
01-01-2023 |
12-31-2023 |
|
01-01-2023 |
EID103 |
5 |
01-01-2023 |
12-31-2023 |
Mapping type
Mapping type is how you load and combine data from multiple sources. For example, you can populate an employee object in Visier with data that is stored in one or more files.
Note: Regular, auxiliary, and lookup mapping types are specific to subject and overlay analytic objects. All mappings targeting event objects must use the regular mapping type.
Regular
Choose a regular mapping type when loading primary data that you consider to be the source of truth for a selected target. Regular mapping types create and remove objects in Visier based on the records that exist in the selected data source. When creating a mapping, regular is the default data type.
Example: Let's say you want to load employee data and you have a file that you consider to be the source of truth for whether an employee currently exists or does not exist in your organization. You can create a regular mapping to ensure employees are added or removed based on the records that exist in your employee data file. Your employee data file may look like:
|
Event date (mm-dd-yyyy) |
Employee ID (EID) |
Department |
Job name |
|---|---|---|---|
|
04-30-2024 |
EID101 |
HR |
HR Manager |
|
04-30-2024 |
EID102 |
IT |
IT Manager |
|
04-30-2024 |
EID103 |
Finance |
Finance Manager |
Auxiliary
Choose an auxiliary mapping type when you want to augment existing data with data loaded from a different source.
Note: This only works if the auxiliary data contains an ID that matches the ID of the records you want to merge with.
Example: Building off the previous example for regular mappings, let's say you want to load employee performance data using an auxiliary mapping type. In addition to the regular mapping for your core employee data, you can create an auxiliary mapping to load your employee performance data. Your employee performance data file may look like:
|
Event date (mm-dd-yyyy) |
Employee ID (EID) |
Performance Rating |
|---|---|---|
|
04-30-2024 |
EID101 |
3 |
|
04-30-2024 |
EID103 |
5 |
In this example, EID102 is missing from the performance data file. Because EID102 exists in the core employee data file, EID102 will still exist in the headcount, but their performance rating is Unknown until you send a performance data file with a Performance Rating value for EID102.
You can use this approach to populate the employee objects in Visier with employee and employee performance data stored in separate files.
When deciding whether to use a regular or auxiliary mapping setting, it’s important to evaluate the relationship between the new data being added and whether any related data already exists within the system.
Regular mapping is used for the primary data source that determines an object's existence within the application. It is appropriate if the presence of a record in the source indicates that the object exists, while the absence of a record means it does not exist. For example, a source containing general employee data, serving as the main source of employee information, would typically use a regular mapping.
Auxiliary mapping is used to provide supplementary details about entities that are already established through regular mapping. It adds additional information without affecting the existence of an entity. For example, a table storing employee performance data would use auxiliary mapping because it supplements existing employee records but does not introduce a new employee into the system.
Best practices:
- By default, temporal auxiliary mappings do not generate a valid range for their data. To enable this, you must explicitly set the Auxiliary temporal valid range option to true in Data Category > Settings. This is crucial for historical reporting and analysis. For more information, see Data Categories.
- Temporal auxiliary mappings are not suitable for multi-value properties (MVPs). This is because system rules, which are necessary to reset attribute values upon profile termination, do not run for MVPs. As a result, attributes will never expire or be reset. If you need expiring attributes from an auxiliary source to populate an MVP, you must use a temporal lookup.
-
Avoid combining temporal auxiliary mappings with transactional regular mappings for the same subject. These can interfere with the createProfilesForCTEvents business rule, blocking the creation of the necessary regular event and leading to an incorrect subject profile state. Use a transactional auxiliary mapping or a temporal lookup instead.
Lookup
Choose a lookup mapping type to augment existing data with data loaded from a different source. This is the preferred method to use when existing data can only be linked to the subject via a secondary property, often called a foreign key.
Because it relies on a secondary property, a lookup mapping requires formulas or business rules to define the key column and properly augment the additional data. For more information, see augmentingMapping and augmentingMultipleMapping.
Note: Use lookup when a data source does not have a key property to match the ID for your subject.
Example: Let's say you want to load employee job name data using a lookup mapping type. You can create a regular mapping to load your internal job code employee data. Your employee data file may look like:
|
Event date (mm-dd-yyyy) |
Employee ID (EID) |
Department |
Job Code |
|---|---|---|---|
|
04-30-2024 |
EID101 |
HR |
123 |
|
04-30-2024 |
EID102 |
IT |
456 |
|
04-30-2024 |
EID103 |
Finance |
789 |
You can then create a lookup mapping to load your job name data. Your job code-to-name file may look like:
|
Event date (mm-dd-yyyy) |
Job Name |
Job Code |
|---|---|---|
|
04-30-2024 |
HR Manager |
123 |
|
04-30-2024 |
IT Manager |
456 |
|
04-30-2024 |
Finance Manager |
789 |
|
04-30-2024 |
Finance Director |
146 |
|
04-30-2024 |
IT Director |
168 |
You can use this approach to populate the employee objects in Visier with job name and job code data stored in separate files.
Best practices
-
Explicitly map a lookup's EventDate to a source column or formula. If a lookup’s EventDate is later than the date of the record you are augmenting or replacing, the system may return a none or default value up until the EventDate of the lookup.
-
For values that change over time: Map the EventDate to the source column containing the effective date of the change.
-
For constant values (one value per key): Map the EventDate to an arbitrary time earlier than or equal to your source data, for example,
date(1970, 1, 1). This ensures the key is active for all historical and current records.
-
- The
mappingKeyin the augmentingMapping business rule must be an existing property in the subject and should not be a subject ID likeEmployeeID. This ensures the lookup only runs when necessary, instead of with every regular event. - Avoid creating multiple lookups from a single source file with the same key and date configuration. This prevents the system from having to parse the same file multiple times, which improves efficiency.
- The order you call lookups in your business rules is important and can impact your final data. For example, a lookup will fail to insert a change event for an attribute if a change event for that same attribute already exists on a given date.
- To prevent potential conflicts, it is recommended to load lookups into attributes that are not already mapped.
- Use the augmentingMultipleMapping business rule to combine data from multiple lookup mappings sharing the same target group into the auxiliary stream.
Static mapping
A static map is a specialized key-value pair lookup mapping used in extraction formulas to consolidate multiple IDs for the same individual across different data sources. For example, an HRIS migration, where an employee's ID from an old system needs to be replaced with a new ID in a different system.
The system uses a static map to replace the ID at extraction time, as you cannot change the ID after the extraction, nor merge separate streams. For more information, see lookup and Connect subject member ID property to lookup.
Note: With file sources, static maps must only be used for updating subject IDs. For updating any other member property, such as Manager ID, you must use a standard lookup mapping.
Best practices
-
A static mapping has no time axis which means any value replacement is valid at all times, making it unsuitable for values that change over time. For lookups over time, use a business rule.
-
When applying a static map to a subject ID, you must add the lookup rule to all relevant mappings for that population. Failure to do so can cause both the old and new versions of the ID to appear in your data, leading to unexpected results.
-
When using the lookup function with a table source mapping, use the following formula format: lookup('<static map object name>', ColumnA). Table source mappings do not support nested lookups and lookups in filters.
Correction
Choose a correction mapping type when you want to overwrite the current data with updates or corrections.
Visier applies corrections when the source data itself cannot be corrected and providing a full restatement is not possible. To apply corrections, you must provide a correction file for the specific properties to correct. These corrections are applied through rules after the stream is built and cannot change the profile conception or termination events. For more information about how to correct data, see Data Load Deletions and Corrections.
Corrections follow a check, edit, update workflow:
- Check the event stream for errors.
- Specify corrections.
- Update the event stream with the corrections.
A correction has an event stream ID (e.g., subject member ID) and a correction map with time-ordered corrections. The following corrections are available:
- Insert: Inserts a specified value or event until the next change.
- Edit: Edits a value for a property at a specific time or over a period of time. Only valid for profile events.
- Delete: Deletes profile events, regular events, conception events, or termination events.
- Restatement: Updates or inserts profile change events.
For more information about the event stream, see Data Processing.
Data file types by mapping type
The available data file types change with the selected mapping type. The following table shows the data file types that can be used per mapping type.
| Mapping type | Data file types |
|---|---|
| Regular | Temporal, transaction log, transactional profile, validity range |
| Auxiliary | Temporal, transaction log, transactional profile |
| Lookup | Temporal, transactional log, transactional profile, static map |
| Correction | Various |
There are two distinct types of regular events to highlight:
- Conception events: These are journal-style records marking the beginning of a subject's validity interval. For example, an employment start event signifies the creation of an employee profile. While they are loaded like other events, Visier treats them differently as conception events should align with the employee profiling data.
- Termination events: These journal-style records indicate the end of a subject's validity interval. For example, an employee exit event marks the conclusion of an employee profile (a profile termination event). Termination events must align with the employee's removal from the profiling data.
Override behavior
Override behavior is how you specify which records to load when loading data on an ongoing basis with file sources. For example, if you load incorrect employee data for January 2024, you can re-upload the correct employee data for January 2024 and configure the override behavior to load the correct employee data and ignore the incorrect employee data.
Visier determines whether a data file is newer or older using snapshot time. By default, snapshot time is the file's upload time, but you can set a different snapshot time in the global workspace in Data > Sources > Uploaded Files. For more information about snapshot time, see How Time Is Represented in a Source.
Override behavior is not applicable to table sources. For more information, see Use SQL with Table Sources.
In Visier, override behavior serves the following purposes:
- Restate data at any point in time without manually excluding previously-uploaded files.
- Group data flexibly.
- Configure override behavior once and never have to configure it again.
You can change a mapping's override behavior at any time without losing files or data.
Caution:
- Records with incorrect date formats or typos can cause records from previous files not to load.
- If the file doesn't contain an event date, such as in a lookup, the default is
sourceTimestamp.
In each mapping, choose one of the following override behaviors:
- Event date
- Event date and subject member ID
- Record period date
- Record period date and subject member ID
Event date or record period date?
Put simply, you have a choice between grouping data records for overriding by their event date or by a record period date that you assign. Event date override uses the EventDate property as both the record date and the override ID. Record period date override groups records to a specific date, such as the snapshot time, where EventDate is the record date and record period date is the override ID.
After you decide whether to override by event date or record period date, you can then decide whether to override entire files or specific IDs in a file. Overriding by file removes old data of the same event date or record period date and replaces it with the latest file's data, known as remove-and-replace logic. Overriding by subject member ID replaces old data of the same event date or record period date if there is also a matching subject member ID in the old and new files, know as upsert (update or insert) logic. Subject member ID overrides cannot remove previously-sent records, it can only update them.
The following table describes the differences between the override behaviors.
|
Override behavior |
Uses |
Choose if: |
|---|---|---|
|
Event date |
|
|
|
Record period date |
|
|
|
Event date and subject member ID |
|
|
|
Record period date and subject member ID |
|
As an override behavior, record period date can do everything that event date does and more. We recommend using record period date because it's more flexible than event date. Event date is limited by its use of EventDate as both record date and override ID.
Example: Event date and subject member ID limitation
Let's say you sent a file on February 1 that contains 3 pay events for E1234 and 1 pay event for E5678 on January 31. On February 4, you send a new file that contains 1 additional pay event for E1234 on January 31. You expect Visier to add the new pay event for a total of 4 pay events for E1234 on January 31.
The following table is the February 1 file.
|
Pay date (EventDate) |
Employee ID |
Pay type |
Amount |
|---|---|---|---|
|
2020-01-31 |
E1234 |
Salary |
$10,000 |
|
2020-01-31 |
E1234 |
Bonus |
$1,000 |
|
2020-01-31 |
E1234 |
Allowance |
$500 |
|
2020-01-31 |
E5678 |
Salary |
$8,000 |
The following table is the February 4 file.
|
Pay date (EventDate) |
Employee ID |
Pay type |
Amount |
|---|---|---|---|
|
2020-01-31 |
E1234 |
LTI |
$5,000 |
Because the override behavior is event date and subject member ID, the platform ignores all previous E1234 records from 2020-01-31 and only keeps the latest.
The following table is the pay event data for 2020-01-31 after overriding.
|
Pay date (EventDate) |
Employee ID |
Pay yype |
Amount |
|---|---|---|---|
|
2020-01-31 |
E1234 |
LTI |
$5,000 |
|
2020-01-31 |
E5678 |
Salary |
$8,000 |
To insert new records of the same event date and ID, instead use the record period date and subject member ID override behavior with a different record period date than the previous file.
Example: Record period date and subject member ID flexibility
Using the same example as above, let's say you use a record period date in your data files to group data by the file's extraction time.
The following table is the February 1 file.
|
Pay date (EventDate) |
Employee ID |
Pay type |
Amount |
Extraction time (record period date) |
|---|---|---|---|---|
|
)2020-01-31 |
E1234 |
Salary |
$10,000 |
2020-02-01 |
|
2020-01-31 |
E1234 |
Bonus |
$1,000 |
2020-02-01 |
|
2020-01-31 |
E1234 |
Allowance |
$500 |
2020-02-01 |
|
2020-01-31 |
E5678 |
Salary |
$8,000 |
2020-02-01 |
The following table is the February 4 file.
|
Pay date (EventDate) |
Employee ID |
Pay type |
Amount |
Extraction time (record period date) |
|---|---|---|---|---|
|
2020-01-31 |
E1234 |
LTI |
$5,000 |
2020-02-04 |
Because the record period date is different from the previous file, the platform adds the new E1234 record and keeps the old records.
The following table is the pay event data for 2020-01-31 after overriding.
|
Pay date (EventDate) |
Employee ID |
Pay type |
Amount |
Extraction time (record period date) |
|---|---|---|---|---|
|
2020-01-31 |
E1234 |
Salary |
$10,000 |
2020-02-01 |
|
2020-01-31 |
E1234 |
Bonus |
$1,000 |
2020-02-01 |
|
2020-01-31 |
E1234 |
Allowance |
$500 |
2020-02-01 |
|
2020-01-31 |
E1234 |
LTI |
$5,000 |
2020-02-04 |
|
2020-01-31 |
E5678 |
Salary |
$8,000 |
2020-02-01 |
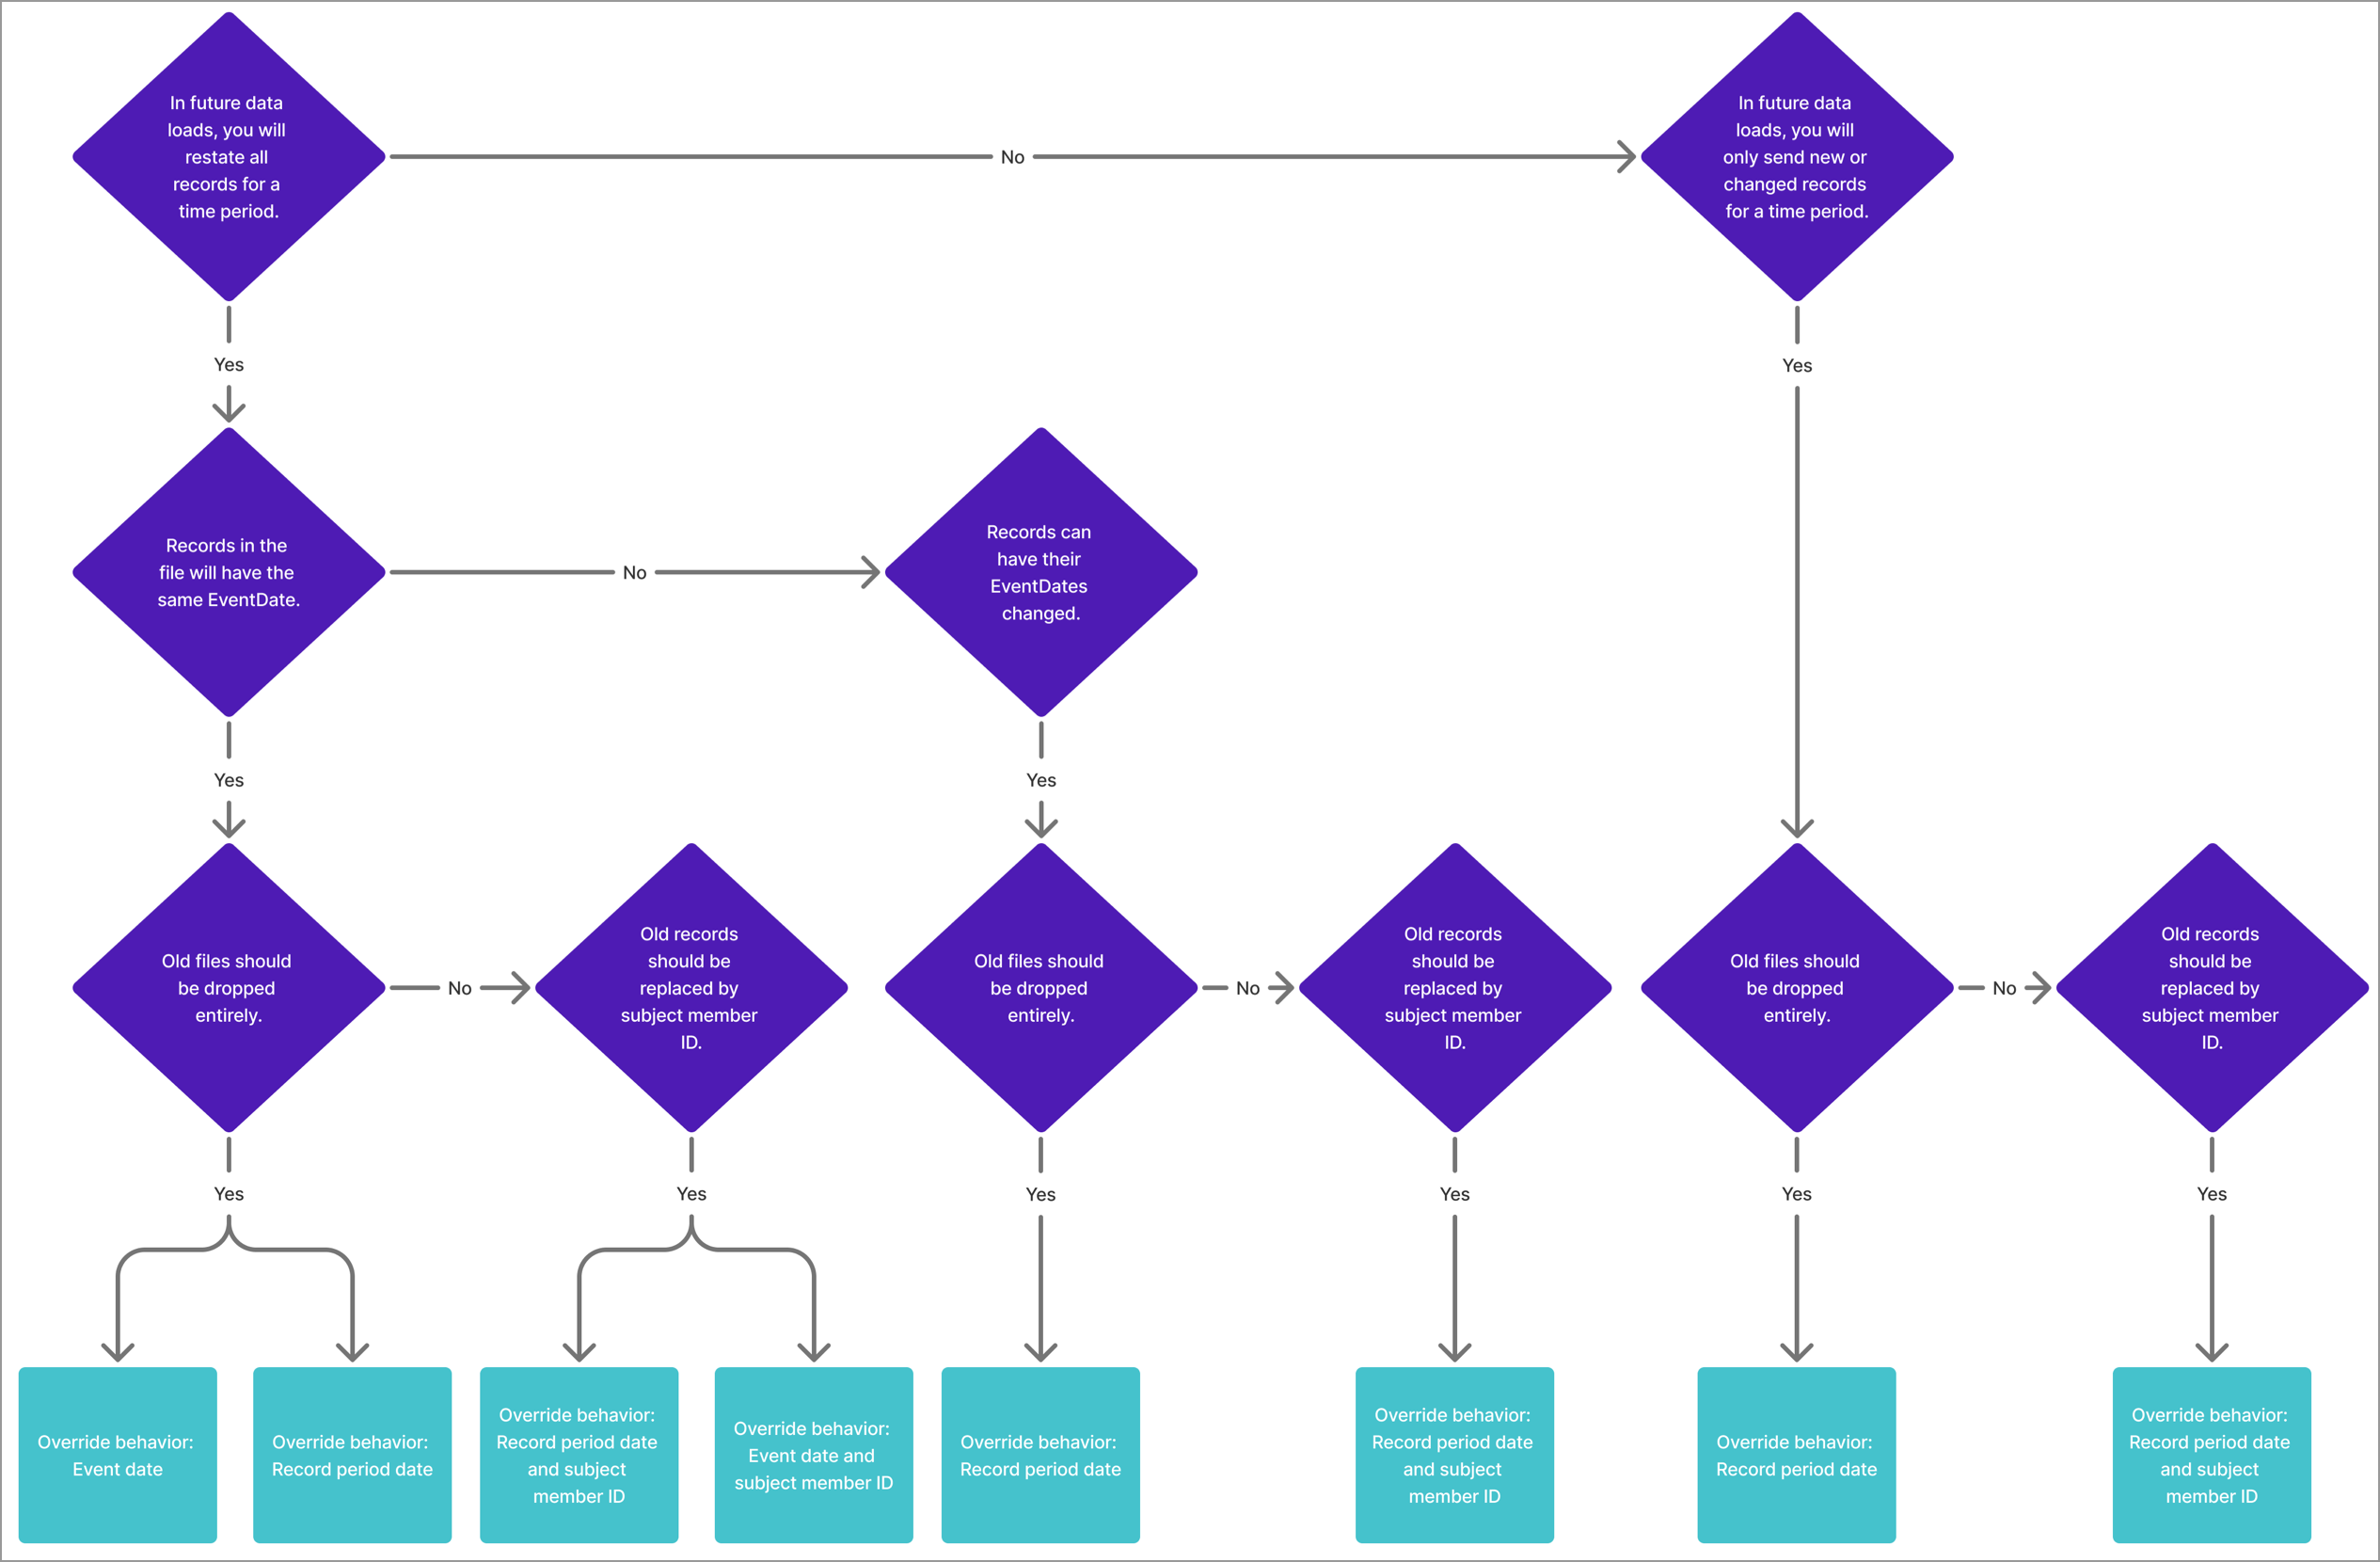
There are several details about your data files and how you plan to correct data that can help you determine which override behavior is correct for the data.
First, decide if you plan to correct data by sending a complete restatement that contains all records for the period or by only sending records that changed or were created since your last data load.
- If your data is a complete restatement that contains all records for the period, use event date or record period date. For complete restatements, you want Visier to ignore previously-sent files for the same period, which can be achieved by either event date or record period date. We recommend record period date because it can do everything that event date does and more; it's more flexible than event date!
- If your data only corrects records that changed since your last data load, use record period date. For restatements that only include new or changed records, you want Visier to keep previously-sent records for the same period and update or insert records from the latest file.
If you chose record period date, skip this next decision. If you aren't sure whether to use event date or record period date, you can narrow down your options by deciding if you'll need to correct event dates in the future.
- If all records in the file will have the same event date, use event date or record period date. You can override using the event date itself by giving all records in a period the same event date. However, we recommend record period date because it can do everything that event date does and more; it's more flexible than event date!
- If you will correct event dates in your data use record period date. Because each event date in the file will be different, you cannot use event date to identify one group of records as part of the same period, so record period date is your only option.
Finally, decide whether to drop entire files or replace records based on their subject member IDs.
- To drop previously-sent files for the same event date or record period date, use per file. In this scenario, per file removes all previously-sent records for the event date or record period date, allowing you to fully replace the period's data. You don't want to choose a per subject member ID override because it would keep some old records from previously-sent files that you want to remove.
- To replace or add new records for a previously-sent event date or record period date, use per subject instance. In this scenario, per subject member ID updates previously-sent records and inserts any new records from the latest file. You don't want to choose a per file override because it would remove all records from the restated dates that aren't present in the latest file.
If using record period date, you must also decide how to configure the value for record period date.
- If your data is a complete restatement that contains all records for a period of time, such as a month, use
lastDayInMonth(dateColumn("EventDate")). This ensures that every file that contains event dates in the same month has the same record period date so that previous files for that month are replaced or dropped. - If your data is a complete restatement that contains all records for all history, use a static date, such as
tenantStartDate. This ensures that every file has the same record period date so that all previous files are dropped. - If your data only adds new records since your last data load, use the file's upload time:
sourceTimestamp. This ensures that every file has a unique record period date so that no previous files are dropped and records are not missed.
Use the following diagram to decide which override behavior to use.
Event date
Ignore records from previous file uploads that have an event date that matches the event date of a record in a newer file upload. Be aware that if you send a new data file with the same event date as a previously-loaded file, only the latest data persists.
Let's say you want to load employee data for April 2024 and then reload that data with some corrections using the event date override behavior.
Your first file upload for April may look like:
|
Event date (mm-dd-yyyy) |
Employee ID (EID) |
Department |
Job name |
|---|---|---|---|
|
04-30-2024 |
EID101 |
HR |
HR Manager |
|
04-30-2024 |
EID102 |
IT |
IT Manager |
|
04-30-2024 |
EID103 |
Finance |
Finance Manager |
Your second file upload for April may look like:
|
Event date (mm-dd-yyyy) |
Employee ID (EID) |
Department |
Job name |
|---|---|---|---|
|
04-30-2024 |
EID101 |
HR |
HR Director |
How your employee data appears in Visier:
|
Event date (mm-dd-yyyy) |
Employee ID (EID) |
Department |
Job name |
|---|---|---|---|
|
04-30-2024 |
EID101 |
HR |
HR Director |
Because the new file has a record with an event date of 04-30-2024, we only load the one record and ignore any record from previous file uploads that have an event date that matches 04-30-2024.
Event date and subject member ID
Ignore records from previous file uploads that have an event date and subject member ID that matches the event date and subject member ID of a record in a newer file upload. Be aware that if you send a new data file with the same event date as a previously-loaded file that contains a record with the same subject member ID as a previously-loaded subject member ID, the latest record overrides the older record.
Let's say you want to load employee data for April 2024 and then reload that data with some corrections using the event date and subject member ID override behavior.
Your first file upload for April may look like:
|
Event date (mm-dd-yyyy) |
Employee ID (EID) |
Department |
Job name |
|---|---|---|---|
|
04-30-2024 |
EID101 |
HR |
HR Manager |
|
04-30-2024 |
EID102 |
IT |
IT Manager |
|
04-30-2024 |
EID103 |
Finance |
Finance Manager |
Your second file upload for April may look like:
|
Event date (mm-dd-yyyy) |
Employee ID (EID) |
Department |
Job name |
|---|---|---|---|
|
04-30-2024 |
EID101 |
HR |
HR Director |
How your employee data appears in Visier:
|
Event date (mm-dd-yyyy) |
Employee ID (EID) |
Department |
Job name |
|---|---|---|---|
|
04-30-2024 |
EID101 |
HR |
HR Director |
|
04-30-2024 |
EID102 |
IT |
IT Manager |
|
04-30-2024 |
EID103 |
Finance |
Finance Manager |
Because the new file has a record with an event date of 04-30-2024 and subject member ID of EID101, we only load the record for EID101 in the second file and load the records for EID102 and EID103 from the first file upload.
Record period date
Ignore records from previous file uploads that have a record period date that matches the record period date of a record in a newer file upload.
Record Period Date does not have to be a named column in your source file. Instead of a record period column, you can alternatively use the Visier Formula Language to group events based on the event date column; for example, lastDateInMonth(dateColumn("Event Date")). This is useful to load the accuracy of EventDate while also grouping events to represent the period they exist in.
Let's say you want to load employee data for April 2024 and then reload that data with some corrections using the record period date override behavior.
Your first file upload for April may look like:
|
Event date (mm-dd-yyyy) |
Employee ID (EID) |
Department |
Job name |
Record period date (mm-dd-yyyy) |
|---|---|---|---|---|
|
04-10-2024 |
EID101 |
HR |
HR Manager |
04-30-2024 |
|
04-12-2024 |
EID102 |
IT |
IT Manager |
04-30-2024 |
|
04-18-2024 |
EID103 |
Finance |
Finance Manager |
04-30-2024 |
Your second file upload for April may look like:
|
Event date (mm-dd-yyyy) |
Employee ID (EID) |
Department |
Job name |
Record period date (mm-dd-yyyy) |
|---|---|---|---|---|
|
04-10-2024 |
EID101 |
HR |
HR Director |
04-30-2024 |
How your employee data appears in Visier:
|
Event date (mm-dd-yyyy) |
Employee ID (EID) |
Department |
Job name |
Record period date (mm-dd-yyyy) |
|---|---|---|---|---|
|
04-10-2024 |
EID101 |
HR |
HR Director |
04-30-2024 |
Because the new file has a record with a record period date of 04-30-2024, we only load the one record and ignore any record from previous file uploads that have an record period date that matches 04-30-2024.
Record period date and subject member ID
Ignore records from previous file uploads that have a record period date and subject member ID that matches the record period date and subject member ID of a record in a newer file upload.
Let's say you want to load employee data for April 2024 and then reload that data with some corrections using the record period date override behavior.
Your first file upload for April may look like:
|
Event date (mm-dd-yyyy) |
Employee ID (EID) |
Department |
Job name |
Record period date (mm-dd-yyyy) |
|---|---|---|---|---|
|
04-10-2024 |
EID101 |
HR |
HR Manager |
04-30-2024 |
|
04-12-2024 |
EID102 |
IT |
IT Manager |
04-30-2024 |
|
04-18-2024 |
EID103 |
Finance |
Finance Manager |
04-30-2024 |
Your second file upload for April may look like:
|
Event date (mm-dd-yyyy) |
Employee ID (EID) |
Department |
Job name |
Record period date (mm-dd-yyyy) |
|---|---|---|---|---|
|
04-10-2024 |
EID101 |
HR |
HR Director |
04-30-2024 |
How your employee data appears in Visier:
|
Event date (mm-dd-yyyy) |
Employee ID (EID) |
Department |
Job name |
Record period date (mm-dd-yyyy) |
|---|---|---|---|---|
|
04-11-2024 |
EID101 |
HR |
HR Director |
04-30-2024 |
|
04-12-2024 |
EID102 |
IT |
IT Manager |
04-30-2024 |
|
04-18-2024 |
EID103 |
Finance |
Finance Manager |
04-30-2024 |
Because the new file has a record with an record period date of 04-30-2024 and subject member ID of EID101, we only load the record for EID101 in the second file and load the records for EID102 and EID103 from the first file upload.
Target group
Use a target group to include supplemental data in a mapping that will be considered separate from the main source. This setting in mappings allows you to incorporate additional data sources alongside existing mappings and avoid override behavior clashes, or to distinguish auxiliary mappings from one another.
A target group serves as an optional label for grouping mappings in regular and lookup scenarios but is required for auxiliary mappings. Use target groups to isolate a specific mapping, or several mappings, for a target. The job compares changes within the same target group, ensuring that data from other mappings is not treated as missing or deleted. If you have completely separate populations between two sources, use different target groups.
Example: Let’s say you load your employee data from two files: full-time workers and contingent workers. Both files represent the same time periods and map to the Employee subject, but they're uploaded at different times. When creating mappings to load this data, you can set the target group as Full-Time for the full-time workers mapping and Contingent for the contingent workers mapping. This ensures that Employee data isn't considered missing when it's uploaded at different times.
By mapping the full-time and contingent target groups separately, Visier treats them as distinct sources, preventing overwrites when loading new data.
If the same subject ID appears in both the new and existing sources, the data will be merged, potentially causing conflicts. To prevent this, ensure that subject IDs are unique across sources. This ensures a seamless transition while maintaining data integrity and system continuity.
Frequently asked questions
How can I do a full historical restatement every data load?
With a full historical restatement, you don't want to load data from previous uploads. For example, use this setup for organizational hierarchies where you only want the current hierarchy or if you send a full history every time you send data, which is common for transactional data.
-
Override behavior: Record period date
-
EventDate: Set as normal
-
Record period date: A static value like
tenantStartDate
How can I use only the latest data for each subject instance?
To only take the latest data for each subject instance, you don't want to remove data for other subject instances that were previously sent. For example, use this setup to upload full restatements only for impacted subject instances if your source system contains all history and you frequently make corrections to older records in addition to adding new ones.
-
Override behavior: Record period date and subject member ID
-
EventDate: Set as normal
-
Record period date: A static value like
tenantStartDate
How do I set up rolling restatements?
Rolling restatements are when you send the last few periods of data with each regular load. You can send rolling restatements in a single file or multiple files.
-
Override behavior: One of:
-
If your data is snapshots: Event date
-
If your data is events: Record period date
-
-
EventDate: Set as normal
-
Record period date: The first or last date of the period to which the event belongs
How do I insert data without losing previous files?
Insert-only configuration keeps all records that were ever sent. To keep old records and insert new records, use a unique record period date for each file so that no files ever overlap with the same record period date. For example, use this setup for pay events like Compensation_Payout where you only send new events and fix mistakes by sending a deletion record. For more information about deletions, see Data Load Deletions and Corrections.
-
Override behavior: Record period date and subject member ID
-
EventDate: Set as normal
-
Record period date: A unique value like
sourceTimestamp
How do table sources handle null and None values?
Table sources handle null and None values based on the data file type. For more information about table sources, see Use SQL with Table Sources.
Subject-like tables
The default behavior is to only emit None values when a defined value changes to null after extraction. This applies to temporal, transactional profile, and validity range tables.
// Data after extraction:
EmployeeID,EventDate,Job,Name,Location
Employee-1,Jan 31,Manager,Bob,null
Employee-1,Feb 28,ManagerII,Bob,Vancouver
Employee-1,Mar 31,ManagerII,Bob,null

// Emits the following events:
ProfileChangeEvent(Jan 31, EmployeeID='Employee-1')
ProfileChangeEvent(Jan 31, Job='Manager')
ProfileChangeEvent(Jan 31, Name='Bob')
ProfileChangeEvent(Feb 28, Job='ManagerII')
ProfileChangeEvent(Feb 28, Location='Vancouver')
ProfileChangeEvent(Mar 31, Location=None)
Transactional log tables
With table sources, transactional log tables skip null values or empty strings by default. You can use the following custom function to change the default behavior:
- skip_null: Doesn't emit events with None values when null is observed after extraction. This is the default for transactional log tables.
// Source data:
ID,EventDate,Attribute,Value
Employee-1,Jan 14,Job,Manager
Employee-1,Jan 14,Name,Bob

// 'Job' mapped as
CASE WHEN `Attribute` = 'Job' THEN `Value` else null end

// 'Name' mapped as
CASE WHEN `Attribute` = 'Name' THEN `Value` else null end

// Emits the following events:
ProfileChangeEvent(Jan 14, EmployeeID='Employee-1')
ProfileChangeEvent(Jan 14, Job='Manager')
ProfileChangeEvent(Jan 14, Name='Bob')