
Set Access
Configure data security for the different items users can access.
Access requirements
Custom profiles with one of the following capability sets:
- Permission Management (Write, Simple)
- Security (Write, Simple)
Reach out to your administrator for access.
Overview
In a permission, you can configure data security for the different items users can access such as analytic objects, and if enabled, sources, data categories, and targets.
Note: If the More Security Around Data Access Management feature is enabled, you will need access to all data, such as the Super Admin permission, to perform this task. For more information, see More security around data access management.
Add items to a permission
If target security is enabled, see Set access with target security enabled.
-
In a project, on the navigation bar, click Security > Permissions.
- Select a permission.
- In a permission, click the Data security tab and then click Add access.
- In the Select the data dialog, select the items that users with this permission can access.
- Click Finish.
Result: Population and data access configurations appear for analytic objects. To configure custom population access, see Refine Population Access. To configure data access, see Configure Data Access.
Set access with target security enabled
-
In a project, on the navigation bar, click Security > Permissions.
- Select a permission.
- In a permission, click the Data security tab and then click Set access.
- Select an access type from the list.
- In the Set access dialog, do one of the following:
To add access to Do this Analytic objects or sources - Select the items that users with this permission can access.
- Optional: To grant users full access to all sources, select Full read and write access to all sources, including the ability to create new source objects. Users with full access to all sources can create, read, edit, and delete all sources.
- Click Add.
Result: Population and data access configurations appear for analytic objects. To configure custom population access, see Refine Population Access. To configure data access, see Configure Data Access.
Targets within a data category - Select the data category that users with this permission can access.
- In the selected data category, click Add targets.
- In the Select targets dialog, select the targets that users with this permission can access and then click Select.
- Click Save.
All current and future targets in a data category
- Select the data category that users with this permission can access.
- In the selected data category, select All current and future targets from the list.
- Click Save.
Remove or restrict access to items
-
In a project, on the navigation bar, click Security > Permissions.
- Select a permission.
- In a permission, click the Data security tab.
- Do one of the following:
To Do this Remove access to analytic objects or sources - Hover over the item you want to remove access to and click the Remove access button
 .
.
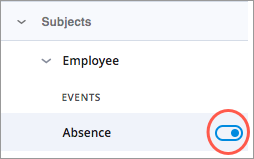
Restrict access to an event or related object for a subject
- Hover over the analytic object you want to restrict and click the toggle button.
Edit access to the targets in a data category - Click Set access.
- Select Data categories and targets from the access type list.
- In the Set access dialog, select the data category you want to edit and then click Edit targets.
- In the Select targets dialog, select targets or clear previously selected targets and then click Add.
- Click Save.
- Hover over the item you want to remove access to and click the Remove access button
Migration workflow for mappings
Note: Migration is only required if your Customer/Partner Success Manager has reached out to you.
After Target Security is enabled, you must migrate existing permissions to ensure users maintain the appropriate access to Regular, Auxiliary, and Correction mappings. If a user has Super Admin Permission, no permission changes are required as they have access to all data.
For example, if User A is assigned the Employee Access permission which allowed them to edit Employee mappings through source security, that permission must be updated to give access to the Employee target under the appropriate data category.
Before migrating existing permissions:
- Create a list of all users who require access to create and edit mappings.
-
Determine which data categories and targets each user or group needs to access.
- Identify which existing permissions need to be updated or if new permissions need to be created.
Follow the steps below to perform the migration:
- In a project, on the navigation bar, click Security > Permissions.
- Select a permission from the list or create a new permission.
- Click the Data security tab and then click Set access.
- Select the data category that users with this permission can access.
- In the selected data category, click Add targets.
- In the Select targets dialog, select the targets that users with this permission can access and then click Select.
- Click Save.
Considerations
- It is recommended to only assign what is needed. For example, if a user only requires the ability to edit the Employee mapping, they should only be granted access to the primary data category and Employee target, and not the Applicant target.
- If a user previously had the ability to edit the Employee mapping, but did not utilize the permission capability, it is recommended to avoid configuring target access for this user. If the user needs to edit Employee mappings in the future this can be assigned retroactively.