
Refine Population Access
Produce a population of analytic object members that can be accessed.
Access requirements
Custom profiles with one of the following capability sets:
- Permission Management (Write, Detailed)
- Security (Write, Detailed)
Reach out to your administrator for access.
Overview
Once you've added an analytic object to a permission, such as Employee, you'll need to define the population access by creating security filters. Ask yourself, which employees do users of this permission get to see? You have the option of granting access to the entire population or a filtered subset. For example, if you want to give users access to all employees in New York, you can create a security filter on the Employee subject where City = "New York". You can think of a security filter as a population filter.
To refine population access:
-
In a project, on the navigation bar, click Security > Permissions.
- Create or select a permission.
-
Click in the Population Access column.

- Select one of the following:
- No access: Block users with this permission from accessing the entire population.
- Access to all: Give users with this permission access to the entire population.
- Custom: Give users with this permission access to a specific population through member filters or dynamic filters.
Note: Custom population access is applicable to analytic objects, but not sources. If defining data access for a source, population access must be either Access to all or No access. For more information about adding sources to a permission, see Set Access.
Security filter types
Security filters can be static or dynamic in nature. Member filters, like the previous City = "New York" example, are static and produce the same result regardless of the user. Whenever an employee is promoted, changes departments, relocates, or leaves the company, an administrator must manually update their security groups or permissions. Dynamic filters produce a different Employee population for each user. By leveraging user attributes to define security, Visier automatically adjusts data access after a user's hierarchy position changes.
Member filters
Member filters give users access to a population based on the values of one or more dimensions in the Employee data.
For example:
- City = "New York"
- City = ("New York" or "Boston")
- City = ("New York" or "Boston") and Job Family = "Accountant"
Member filters are the simplest way to define a user's access. However, you may have to edit the member filter when there are new values in your data. These filters are ideal for permissions that are based on dimensions that rarely change. Member filters are also great for permissions that will be assigned to multiple users as they produce the same population of employees no matter which user is using the filter.
Dynamic filters
Dynamic filters produce different results for each user based on their relationship with the target population. Dynamic filters are commonly used to grant users access to their reports, where a user's reports are identified by taking the user's position in the Supervisory Hierarchy and returning all employees that are below them in the hierarchy. Dynamic filters are used primarily to give users more detailed access to the employees that report to them. The reporting structure is defined using the Supervisory Hierarchy or Organization Hierarchy (where the user is the designated Org Head of certain organizations).
Dynamic filters reduce the amount of time spent on permission maintenance whenever there are changes in the data. They also allow you to provide different access for each user without having to define multiple permissions for each variation. For example, you can create a single permission using a dynamic filter that automatically gives users (managers) access to their organization instead of creating a permission for each individual organization (Sales, Product, and Development). These filters are ideal for permissions that are based on dimensions that regularly change.
The following scenarios show how dynamic filters control data access based on a user's position in the Supervisory Hierarchy. In the example scenarios below "John Smith" is the organization head of team "Engine" which has a parent organization "Platform".
Scenario 1 : User belongs to their manager's organization
| EmployeeID | StartDate | EndDate | SupervisoryHierarchy |
|---|---|---|---|
| John Smith | 2024-01-01 | 2024-02-02 | Platform |
- John is a manager and head of "Engine" but belongs to "Platform".
- John can access all records in "Engine" and its descendants, but not his own record.
Scenario 2: User belongs to the organization, and is the head of the organization
| EmployeeID | StartDate | EndDate | SupervisoryHierarchy |
|---|---|---|---|
| John Smith | 2024-01-01 | 2024-02-02 | Engine |
-
John is a manager and head of "Engine".
- John can access all records in "Engine" and its descendants, including his own.
Managers can gain access to all records in their node and descendants. However, access to their own record depends on their inclusion in the node’s data.
The hierarchy used for defining security doesn't have to be the hierarchy used for analysis. For instance, if users are assigned to their own organization but you don’t want them to have access to their own records, you can set up a different hierarchy where they belong to their parent organization for security purposes.
Dynamic filters can be created by mapping a user to a:
- Hierarchy
- Dimension
- File
Mapping a user to a hierarchy
In this dynamic filter, the User's ID is matched with an ID in a hierarchy.
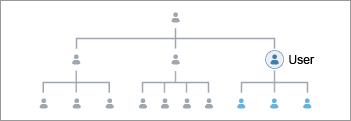
For example, in the Organization Hierarchy data, there is an Organization Head property that identifies the employee who is the leader or manager for each level of the organization through their Employee ID. We can create a link between the user's Employee ID to the Organization Head property, to give managers access to employees in their organization.
The Name Property is configurable (Username, Email, or Employee ID) and when configured matches the selected property with the corresponding dimension member ID (shown below as Employee ID). To learn more about the Name Property, contact your Customer/Partner Success Manager.
In most cases, configuring the Name property is not required to successfully create or define a dynamic filter.
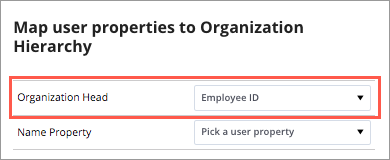
When a user logs on, the solution scans the latest data and looks for a match between the User's ID (Employee ID) and the Organization Head property (Employee ID). When there is a match, the user is granted access to the employees in the organization that they are the head of. With this type of dynamic filter applied, a user’s access automatically changes if the user changes position in the organization or there is a change in the organization structure.
In this dynamic filter, many-to-many data security is possible. For example, let's say that in the Organization Hierarchy data, there is an HRBP List property that identifies HR business partner employees who have access to the same teams through their Employee ID, such as Jonah and Amy both having data access for the Sales team. In this example, the HRBP List is the Organization Head to map user IDs to, which gives multiple HRBPs access to employees in the same department.
To apply many-to-many mapping, the following requirements must be met:
- In the data file, the Organization Head column must:
- Use String data format with no quotation marks.
If the column contains quotation marks, you can use mappings or extraction rules to remove the quotation marks. For example, you must transform "E001","E002","E003" to E001,E002,E003.
- Separate user IDs with a comma delimiter.
If the Organization Head strings are separated by a delimiter other than a comma, you can use mappings or extraction rules to transform the delimiter into a comma. For example, you must transform HRBP-001;HRBP-002;HRBP;003 to HRBP-001,HRBP-002,HRBP-003.
- Use String data format with no quotation marks.
- In the selected dimension, such as Organization Hierarchy, the Organization Head property must contain an object name that ends in "_List". For example, the HRBP List object name must be "HRBP_List". To edit the object name:
- In a project, navigate to the selected dimension. For example, if using Organization Hierarchy, navigate to Model > Dimensions > Organization Hierarchy.
- In the selected dimension, click the Customize tab.
- In Custom properties, select the Organization Head property.
- In the Info panel, change the object name so that it ends with "_List".
Mapping a user to a dimension
In this dynamic filter, the User's ID is matched with an Employee property. There is no hierarchy used in this approach and the User's ID must match a property in an employee record. This type of dynamic filter is used to manage the security access for Human Resource Business Partners (HRBPs).
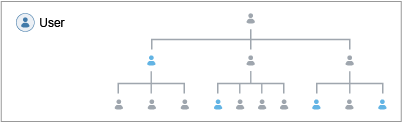
With this type of filter, employees can only match a single User ID, as a result this method cannot be applied to a situation where employees have multiple HRBPs assigned to them.
When a user logs on, the solution scans the latest data and looks for a match between the User's ID (Employee ID) and the property in an employee record (Employee ID). When there is a match, the user is granted access to the employee.
Mapping a user to a file
Direct user to subject ID mapping is achieved through a dedicated security file, which explicitly defines authorized IDs. This provides control over which user is granted access, as any ID not listed in the file is automatically excluded from permissions. Mapping users directly to files is more restrictive and time-consuming than using dimensions or hierarchies, as each entry is done manually. For more information, see Map a user to a file.
When to use each security filter type
|
Goal |
Use this filter |
Why? |
|---|---|---|
|
Give all regional HRBPs access to everyone in the US-East region. |
Member filter |
The region is static and the population scope is identical for every HRBP assigned to it. |
|
Give 500 different managers access to their respective teams. |
Dynamic filter |
Writing 500 individual member filters is inefficient. One dynamic filter evaluates each manager's direct reports automatically. |
|
Limit a recruiter's view to only Engineering job families. |
Member filter |
Engineering is a fixed value that doesn't depend on who the recruiter is. |
|
Give department heads access to their designated business units. |
Dynamic filter |
The Organization Hierarchy dictates who owns which department. When department heads change, the security updates itself. |
How member filters are evaluated
When building a member filter, if more than one value for a single dimension is selected, the dimension values will be evaluated as an OR statement.
Let's say you have a permission with the following member filter:
- Location = "New York", "Boston", "Miami".
In an OR statement, an employee is included in the population if they satisfy any of the conditions (has any of the dimension values). In this example, users with this permission get access to:
- Employees in New York, or
- Employees in Boston, or
- Employees in Miami
When multiple dimensions are used, the dimension values will be evaluated differently depending on how the member filters are combined.
Combining dimensions within a single permission (AND)
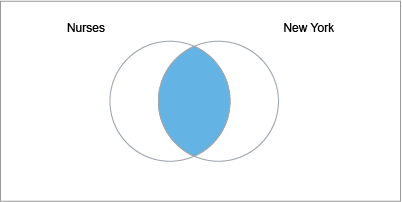
When dimensions are combined within a single permission, the dimension values are evaluated as an AND statement.
Let's say, you have a permission with the following member filters:
- Job = "Nurse"
- City = "New York"
In an AND statement, an employee is included in the population if they satisfy all of the conditions (has both dimension values). In this example, users with this permission get access to:
- Employees who are Nurses in New York.
Combining dimensions across multiple permissions (OR)
When dimensions are combined across multiple permissions, the dimension values are evaluated as an OR statement.
Let's say, you have permissions with the following member filters:
| Permission | Filters |
|---|---|
| 1 | Location = "New York" |
| 2 | Job = "Nurses" |
In an OR statement, an employee is included in the population if they satisfy any of the conditions (has any of the dimension values).
In this example, users with both permissions get access to:
- Employees in New York, or
- Employees who are Nurses, or
- Employees who are Nurses in New York
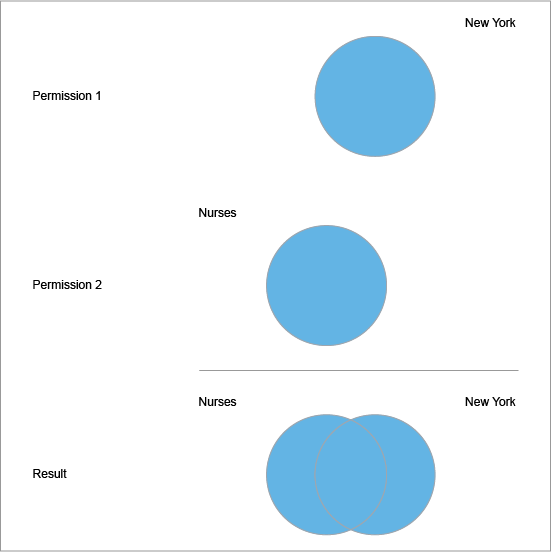
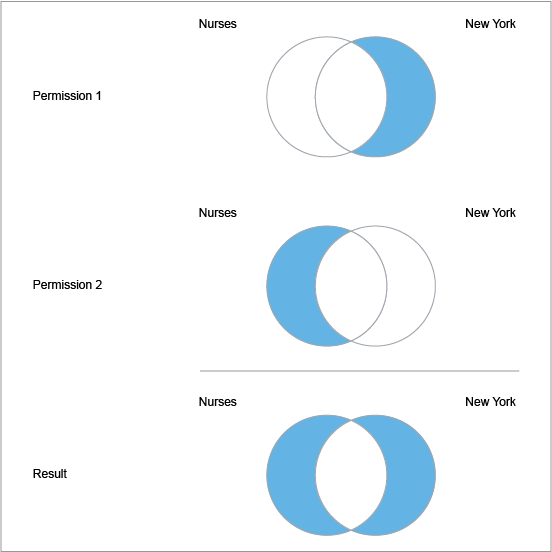
Since different dimensions are used, you end up with employees who meet both conditions in the filtered population. Continuing this example, let's say you don't want to grant access to employees who meet both conditions. In other words, you don't want to include employees who are Nurses in New York in the filtered population.
You can achieve this by creating two permissions and using the exclude option when selecting dimension values.
| Permission | Filters |
|---|---|
| 1 |
|
| 2 |
|
Permission 1 grants access to all employees in New York who are not Nurses while Permission 2 grants access to all Nurses who are not in New York.
When combined, users with both permissions get access to:
- Employees in New York, or
- Employees who are Nurses, but not
- Employees who are Nurses in New York
Create a security filter
Create security filters on the fly when creating a permission or ahead of time in the Security Filters room. You can create up to 10,000 security filters in a project, except free trial tenants, which have a maximum of 100 security filters. These maximums are the default, however, contact Visier Technical Support to request limit adjustments.
Note: If the More Security Around Data Access Management feature is enabled, you will need access to all data, such as the Super Admin permission, to perform this task. For more information, see More security around data access management.
Step One: Create the security filter
To create security filters on the fly when creating a permission:
-
Click in the Population Access column.
- In the Refine population access dialog, click Custom.
Tip:
You will be provided with an estimate of the population based on your setting and the custom security filters applied.
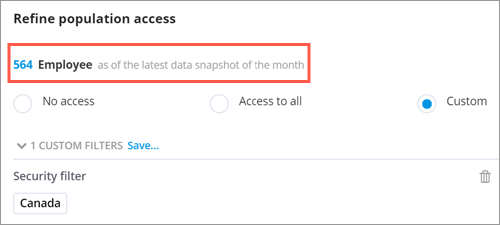
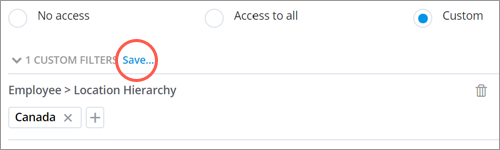
- After you add the custom security filters, you can save them and reuse in other permissions by clicking the Save button. You can manage your saved security filters in the Security Filters room.
To create security filters ahead of time in the Security Filters room:
-
In a project, on the navigation bar, click Security > Security Filters.
- Click Add Security Filter.
- In the New security filter pane, select the analytic object you want to create a security filter for and then click Next.
- Type a display name for the security filter and then click Create.
Step Two: Apply a member or dynamic filter
To give users access to a population by adding a member (static) filter:
-
In a project, on the navigation bar, click Security > Permissions.
- Create or select a permission.
- In Data Security, click the Population Access column for the analytic object.
- Click Custom > Member Filter.
- In the Filter dialog, include or exclude the attribute values that define the population you want to grant access to.
- Click Apply.
To give users access to a population by adding a dynamic filter:
-
In a project, on the navigation bar, click Security > Permissions.
- Create or select a permission.
- In Data Security, click the Population Access column for the analytic object.
- Click Custom > Dynamic Filter.
-
Do one of the following:
Option Do this Map a user attribute to a dimension - Click User to dimension. For more information, see Mapping a user to a dimension.
- In the Filter dialog, select the attribute you want to base your filter on.
Note: For dynamic filters to work, you must select a hierarchy that is based on Employee IDs, typically there are only two that can be used: the Supervisory Hierarchy or an Organization Hierarchy where there is an Org Head defined for each Org unit. After selecting the desired hierarchy, select the User property that will be used as the matching value, typically this is EmployeeID.
- In the Map user properties dialog, select the user property that you want to link the name property or organization head to.
- Click Apply.
Map a user's Employee ID to individual subject members -
Click User to data file. For more information, see Refine Population Access.
Note:
- For this to work, you must provide a mapping file to the Visier Technical Support team. Population access is determined by the file and the mappings between a user's Employee ID to individual employees, requisitions, candidates, etc.
- A separate mapping file is required for each subject.
To give users access to a population by adding a saved security filter:
-
In a project, on the navigation bar, click Security > Permissions.
- Create or select a permission.
- In Data Security, click the Population Access column for the analytic object.
- Click Custom > Member Filter.
- In the Filter dialog, click Security Filters.
- Select the security filter that you created ahead of time in the Security Filters room.
- Click Apply.