
Import or Export a Project Changelist
Learn how to import an existing changelist or export your project changelist.
Access requirements
Data required: Access to all data such as the Super Admin permission
Reach out to your administrator for access.
Overview
Project changes can be saved locally by exporting a project changelist, which can then be used to import changes into a new or existing project. If you want to collaborate on a project, see Share a Project.
All project exports are saved as a ZIP.SIG file. The .SIG in the extension indicates that the file includes a system-generated digital signature, which guarantees security, authenticity, and integrity when transferring projects between environments.
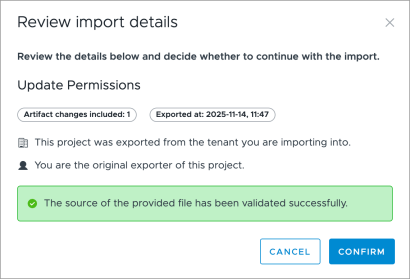
When importing a project changelist the digital signature is automatically verified, and import details are displayed for review. Once you have reviewed the details and verified that you trust the source, you can proceed with the import.
Export a changelist
Export a project to your local computer to save a copy of your changes outside the solution. This is helpful when a project is archived, but you want to keep the changes available to you.
- In a project, on the navigation bar, click the Home button
 .
. - Click the More button
 .
. - Click Export Project.
Result: A ZIP.SIG file is downloaded to your computer.
Import a changelist
You can import an existing changelist to create a new project with those changes, or you can import a changelist into an existing project. Importing the changelist helps avoid manually recreating changes that need to be made in another tenant.
-
Do one of the following:
To
Do this
Create a new project by importing a changelist
- On the global navigation bar, click Projects.
- Under Draft Projects, click Import Project.
Import a changelist into your existing project
- Open a project.
- On the navigation bar, click the Home button > Changes.
- Click Actions > Import Project.
- Select the ZIP.SIG file.
- Click Open.
- Review import details and click Confirm.
Note:
If the file's source cannot be verified, due to missing information for signature validation or the digital signature is invalid,
- Confirm that you selected the correct file.
- Re-export the project changelist. This only applies if the project has not been released to production.
- If you are unable to export a changelist with a valid signature, and you trust the file's source, click Confirm to override the verification workflow.
- If you are importing changes in an existing project and changes in your project conflict with the imported changes, you will be prompted to use the merge tool to resolve the conflicts. For more information, see Merge Project Changes.