
Personalized Alerts
Manage the metric-based alerts you receive in your Home room and email digest.
Who can use this feature?
Users with this permissions capability:
- Set and View Alerts
Not sure if you have this feature or capability? Reach out to your administrator.
Overview
Use personalized alerts to define a metric threshold that, if exceeded, notifies you of the metric value. For example, if you want to be notified any time your Resignation Rate exceeds 5%, set up a personalized alert. Users can set up their own personalized alerts and administrators can create alerts for user groups.
Alerts evaluate every time a new data version is available. If the metric threshold is exceeded, the alert triggers. When triggered, the alert shows up in a user's Home room and is sent to the user in an email digest. Each user can configure the frequency of their email digest, such as daily or weekly. Emails send at 12:00 AM Coordinated Universal Time (UTC). If weekly, the emails send on Mondays.
To access your alerts, on the navigation bar, click Home ![]() > Alerts. The following screenshot is an example of personalized alerts.
> Alerts. The following screenshot is an example of personalized alerts.
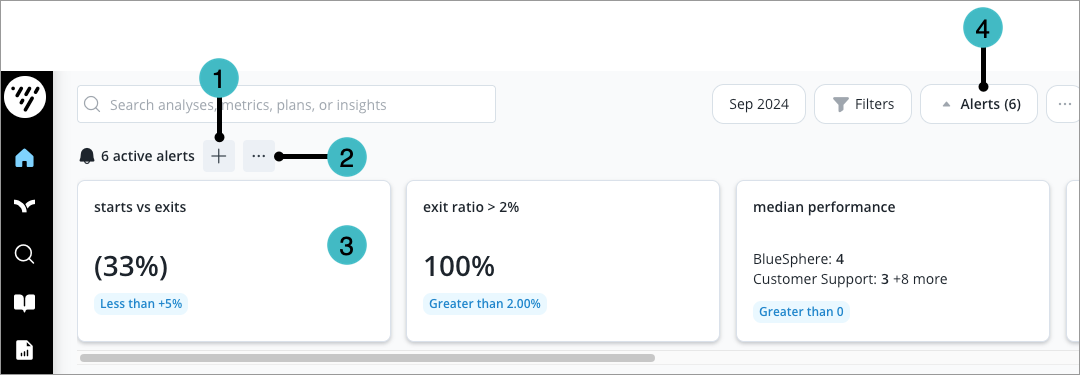
- Create alert. Create new alerts to monitor metrics. For more information, see Create an alert.
- Manage alerts. View all your alerts, manage your email digest, and enable or disable alerts. For more information, see Manage alerts.
- Active alerts. Hover over an active alert to investigate the metric in Explore or Detailed View. Any filters, group bys, or time periods in the alert are applied in Explore or Detailed View.
- Display or hide alerts. Toggle whether to display or hide active alerts in your Home analysis.
Create an alert
To monitor a metric's value and receive notifications if it exceeds a certain threshold, on the navigation bar, click Home ![]() > Alerts. If you are an administrator that wants to create alerts for your users, see Create Personalized Alerts for User Groups. Users can create a maximum of 25 personalized alerts. There is no maximum for administrator-created personalized alerts.
> Alerts. If you are an administrator that wants to create alerts for your users, see Create Personalized Alerts for User Groups. Users can create a maximum of 25 personalized alerts. There is no maximum for administrator-created personalized alerts.
Note: This feature is also available through Visier's public APIs. For more information, see Personalized Alerts API.
- Click Create Alert > Select a metric.
- In the list, search for and select the metric to be notified about.
- Optional: Choose whether to trigger the alert when compared to a time period, another metric, or a group.
- Compare to time period: A time period to compare the metric against. For example, if your metric is Resignation Rate and you compare against the previous period, you can set up an alert to notify you if your resignation rate is 5% higher than the previous period.
- Compare to metric: Another metric to compare the alert metric against. For example, if your alert metric is Resignation Rate and you compare against Resignation Rate - My Visier Benchmark™ - Trend (Average), you can set up an alert to notify you when your resignation rate is 10% higher than the industry average.
- Compare to group: A group to compare the metric against. For example, if your metric is Resignation Rate and you compare against High Performers, you can set up an alert to notify you if your resignation rate among high performers is 5% higher than the overall population.
- In Activate if, select the operator for the alert, such as greater than, equal to, or less than.
- In Activate if, type the value for the alert, such as 5.
- In Name, type a name for the alert, such as Resignation Rate > 5%.
- Optional: To set more advanced options like filters and time periods to evaluate, click Show advanced options.
- Filters: A filter to apply to the metric. For example, select New Hire to filter the alert by employees hired in the last 6 months.
- Time period: The time period in which to evaluate the alert. If you don't set a time period, the default is the latest partial month. For example, select Latest complete 1 Month to evaluate the alert for the latest complete month.
- Activate based on: Whether to trigger the alert on the overall metric value or on a specific group's metric value. The default is overall metric value. For example, select Any value in Organization Hierarchy to trigger the alert if any department in your organization exceeds the alert conditions, such as a Resignation Rate greater than 5%. Otherwise, the alert triggers if your company's overall Resignation Rate is greater than 5%.
- Click Save.
Manage alerts
View all your alerts, change your email digest frequency, and enable or disable alerts.
- On the navigation bar, click Home
 .
. - Click Alerts > More actions button
 > Manage alerts, as shown in the following screenshot.
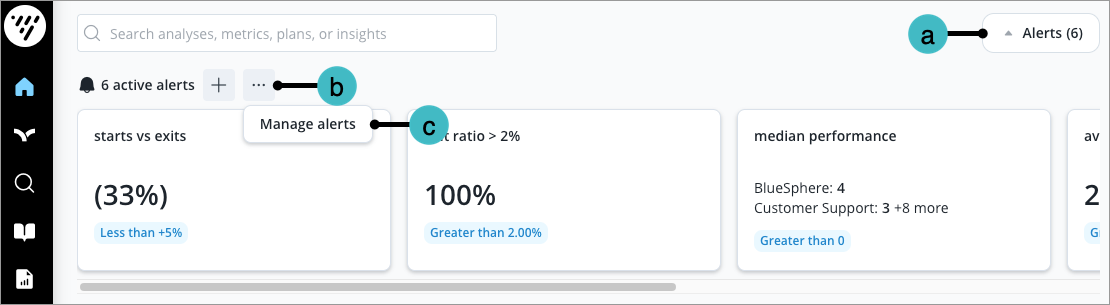
- To see all your alerts, including alerts that aren't currently active, click All. To see the alerts shared with you by an administrator, click Shared with me.
- To set your email digest frequency, do the following:
- Click Weekly digest.
- Select a frequency to receive an email digest.
- Click Save.
- To create a new alert, click Create alert. For more information, see Create an alert.
- To disable an alert, in the Actions column, turn off the Enabled toggle. Disabling an alert removes it from your Home room and future email digests. You can re-enable an alert at any time.
- To make a copy of an alert, in the Actions column, click the More actions button > Copy.
- To edit or delete an alert that you created, in the Actions column, click the More actions button > Edit or Delete.