
Sync Databricks Data
Connect and synchronize your data lakehouse with Visier to transform your data into actionable insights.
Who can use this feature?
Users with the following:
- Profile capabilities: Data (Write, Detailed)
- Additional capabilities: Manage Jobs
Not sure if you have this feature or capability? Reach out to your administrator.
Note: Beta This is a beta connector. If you are interested in using this connector, please contact your Customer/Partner Success Manager.
Overview
Visier’s Databricks connector lets you ingest large volumes of data from data warehouses and data lakes into Visier, allowing you to quickly visualize, analyze, and solve your organization’s most pressing people challenges. The connector uses Delta Sharing, an open standard from Databricks that enables secure, reliable data sharing across organizations, platforms, and tools. For more information, see What is Delta Sharing.
Set up your initial Databricks sync
To help you seamlessly onboard your data, the setup experience is split into two parts: the setup wizard and the Studio Assistant. The setup wizard walks you through connecting to Databricks, selecting tables, mapping data, creating a sync schedule, and initiating a full sync. After that, the Studio Assistant guides you through the remaining steps to complete your setup, with links to the relevant documentation.
Prerequisites: To perform this task, you will to need:
- Set up Delta Sharing in Databricks. For more information, see Databricks.
- Create a connector credential in Visier
- Access to all sources to use the setup wizard
- To launch the Databricks setup wizard, do one of the following in a project:
- On the navigation bar, click the Home button
 to go to the project home. In the Dashboard tab, under What's new, click Start Setup in the Databricks banner.
 - On the navigation bar, click Data > Connectors. In the Connectors room, click Create Connectors, and select Databricks in the Select data provider dialog.
- On the navigation bar, click the Home button
-
In the setup wizard, do the following:
-
Connect to Databricks by selecting an existing connector credential or creating a new one. If you're creating a connector credential, you can upload the generated file from Databricks or manually enter the following information:
Credential
Description
Example
Share Credentials Version
The version of the credential file format used by Databricks in the open Delta Sharing protocol.
1
Bearer Token
The token used to authorize the recipient.
test_token
Endpoint
The endpoint for the share to be used by the recipient.
https://oregon.cloud.databricks.com/api/2.0/delta-sharing/.../
Expiration Time (Optional)
The date and time when the authentication token expires in ISO 8601 format.
2025-05-29T22:00:00.000Z
Note: When you create a new connector credential, the connector automatically syncs 100 sample records from each table, letting you view the table’s columns and preview records to help you decide which tables to select in the next step.
-
When creating a connector credential, set the source type to define how the connector processes data.
- File source: Data is stored in files. Updating data requires reprocessing and overwriting entire files.
- Table source: Data is stored as tables. Incremental updates are supported, allowing you to modify individual records as needed.
Note:
- To enable the Table Source option, contact Visier Technical Support.
- You cannot change the source type after the credential is created. You must create a new connector credential to change the source type.
- Select the tables you want to sync from your Databricks workspace.
- Decide whether to use AI to automatically create mappings or manually create them later. Mappings define the link between your source data and Visier through column association or formula calculations. For more information, see Add a Mapping.
Note: To automap with AI, your organization must also opt in to AI features. In the global workspace, click Settings > AI Features.
-
Decide if you want to set up a recurring sync schedule.
Note: If you chose to sync all tables for the connector credential, you can enable the Sync all tables (including new tables) option to automatically include new source tables in future syncs. Just remember to sync the schema for the connector credential so new tables can be discovered.
Result: A job runs to sync data for the selected tables.
- After the job is finished, click Continue with Studio Assistant to close the wizard. The Studio Assistant will guide you through the remaining steps to complete your initial setup.
-
- Review the AI-created mappings or create them manually. To configure mappings, open the Databricks connector by clicking Data > Connectors on the navigation bar. For more information, see Update mappings.
-
Configure business rules to transform your data to work with Visier's analytic model. Apply transformations to the data, such as adding, removing, or editing events in the event stream. To configure business rules, on the navigation bar, click Data > Rules. For more information, see Business Rules.
- Run a job to process the synced data and generate a data version for analysis. To run a job, open the connector by clicking Data > Connectors on the navigation bar. For more information, see Sync data.
Update a Databricks connector
After the initial onboarding, you can modify the mappings, sync schedule, and connector credentials for your Databricks connector in a project.
Update mappings
-
In a project, on the navigation bar, click Data > Connectors.
- In the Connectors room, click the Databricks connector.
- Create, review, and update mappings in the Mappings tab. For instructions on how to create and configure mappings, see Add a Mapping.
The Mappings tab has two views: Source and Target. Source view groups mappings by source, which contains the raw data before processing, while Target view groups mappings by the objects in the Visier analytic model that the data is loaded into. Source view helps you identify unused source columns that still need mapping, while Target view is useful for configuring mappings one data category at a time.
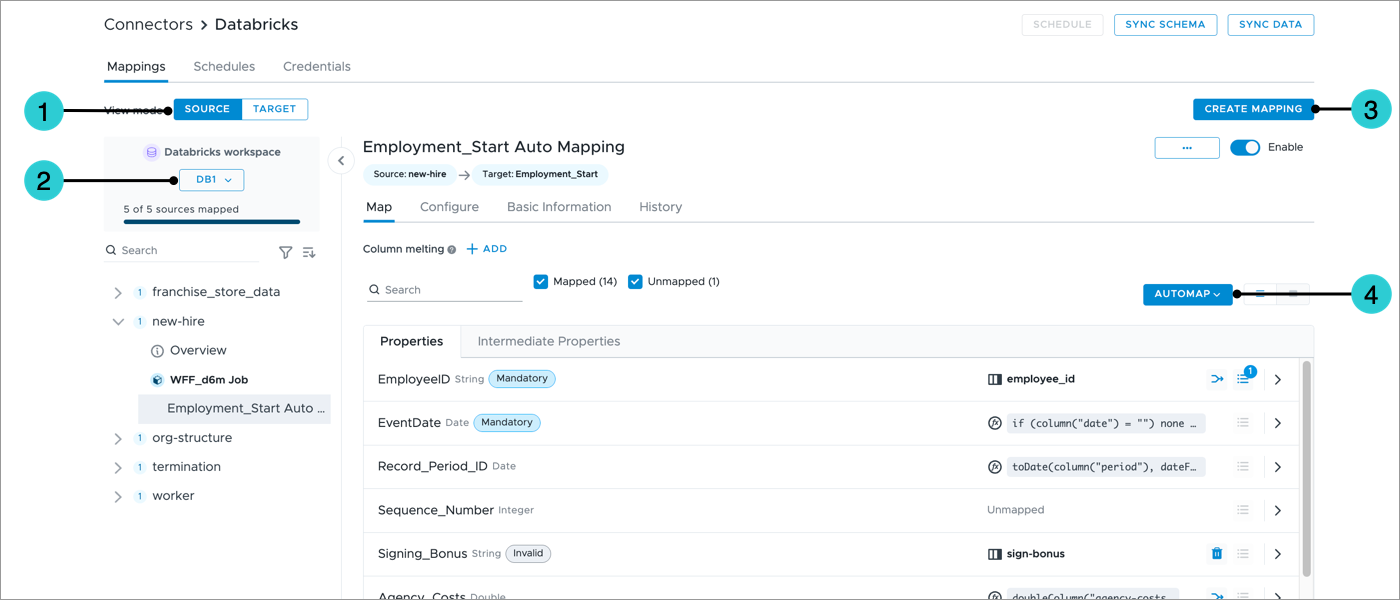
- Switch between Source and Target view.
- Select the Databricks connector credential you want to update mappings for.
- Create a new mapping to connect your source data to objects in Visier.
- Automatically connect source columns to data load target properties using AI or string matching.
Note: To automap with AI, your organization must also opt in to AI features. In the global workspace, click Settings > AI Features.
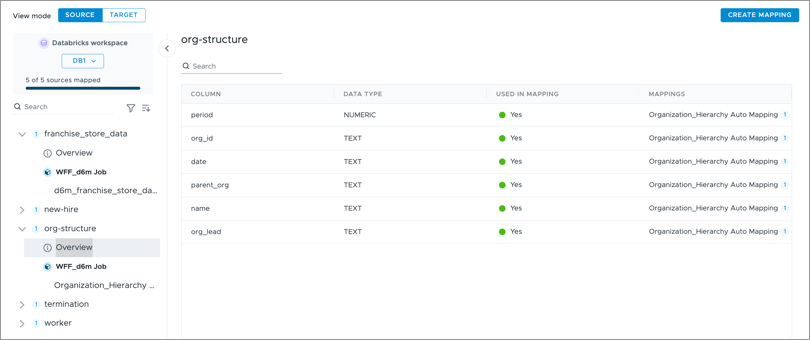
Source view
In Source view, the mappings are grouped by source, which contains the raw data before processing. The number next to each source shows how many mappings it is used in. The Details page provides an overview of the source columns and which mappings they are being used in and allows you to preview the records in the source. Select a connector credential to view mappings that uses sources from Databricks.
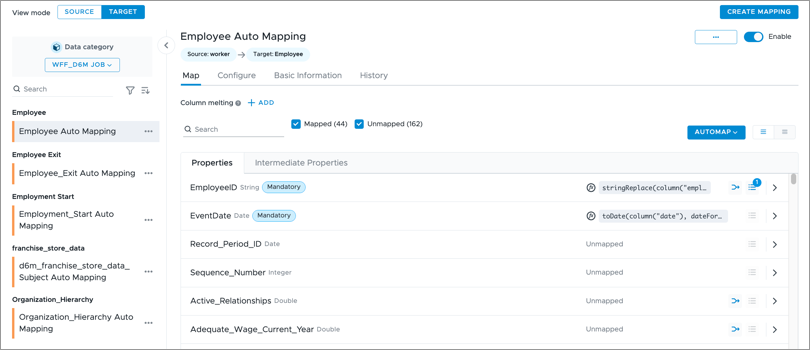
Target view
In Target view, the mappings are grouped by the objects in the Visier analytic model that the data is loaded into, similar to the Mappings room. Select a data category to view mappings that uses sources from Databricks.
Update schedules
The Schedules tab is where you can create and update recurring schedules for your Databricks connector. You can set only one schedule per connector credential.
To create a recurring schedule, you must be in the production project.
- In the production project, on the navigation bar, click Data > Connectors.
- In the Connectors room, click the Databricks connector.
- Click Schedule.
- In the Create schedule dialog:
Select the operation:
- To sync data from the selected tables and generate a data version, click Sync and process data.
- To sync data from the selected tables without generating a data version, click Sync data only.
- To generate a data version without syncing new data, select Process data only.
- Select the connector credential you want to create a schedule for. If you chose to sync all tables for the connector credential, you can enable the Sync all tables (including new tables) option to automatically include new source tables in future syncs. Just remember to sync the schema for the connector credential so new tables can be discovered.
- Select the tables you want to sync.
- Select the data category you want to use to generate the data version.
- Set the date and time when you want the sync and job to run.
- When finished, click Schedule.
To edit an existing schedule:
-
In a project, on the navigation bar, click Data > Connectors.
- In the Connectors room, click the Databricks connector.
- In the Schedules tab, find the connector credential you want to edit, and click the More button
 in the Actions column.
 - Click Edit.
Update credentials
The Credentials tab is where you can reauthenticate to update expired connector credentials and view the current schema definitions.
-
In a project, on the navigation bar, click Data > Connectors.
- In the Connectors room, click the Databricks connector.
- In the Credentials tab, find the connector credential you want to edit, and click the More button in the Actions column.
-
Do one of the following:
- To refresh the schema definition so new tables from the source are detected, and existing table structures are updated, click Sync schema.
- To view the current schema definition and preview sample data for the connector credential, click View schema.
- To renew the connector credentials, click Reauthenticate.
Sync schema
Whenever you add new tables or modify existing table structures in Databricks, you must also update the schema definition for your connector credential in Visier. This allows Visier to discover these changes so you can successfully sync data.
-
In a project, on the navigation bar, click Data > Connectors.
- In the Connectors room, click the Databricks connector.
- Click Sync Schema in the upper-right corner.
You can also sync schema for your connector credential in the Credentials tab.
Sync data
Get the latest data from Databricks and optionally run a job immediately to generate a data version. For more information, see Data Versions.
-
In a project, on the navigation bar, click Data > Connectors.
- In the Connectors room, click the Databricks connector.
- Click Sync Data in the upper-right corner.
-
In the Sync data dialog:
-
Select the operation:
- To sync data from the selected tables and generate a data version, click Sync and process data.
- To sync data from the selected tables without generating a data version, click Sync data only.
- To generate a data version without syncing new data, select Process data only.
- Select the connector credential you want to run the job for.
- Select the tables you want to sync.
- Select the data category you want to use to generate the data version.
-
- When finished, click Sync Data. You can monitor the progress of your job in the Jobs room. For more information, see Jobs.