Get Started with Visier APIs
Everything you need to know to get started with Visier's suite of public APIs.
Overview
Make your first request with Visier APIs. Visier APIs make requests and return data based on your production environment in Visier unless otherwise specified.
Visier reserves the right to, without notice and at its sole discretion, add new elements to API responses. Authorized users who call Visier's APIs must set their JSON parsers to not fail on unknown properties or risk being unable to interpret such API's result set.
Get a Visier account
To use the APIs, you must have a Visier account with a profile that has the API capability. If you don't have an account, contact your administrator. They will create an account for you with permissions that allow you to view data.
Generate your API key and authentication token
To make an API request, you will need an API key and an authentication token. For more information about how to get an API key and request an authentication token, see API Authentication.
Note: If using Postman to send requests, you can request a security token directly in the tool, see Use Postman to Call Visier APIs.
Choose your tool
To use Visier APIs, you need to choose a tool to make your first request. This can be Postman or whichever method you usually use to make HTTP requests. For more information about using Postman for your first request, see Use Postman to Call Visier APIs.
Put your data files in the right place
To send data files using the API, the data files must be in a location that your API application can access. If using Postman, the data files you want to upload must be in Postman's files folder on your local device. For more information, see "Working directory" in Setting up Postman.
Make your first request
To test that you have everything set up correctly, we'll create a request to retrieve all the users in your Visier solution using the /v1/admin/users endpoint.
Replace {vanity_name} with your tenant name. The API key is expected as a header, while the security token is expected as a cookie.
Tip:
To find your vanity name:
- Go to the global workspace in Studio, click Settings > Single Sign-On. Then, under Single Sign-On, find your service provider endpoint; for example, https://jupiter.visier.com/VServer/auth. In this example, jupiter is the vanity name.
- As an administrating tenant, go to the global workspace in Studio, click Settings > Partner Single Sign-On. Then under Bypass Users (Optional), find your service provider endpoint; for example, https://jupiter.visier.com/VServer/auth. In this example, jupiter is the vanity name.
curl -X GET --url 'https://{vanity_name}.api.visier.io/v1/admin/users' \
-H 'apikey:{api_key}' \
-H 'Cookie:VisierASIDToken={security_token}'If everything was set up correctly and the request was successful, you should see a similar response:
{
"users": [
{
"userId": "02393fdc-3b43-9648-b042-a589a781a9d0",
"username": "john@jupiter.com",
"displayName": "Test User 000",
"accountEnabled": true,
"employeeId": "",
"email": "john@jupiter.com",
"lastLogin": {
"timestamp": "1633121685629"
},
},
{
"userId": "72a6c22e-76be-a24a-92f7-7cbbed16fd58",
"username": "richard@jupiter.com",
"displayName": "Integration Test User 002",
"accountEnabled": true,
"employeeId": "",
"email": "richard@jupiter.com"
}
]
}Next steps
Now that you've successfully authenticated and completed your first API request, you can call more Visier APIs!
For detailed reference documentation, see API Reference.
API references
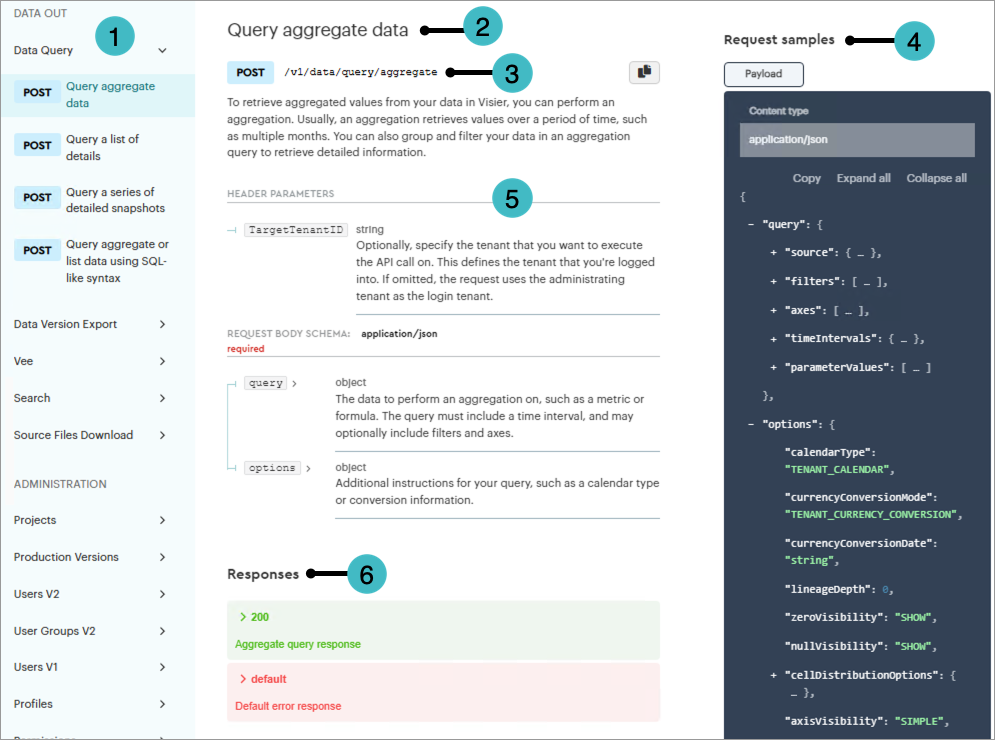
The following screenshot shows you how to read an endpoint in the Visier API reference.

- APIs and endpoints: A navigation bar to find all publicly available Visier APIs.
- Endpoint name: An action statement about what the API endpoint does.
- Method and URL: The action and URL associated with the API endpoint. Visier APIs use GET, POST, PUT, PATCH, and DELETE methods. The URL shown in the API reference is a shortened version of the full API URL; for example, /v1/data/query/aggregate is short for https://{vanity-name}.api.visier.io/v1/data/query/aggregate. To copy the URL to your clipboard, click the Copy button
 .
. - Request samples: An example of the request body fields and the schema for the fields. To copy the sample to your clipboard, click Copy.
- Headers, parameters, and request body schema: The headers, parameters, and request body fields that you can set in the API request. Each field has a description and data type. To expand a field that contains additional fields, click the Expand button
 .
. - Responses: The potential response to your API call, including all possible success or error response fields.
