
Plan Segmentation
Create your plan structure by adding attributes to your plan.
Segmenting is the process of organizing your workforce into logical and practical groupings. It is the key to successful workforce planning as it allows you to analyze your workforce at an increasingly granular level, identify your workforce gaps, and position you to effectively target your business strategies.
Structuring your plan using attributes
The plan structure is made up of a set of attributes. An attribute organizes unique values into a list or a hierarchical structure.
There are two types of attributes that can be used to structure your plan:
-
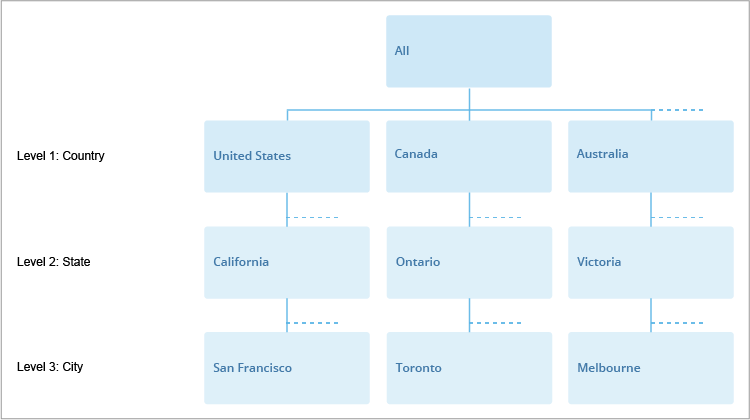
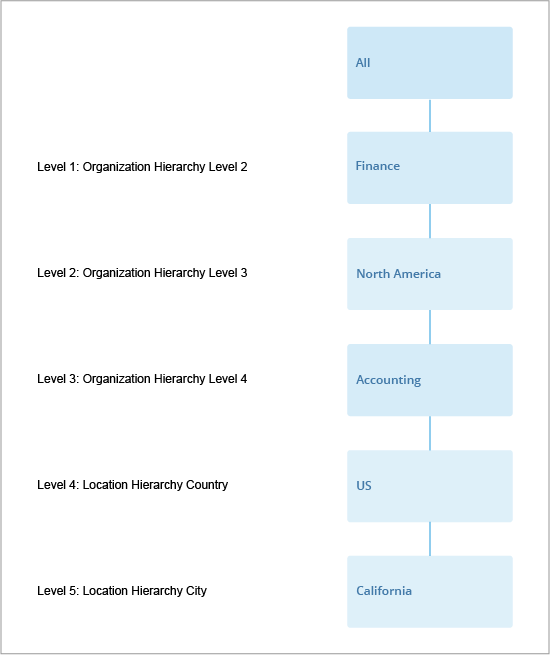
Leveled attribute: Leveled attributes have a fixed number of levels on each path through the structure. A leveled attribute can have as few as one level, such as an attribute like Gender, which is not hierarchical. The members at each level of the attribute are logically equivalent. For example, each level of the Location Hierarchy contains members that represent the same type of information. As shown in the following illustration, every member at level 1 represents a Country.
-
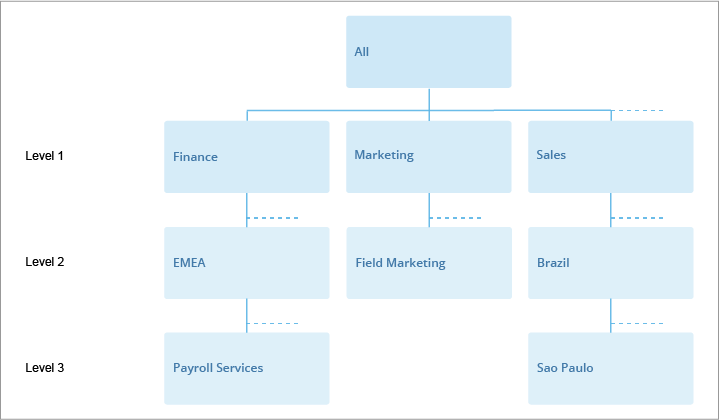
Parent-child attribute: Parent-child attributes are hierarchical attributes in which members of the hierarchy are directly associated with another member in the hierarchy. This type of attribute may create unbalanced structures because each parent branch will have various numbers of children. The members at each level of the attribute are not always logically equivalent. For example, members at the same level in the Organization Hierarchy can represent different types of information. As shown in the following illustration, members at level 2 of the hierarchy can represent a region, function, or country.
Add attributes to your plan
Increase the level of detail in your plan by adding additional attributes. Let's say your current plan is structured using the Cost Center Hierarchy and you want to plan for the various cost centers in each country. Simply, add the attribute Location Hierarchy Country to your plan so these segments appear in your plan.
Note:
- New attributes can only be added to an existing plan structure in freeform plans. If you're working in a fixed plan, you can only add attributes that have been preselected by the main planner to your subplan. For more information about the difference between freeform and fixed plans, see About the plan structure.
- Attributes that are not part of the existing plan structure are added at the end of the main plan structure. If you're adding a new level for an attribute that exists in the plan structure, the level will be added where the attribute is located in the main plan structure.
- Attributes with more than 10,000 members cannot be added.
-
If an attribute has overlay data, the plan model will automatically pull and populate these pre-aggregated values that you've provided as limits or targets in the plan. However, when using the Headcount and Cost Planning model, you'll have to manually sync overlay data to limits. To sync your limits, click the Edit Configuration button
 in the upper-left corner of the planning grid. Then select the metric (budgeted or forecast) that you want to sync your limits to in the Sync limits to published budgets configuration area.
-
When changing your plan structure or the synced limits in the Edit Configuration dialog, select Promote rows for added dimensions from overlay data synced to this plan under Plan structure to promote and include rows that have zero headcount in your plan.
-
- This feature is also available through Visier's public APIs. For more information, see Plan Data Load API.
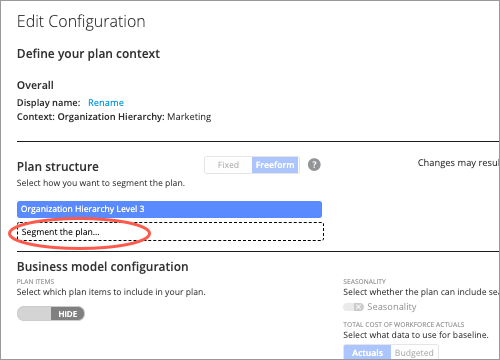
- Click the Edit Configuration button on the right side of the plan name.
- In the Edit Configuration dialog, under Plan structure, do one of the following:
- In a freeform plan, click Segment the plan and then select the attribute and level you want to add.
- In a fixed plan, select the attributes and level you want to add to your plan.

- In a freeform plan, click Segment the plan and then select the attribute and level you want to add.
- Click Save > OK.
After you add attributes to your subplan, reload the values of any attached assumptions. Each time you update your segmentation, the assumption values inherited from the main plan are automatically dropped. You must reload the values of the assumption to get the information provided by the main planner. For more information, see Reload Values From an Assumption Model.
Unbalanced plan structures
Since you can combine different attribute types to create your plan framework, you can end up with an unbalanced plan structure where some paths essentially skip a level. When a level is skipped, the path does not include a segment at that level.
Note:
- Plan levels can only be skipped when creating custom segments.
- You can only skip adding a segment to a level in parent-child attributes.
- You cannot add segments to the levels that you skipped because it will cause conflicts with subplans. You'll have to remove all segments that you added and start over.
For example, let's say your plan is structured using the following attributes: Organization Hierarchy (Level 2 to 4) and Location Hierarchy (Country and State). The following illustration shows the plan structure and plan members included in one path of your plan.
In the upcoming fiscal year, you plan on adding a new Finance group in Europe that does not contain any functional groups. Since the Organization Hierarchy is a parent-child attribute, you can reflect this new structure in your plan by skipping level 3 of the plan. You don't have to add a custom segment at Organization Hierarchy Level 4. As a result, your plan will have an unbalanced plan structure.
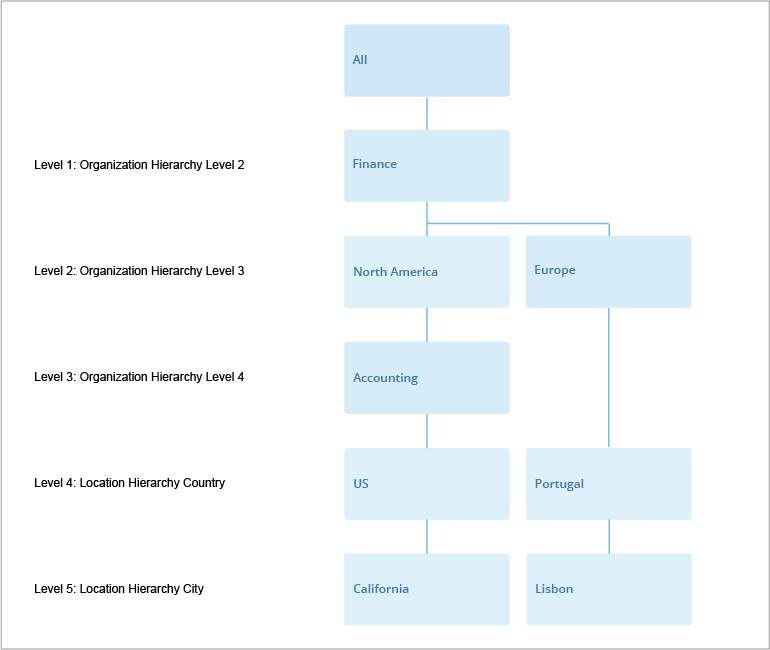
To give you an idea of how the unbalanced plan structure in the previous example can be achieved, you would have to add the following custom segments in order:
For instructions on how to add a segment, see Add a Segment.
- Add the custom segment Europe to level 2 of the plan structure by adding a new segment under the Finance segment.
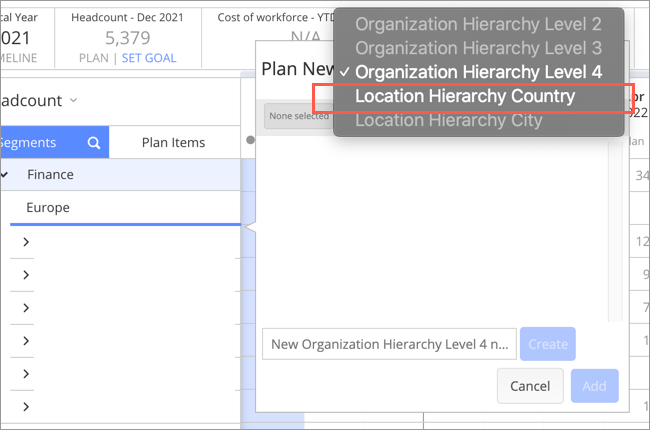
- Skip level 3 of the plan structure by not adding a segment to Organization Hierarchy Level 4:
- When adding a new segment under the Europe segment, select Location Hierarchy Country instead of Organization Hierarchy Level 4 in the New Segment dialog.
- Then, add the custom segment Portugal.
- Add the custom segment Lisbon under the Portugal segment.
In this section