
Plan Model Configuration Examples
Learn how to make common plan model configurations by following along with these examples.
Access requirements
Custom profile with these capabilities: Planning (Write, Detailed)
Reach out to your administrator for access.
Overview
As an administrator, you have the ability to configure various plan model components to suit your organization's requirements. In this topic, you'll find a collection of commonly made configurations along with how to implement them. When modifying plan models, we recommend that you create a duplicate and edit the copy instead of directly modifying the plan model. Changes to plan models with existing plans can result in those plans no longer working correctly or breaking entirely. For more information, see "Best practices" in Configure a Plan Model.
To access plan models, open a project and navigate to Planning > Plan Models.
Add a plan component
You can add a new plan item, input, goal, or parameter to a plan model.
To add a plan component:
- In the Plan Models room, click a plan model. For example, Headcount and Cost Planning (New).
-
In the Model tab, click New.

Tip: You can also add new inputs, goals, and parameters by clicking the Info button
 > New.
 - Select the plan component you want to add. For example, plan item.
- Fill in the required fields.
-
Click Create.
Tip: When adding new plan items, inputs, or parameters with similar configurations, check Create another before clicking create.

If selected, the creation panel will stay open, pre-filled with your last configuration. This lets you quickly create similar objects with minor tweaks, saving time when you need multiple items with mostly the same setup, such as several headcount inputs with different filters.
- Repeat steps 2-5 as necessary.
- Click Preview and create a new plan to see your changes and validate that it works as expected, then publish the project to production. For instructions, see Publish Project Changes.
Rename a plan item
You can rename any plan item, just ensure the new name is unique and doesn't duplicate an existing item.
To rename a plan item:
- In the Plan Models room, click a plan model. For example, Headcount and Cost Planning (New).
- In the Model tab, click the plan item you want to rename.
-
In the plan item panel, click the Basic Information tab.
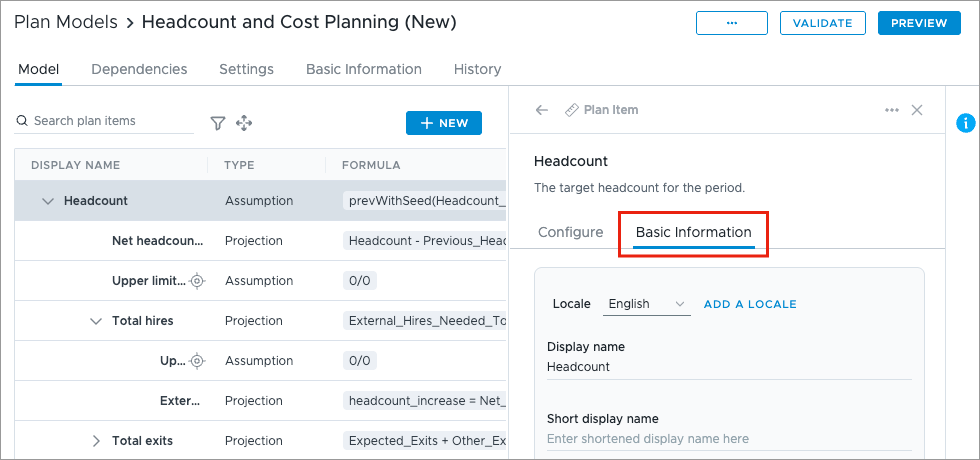
-
Change the display name.
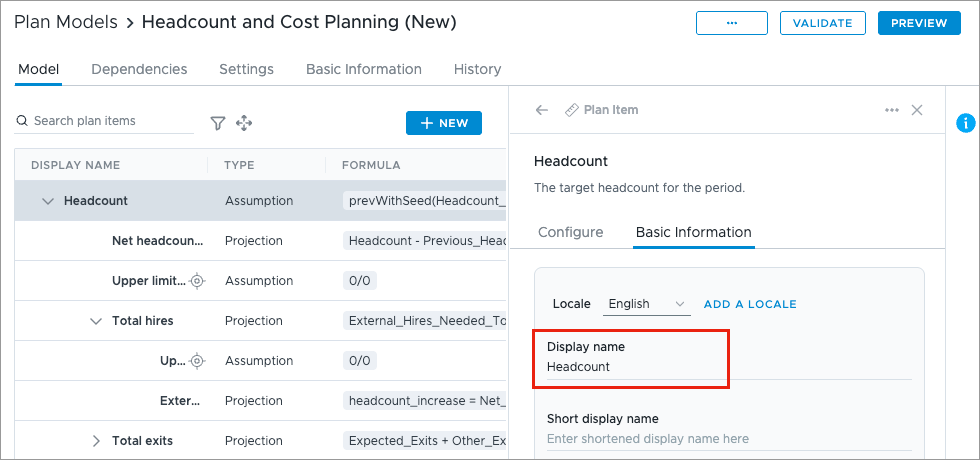
-
Click Preview and create a new plan to see your changes and validate that it works as expected, then publish the project to production. For instructions, see Publish Project Changes.
Delete a plan item
You can remove sections of the plan model by deleting plan items. For example, your organization may not need the FTE section of the Headcount Forecasting plan model. Removing unnecessary plan items can improve the usability and performance of the planning grid. Removing a plan item requires two main steps: removing the plan item and removing references to the removed plan item.
To delete a plan item:
- In the Plan Models room, click a plan model. For example, Headcount and Cost Planning (New).
- In the Model tab, click the plan item you want to delete.
-
In the plan item panel, click the More actions button
 .
.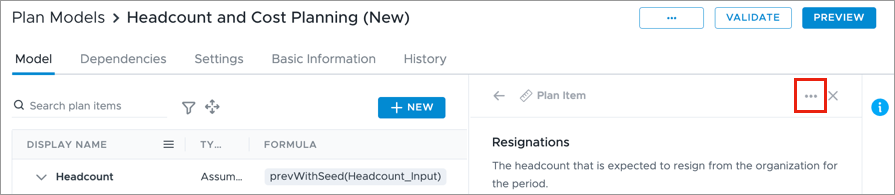
-
Click Delete.
Result: The Delete plan item dialog will appear with a list of the objects directly affected by this plan item.

-
Remove all references to the deleted plan item from the affected objects by updating their formulas or weighting plan items. Consider also removing the input referenced by the plan item.
-
Click Validate. If there are any other validation issues in the model, they will be listed in the validation panel.

- Click Preview and create a new plan to see your changes and validate that it works as expected, then publish the project to production. For instructions, see Publish Project Changes.
Hide a plan item
You can hide a plan item so that it does not appear in plans. For example, you may need to create a plan item to calculate other plan item values, but it may not be useful to analyze on its own in the planning grid.
To hide a plan item:
- In the Plan Models room, click a plan model. For example, Headcount and Cost Planning (New).
- In the Model tab, click the plan item you want to hide.
-
In the plan item panel, toggle off Show in plans.
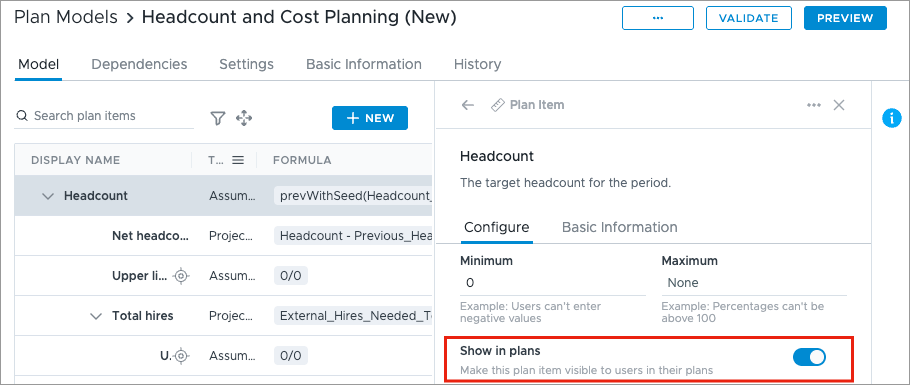
- Click Preview and create a new plan to see your changes and validate that it works as expected, then publish the project to production. For instructions, see Publish Project Changes.
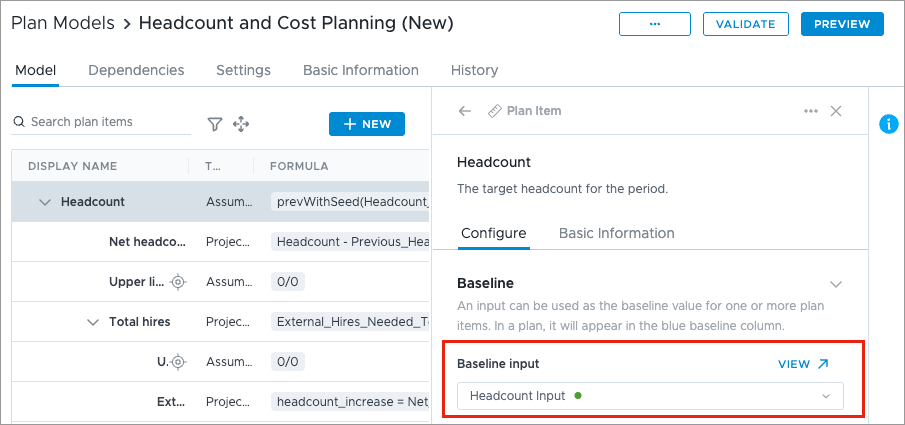
Change the baseline input of a plan item
You can change the input selected to be the baseline input of a plan item.
To change the baseline input of a plan item:
- In the Plan Models room, click a plan model. For example, Headcount and Cost Planning (New).
- In the Model tab, click the plan item you want to change the baseline input for.
-
In the plan item panel, select a new input in the Baseline input list.
-
Click Validate. If there are any other validation issues in the model, they will be listed in the validation panel.
- Click Preview and create a new plan to see your changes and validate that it works as expected, then publish the project to production. For instructions, see Publish Project Changes.
Note: Existing plans are not updated immediately with the new configuration. Planners will need to update the baseline manually to see the new data.
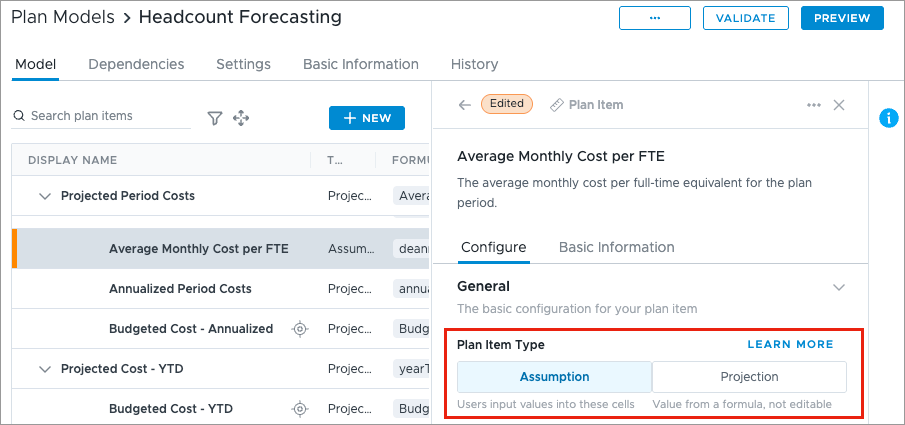
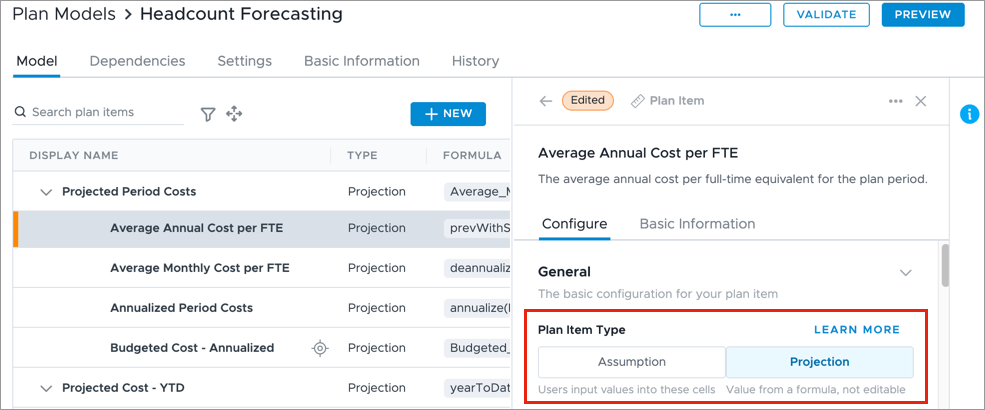
Change the plan item type
In your plans, assumptions are editable and projections are not. You can change a projection to an assumption to make it editable, and vice versa. If the plan item formula relies on another plan item, you may need to change the formula of the related plan item to maintain consistency and avoid validation errors.
Let's walk through an example where we will change the projection Average Monthly Cost per FTE, found in the Headcount Forecasting plan model, to an assumption. This projection relies on an assumption in its formula called Average Annual Cost per FTE, so we will also need to change that assumption to a projection to ensure both plan items model the correct behavior in your plans.
The following list details the current configuration in the Headcount Forecasting plan model:
- Average Monthly Cost per FTE: This is a projection with the formula deannualize(Average_Annual_Cost_Per_FTE)
- Average Annual Cost per FTE: This is an assumption with the formula prevWithSeed(Average_Cost_Per_FTE_Input)
Change Average Monthly Cost per FTE to an assumption
- In the Plan Models room, click the Headcount Forecasting plan model.
- In the Model tab, click Average Monthly Cost per FTE.
- In the plan item panel, do the following:
Change the Plan Item Type to Assumption.
Change the Distribution method to Constant.
Update the formula from deannualize(Average_Annual_Cost_Per_FTE) to deannualize(Average_Cost_Per_FTE_Input).
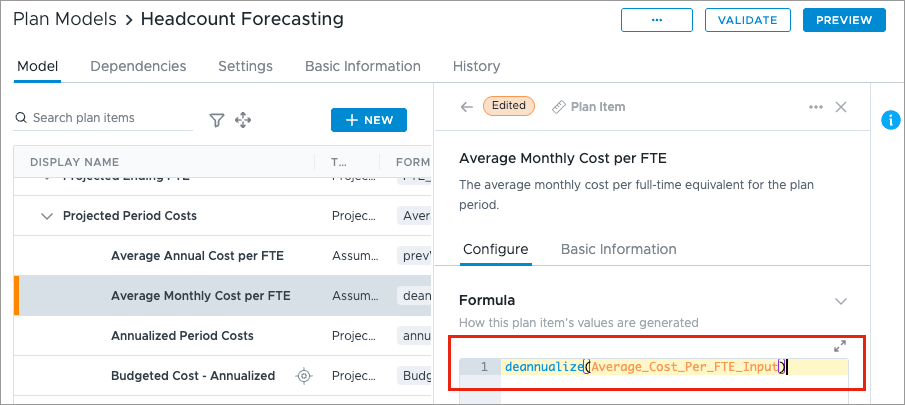
Note: This removes the reference to the Average Annual Cost per FTE assumption in the formula and instead references the Average Annual Cost Per FTE input, which pulls in the actual metric data. Since Average Monthly Cost per FTE is now an assumption, it cannot directly depend on another assumption plan item in the same period for its projection.
Change Average Annual Cost per FTE to a projection
- In the Model tab, click Average Annual Cost per FTE.
-
In the plan item panel, change the Plan Item Type to Projection.
-
Update the formula from prevWithSeed(Average_Cost_Per_FTE_Input) to prevWithSeed(Average_Monthly_Cost_Per_FTE).
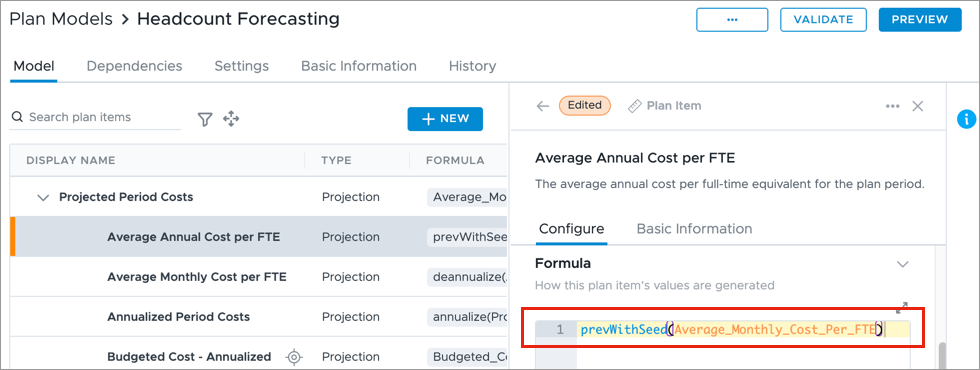
Note: This ensures that the overall relationship between the two plan items remains logical. Now, Average Annual Cost per FTE will use the Average Monthly Cost per FTE assumption in its calculation.
-
Click Validate. If there are any other validation issues in the model, they will be listed in the validation panel.
- Click Preview and create a new plan to see your changes and validate that it works as expected, then publish the project to production. For instructions, see Publish Project Changes.
Change the core metric
You can change the core metric of a plan. The core metric defines which segments are included in the plan, only the segments of the plan population that have a non-zero value for the core metric will be included.
Follow these steps to change the core metric:
- In the Plan Models room, click a plan model. For example, Headcount Forecasting.
- In the Settings tab, choose a new metric input in the Core metric list.
Note: Only metrics that are currently being used by an input in the plan model can be selected. To change the core metric to a metric not used in the model, you must first create an input that uses that metric.
- Click Preview and create a new plan to see your changes and validate that it works as expected, then publish the project to production. For instructions, see Publish Project Changes.