
Bulk User Management
Make bulk change to user accounts.
Access requirements
Custom profile with these capabilities: User Management (Write, Detailed)
Reach out to your administrator for access.
Overview
You can edit user accounts individually or in bulk. To make bulk changes to user accounts, you will download a spreadsheet that contains a list of all the users or permissions, make changes in the spreadsheet, and then upload the spreadsheet to import the user data back to the solution.
Tip: When editing the spreadsheet:
- Do not change the column names.
- Sort the spreadsheet to quickly find users.
- Save the file in .xls, .xlsx, or .csv format.
The User List
The User List is used to:
- Create new users
- Update user details
- Enable or disable user accounts
- Change users access to solutions and Studio
To avoid errors, always download the latest User List before making changes. Do not reuse a spreadsheet that has already been uploaded, particularly one used to create new users, as it will lack the system-generated UUIDs necessary to identify and update existing accounts.
When creating new users in bulk, follow this best practice:
- Download the User List.
- Add new users to the User List.
- Upload the User List to generate UUIDs for the new users.
- Download a new User List to make bulk changes to existing users.
Download the User List in Studio
- Do one of the following:
On the global navigation bar, click Tenant, and then click the Users tab.
On the navigation bar, click Security > Users.
-
Click Download User List in the upper-right corner of the Users room to export the User List.
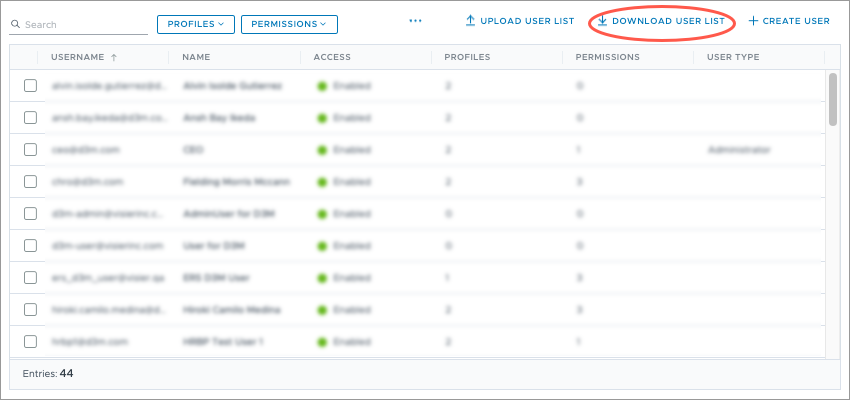
Result: The User List is generated as an .xlsx file and automatically begins downloading.
Upload the User List in Studio
The uploaded Users List file can contain a maximum of 1000 user rows. If necessary, you can separate your changes across multiple files. The uploaded file can simply contain a list of users that you have created or updated. Removing rows will not impact existing users as the Users List cannot be used to delete user accounts.
Note: Changes to the User List are not subject to the project lifecycle and will automatically go into effect.
-
On the global navigation bar, click Tenant, and then click the Users tab.
-
Click Upload User List in the upper-right corner of the Users room to export the User List.
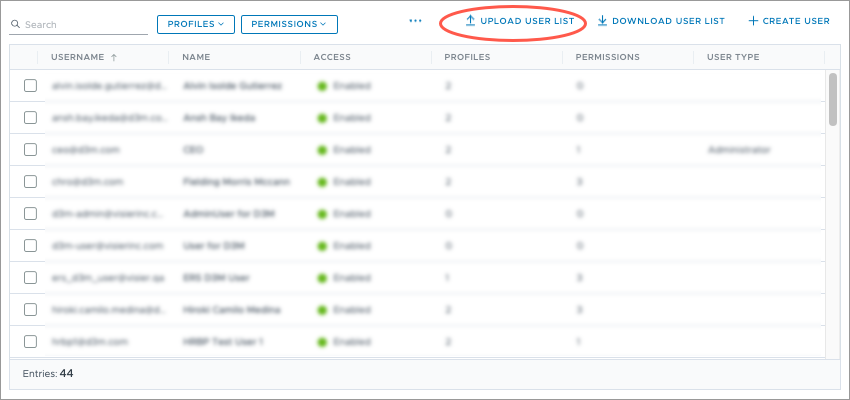
- Select the file on your computer.
Result: A message appears to indicate whether your file was imported successfully.
User List elements
Use the following table as guidance when editing columns contained in the User List:
| Column | Description |
|---|---|
| Username | User's email. |
| Employee Name | User's full name. |
| Employee ID | User's unique employee ID. This column is optional and can be left blank. |
| Enabled |
Allow user to log on to the solution.
|
| Visier People |
User has access to the Visier People solution.
|
| Studio |
User has access to Studio and administrator capabilities.
|
| Profiles | User's assigned profiles. You cannot use this column to change a user's profiles. To change a user's profile assignment, see Manage the profiles assigned to a user. |
| Permissions | User's assigned permissions. You cannot use this column to change a user's permissions. To change a user's permission assignment, see Assign Permissions to a User. |
For more information about bulk user management, see Create users in bulk.
The Permissions List
The Permissions List is used to:
- Assign user permissions
Note: If the More Security Around Data Access Management feature is enabled, you will need access to all data, such as the Super Admin permission, to perform this task. For more information, see More security around data access management.
Download the Permissions List in Studio
- Do one of the following:
On the global navigation bar, click Tenant, and then click the Users tab.
On the navigation bar, click Security > Users.
-
Click the More button
 > Download Permissions List in the upper-right corner of the Users room.
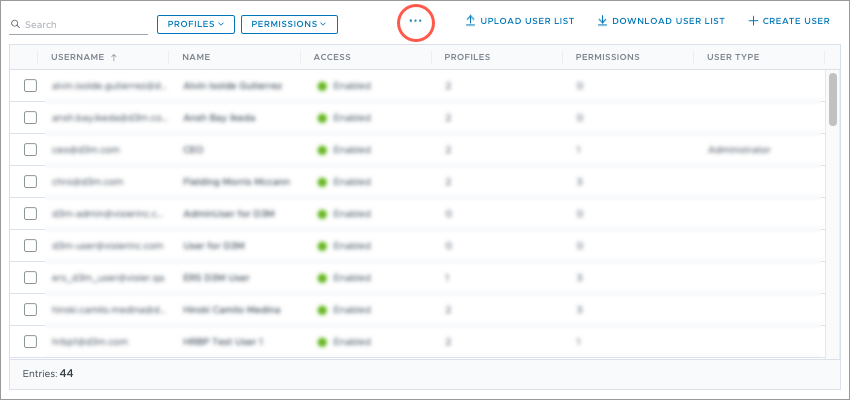
Result: The Permissions List is generated as an .xlsx file and automatically begins downloading.
Upload the Permissions List in Studio
The uploaded Permissions List file can contain a maximum of 1000 user rows. If necessary, you can separate your changes across multiple files. The uploaded file can simply contain a list of users that you have updated. Removing rows will not impact the assigned permissions of existing users.
Note: Changes to the Permissions List are subject to the project lifecycle and do not go into effect until you publish them.
- Do one of the following:
On the global navigation bar, click Tenant, and then click the Users tab.
On the navigation bar, click Security > Users.
-
Click the More button
> Upload Permissions List in the upper-right corner of the Users room.
- Select the file on your computer.
Result: A message appears to indicate whether your file was imported successfully.
Permissions List elements
The Permissions List contains the following worksheets:
- PermissionList: A list of the permissions in the solution that can be assigned to users.
- AssignedPermissions: A list of users and their assigned permissions.
Use the following table as guidance when editing columns contained in the Permissions List:
PermissionsList worksheet
| Column | Description |
|---|---|
| Permission Name | The name of the permission. |
| Permission Description | A description of the permission and the security access it provides. |
| Permission ID | The permission's reference number. To assign a permission to a user, copy the Permission ID and paste it in a column in the AssignedPermissions worksheet. |
AssignedPermissions worksheet
| Column | Description |
|---|---|
| Username | List of the users in the solution. |
| Permission # ID | List of the permissions the user has been assigned. Each column should only contain one Permission ID. |
For more information about bulk permission management, see Assign permissions in bulk.