
Create a Permission
Create permissions to give users access to data, capabilities, and content in the solution.
Access requirements
Custom profiles with one of the following capability sets:
- Permission Management (Write, Detailed)
- Security (Write, Detailed)
-
User Management (Write, Detailed)
Reach out to your administrator for access.
Overview
You can create a new permission or duplicate an existing permission and use it as a starting point.
Note: If the More Security Around Data Access Management feature is enabled, you will need access to all data, such as the Super Admin permission, to perform this task. For more information, see More security around data access management.
Create a new permission
You can create up to 3,000 permissions per project. These maximums are the default, however, contact Visier Technical Support to request limit adjustments.
Note: This feature is also available through Visier's public APIs. For more information, see Permissions API.
-
In a project, on the navigation bar, click Security > Permissions.
- In the Permissions room, click Add Permission.
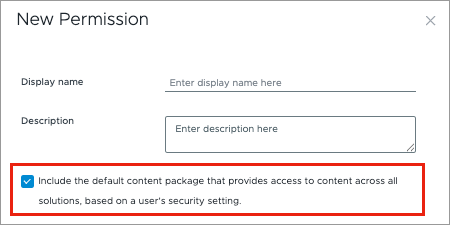
- In the New Permission dialog, add a display name and description for the permission and then click Create. The description should include information about the purpose of the permission and the level of data access a user will have.
Note: By default, the Visier - All Content content package is included in the permission, which provides access to the complete set of Visier content and any new customized content that is created. Deselect this checkbox if you want to restrict the permission to specific content items instead of the full content suite. For more information, see Content Packages.
Set data security
In the permission, select the items you want to grant access to. For more information, see Set Access.
- In a permission, click the Data security tab and then click Add access.
- In the Select the data dialog, select the items that users with this permission can access.
- Click Finish.
Next, set the population access and data access per data security item. For more information about data security items, see Data Security.
Refine population access
In the permission, select whether the permission grants no access, access to all, or custom access to a population. For more information, see Refine Population Access.
-
Click in the Population Access column.

- In the Refine population access dialog, select one of the following:
- No access: Block users with this permission from accessing the entire population.
- Access to all: Give users with this permission access to the entire population.
Custom: Give users with this permission access to a specific population through member filters or dynamic filters. For more information, see Security filter types. Custom population access is not available for sources.
Tip:
- When you add access to analytic objects that are strongly related to each other, you have the option of linking the population settings. For example, if you add access to the Applicant and Requisition subjects, you can set the population access for Applicant to inherit the population access that you defined for Requisition.
You will be provided with an estimate of the population based on your setting and the custom security filters applied.
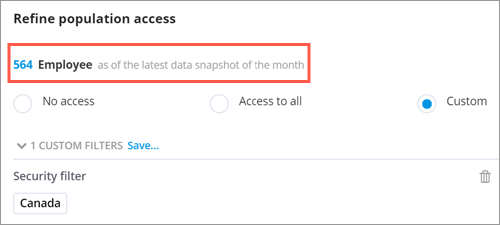
- If you have a prebuilt security filter for the analytic object, you'll find it in the Filter dialog, in the Security Filters category.
- Set the population access for multiple subjects and overlays by clicking the Bulk Action button
 in the Population Access header.
- When finished, click Apply.
Configure data access
Configure the data access for each item. Data access is not applicable to sources. For more information, see Configure Data Access.
-
Click in the Data access column.

-
In the Configure data access for room set the level of data access for each property, reference, and event of the item.
Tip:
- If you have a prebuilt data access set for the analytic object, link to it by hovering over the Data access column and click the Link shareable access set button
 . After a data access set has been linked, the Link shareable access set button will turn blue.
- Set the data access level for multiple subjects and overlays by clicking the Bulk Action button in the Data Access header.
- If you have a prebuilt data access set for the analytic object, link to it by hovering over the Data access column and click the Link shareable access set button
- When finished, click Apply.
Select capabilities and content packages
- In the Capabilities tab, select the capabilities for the permission. Capabilities determine the actions users with this permission can perform in the solution. For more information, see Capabilities List.
- In the Content Packages tab, select the content packages for the permission. Content packages control what analyses, metrics, dimensions, and key groups users with this permission can see in the solution. For more information, see Content Packages.
(Optional) Duplicate a permission
Create a permission from an existing permission. Then, edit the copy to suit your needs. A duplicated permission has the exact metadata, data security, capabilities, and content packages as the original permission. However, it is not assigned to any users or user groups. Duplicating permissions speeds up your work when you must create multiple permissions with minor differences.
-
In a project, on the navigation bar, click Security > Permissions.
- In the Permissions list, select the permission you want to use as a template.
- In the upper-right corner of the room, click Duplicate.
- In the new permission, edit the metadata, data security, capabilities, and content packages.