
Push Data From Visier to Databricks
Automate data extraction from Visier to a preferred data store.
Overview
After going through the work of processing your data and transforming it in Visier, you might want to reuse the data in other data systems. Visier offers an export connector that pushes data directly from our system to Databricks or Snowflake on demand or an automated schedule. This is useful for effective organizational planning by combining people data with work data in other systems, such as team productivity data in Visier with finance data in Databricks. For more information about export connectors, see Data Export Connectors.
This guide describes the tasks to implement data exports from Visier to Databricks and provides a step-by-step example you can follow along with.
Checklist
To implement data export connectors, complete these steps.
- Create a versioned and active Data Export.
- Create a service account in the target system.
- Provide service account credentials in Visier.
- Create an export connector.
- Run an export connector job.
- Schedule a job.
Create a Data Export
Export connectors rely on versioned Data Exports to define the content that gets exported to the target system. Think of it like this: the Data Export is the data to transfer and the export connector is the vehicle through which the data moves from Visier to Databricks. Create a Data Export before the export connector so that you can link to the Data Export while creating the connector.
Each Data Export sends data to exactly one table. Table names are permanent, must be unique within the connector, and are applied to all destinations in the connector. To create a Data Export, see Create a Data Export.
The Data Export must have the following settings:
- Versioned. Create the Data Export in a project.
- Active. Set the Active toggle in the Data Export's Basic Information tab.
Caution: Editing or deleting a Data Export that is linked to a data export connector can impact the schema or data written to the destination.
Create a service account
To send data to a target system, Visier must utilize a service account in that target system. For specific service account access requirements, see Databricks Data Export Connector and Snowflake Data Export Connector.
Provide service account credentials in Visier
Give Visier the service account's credentials so that Visier can send data as the user. For more information, see Add data export connector credentials in Visier.
Create an export connector
The export connector uses the service account's credentials and the Data Export to push data to the target system. If you can't see the Data Export you want to link, it might not be versioned or Active. Check the Data Export settings. To create an export connector, see Create a data export connector.
Run an export connector job
The first time you create an export connector, you'll run an export connector job that syncs the Data Export table to the destination. For more information, see Run a data export connector job.
Caution: Data export connectors use the data permissions of the user who ran or scheduled the data export connector job. The exported dataset contains all the data that the scheduling user is allowed to see in Visier. After the data transfers, the target system applies its own security model. Configure the appropriate access controls in your target system to restrict data visibility.
Schedule a job
After the first export connector job, you can automate export connector jobs to send data on a recurring schedule. First, publish the export connector project to production. Then, in the production project, schedule an export connector job. For more information, see Run a data export connector job.
Outcome
With a scheduled export connector job, your data in the destination will update at the frequency you specified. In your target system, don't forget to configure the appropriate access controls to restrict data visibility.
Example: I want to use Visier data in Databricks
This section provides a step-by-step example to export a detailed Data Export to Databricks and schedule a job to run once a week. The example limits sensitive data and personally identifiable information to help mitigate the risk of accidental data exposure beyond individually-allowed scope.
Access requirements
Custom profile with these capabilities: Data (Write, Detailed) and Manage Jobs
Permission with these capabilities: Author Data Exports and Consume Data Exports
Data required: Access to all data such as the Super Admin permission
Reach out to your administrator for access.
Step 1: Create a Data Export
The Data Export is the data to transfer and the export connector is the vehicle through which the data moves from Visier to Databricks. Each Data Export sends data to exactly one table. Table names are permanent, must be unique within the connector, and are applied to all destinations in the connector.
Create a project
The Data Export must be versioned, so start by making a project.
- On the global navigation bar, click Projects > New Project.
- In Display name, type Set Up Databricks Data Export Connector.
- In Description, type New detailed Data Export and Databricks data export connector.
- Click Create.
Create a versioned and detailed Data Export
- In the project, on the navigation bar, click Model > Data Exports.
- Click New Data Export.
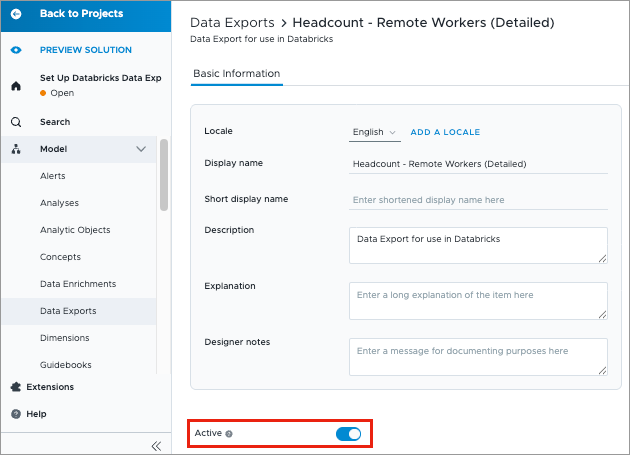
- In Title, type Headcount - Remote Workers (Detailed, No Sensitive Data).
- In Description, type Data Export for use in Databricks.
- Click Create.
- In the visual title, do the following:
- Click the Data Export picker and select Detailed Data Export.
- Select Employee.
- Click Add a filter > Remote.
- In the Table settings panel, remove any attributes that are personally identifying information or sensitive data about pay and performance. This reduces the security configuration you must maintain in the target system by reducing the sensitivity of data being sent from Visier to Databricks.
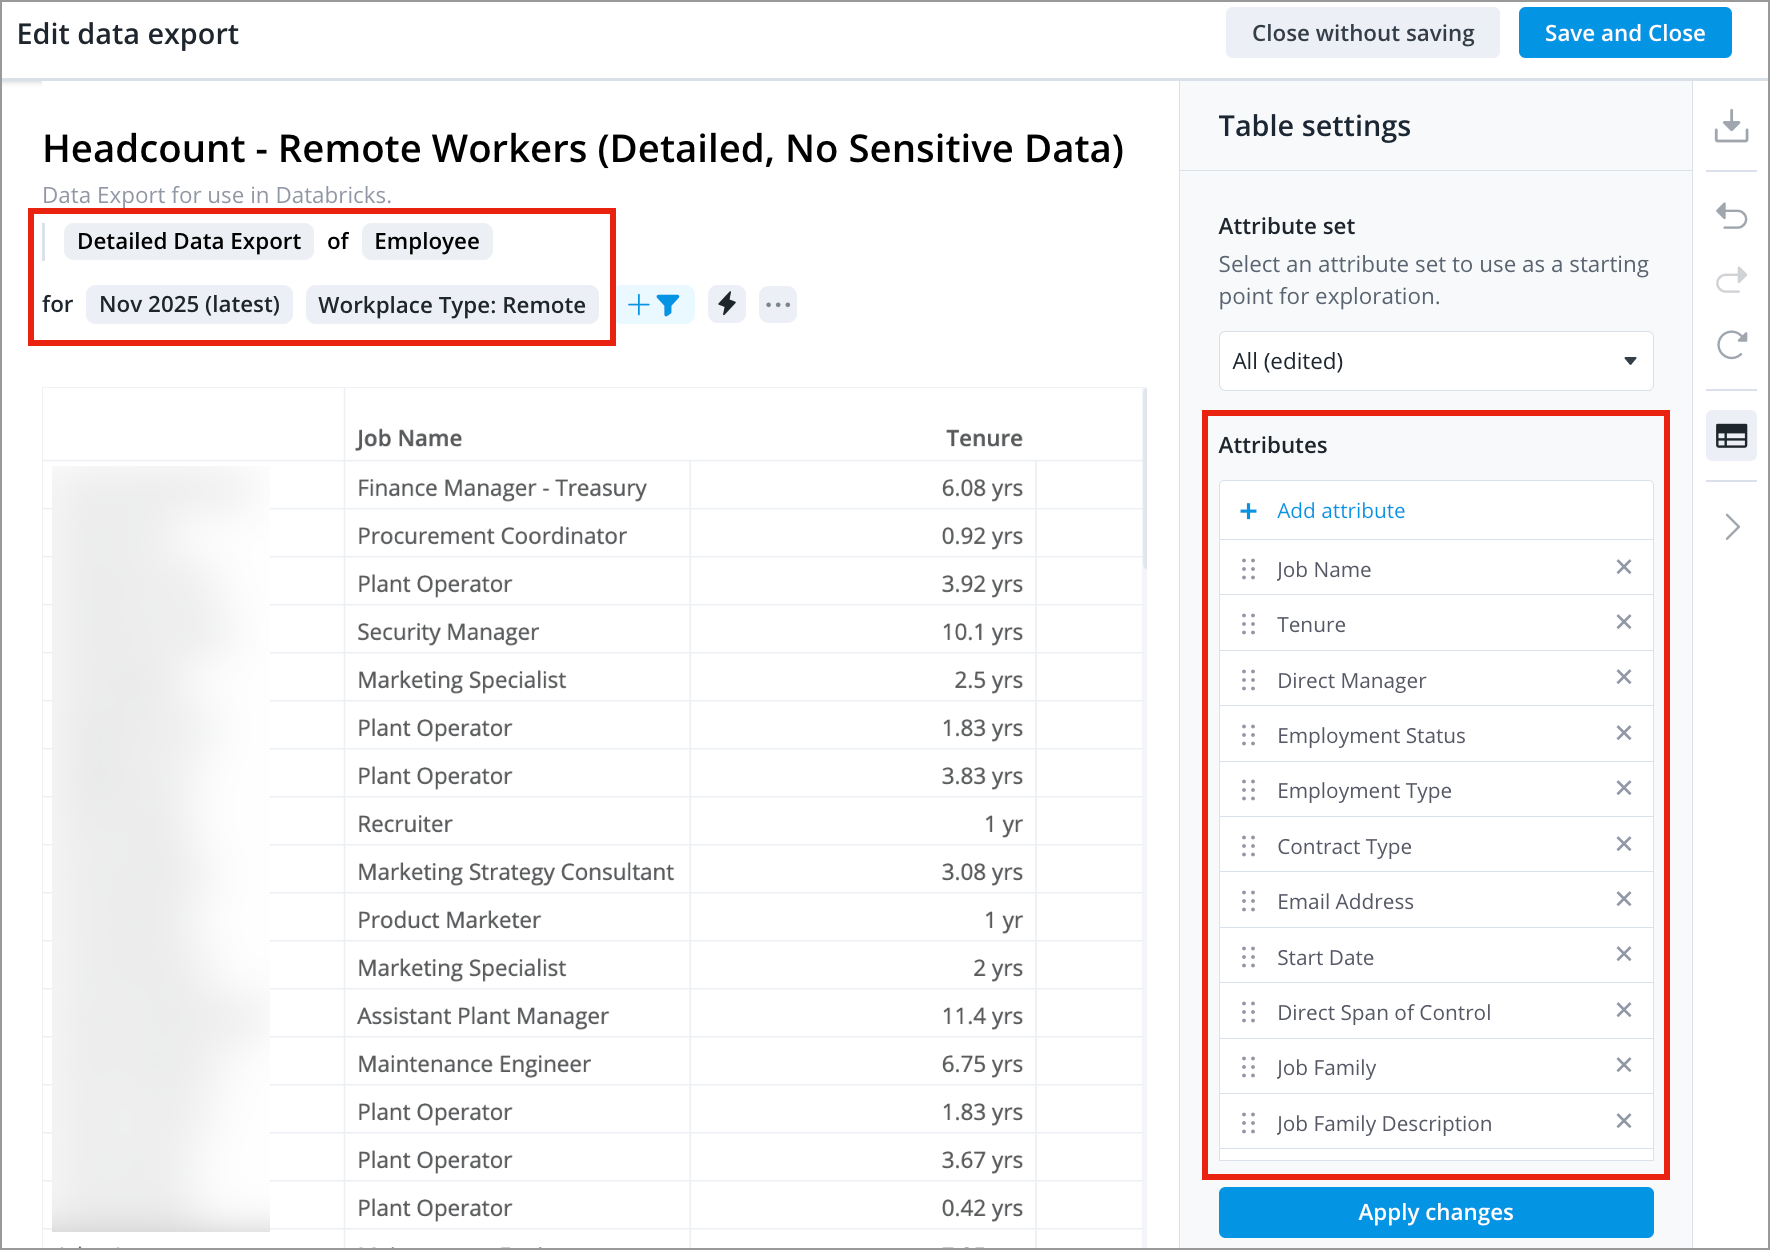
- Click Save and Close.
Set the Data Export to Active
- In the Data Export, navigate to the Basic Information tab.
- Turn on Active.
Caution: Editing or deleting a Data Export that is linked to a data export connector can impact the schema or data written to the destination.
Step 2: Create a service account in Databricks
To send data to Databricks, Visier must utilize a Databricks service account. For more information, see Databricks Data Export Connector.
The service account must use OAuth 2.0 client ID and client secret authentication.
- Set up a service principal for OAuth 2.0 machine-to-machine (M2M). For more information, see Create service principal.
- Grant the necessary privileges to the service principal. For more information, see Grant a principal Unity Catalog privileges.
-- Example service principal ID: 123e4567-e89b-12d3-a456-426614174000
-- Allow service principal to create and write data to tables in a provided catalog and schema
GRANT EXTERNAL USE SCHEMA ON SCHEMA <catalog name>.<schema name> TO `<service principal ID>`
GRANT USE CATALOG ON CATALOG <catalog name> TO `<service principal ID>`;
GRANT CREATE TABLE ON SCHEMA <catalog name>.<schema name> TO `<service principal ID>`;
GRANT USE SCHEMA ON SCHEMA <catalog name>.<schema name> TO `<service principal ID>`;
-- Allow service principal ability to create external metadata for lineage
GRANT CREATE EXTERNAL METADATA ON METASTORE TO `<service principal ID>`;Step 3: Provide connector credentials in Visier
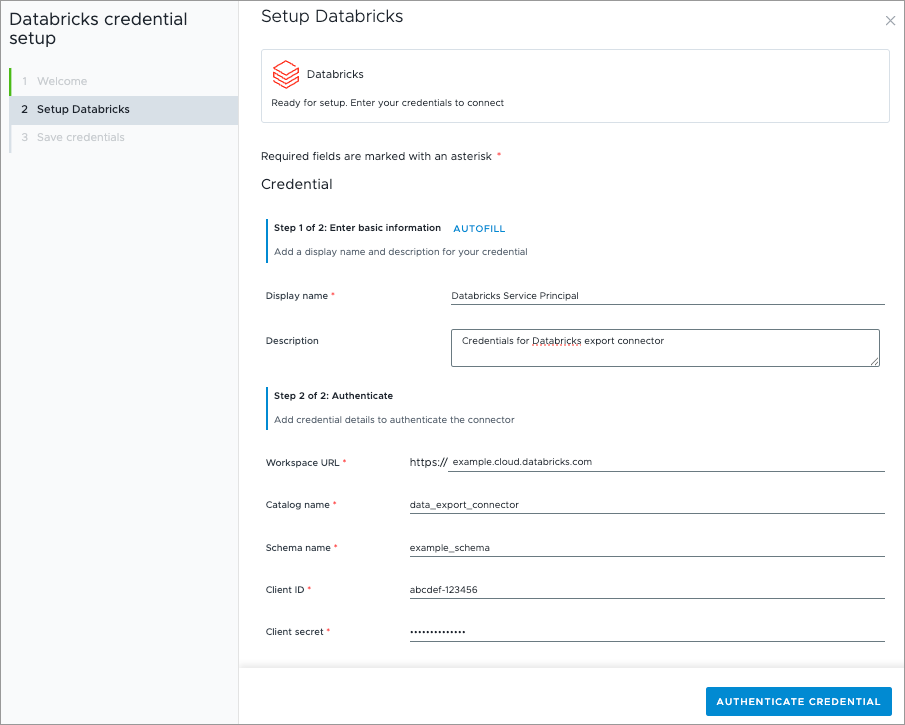
- On the global navigation bar, click Data > Connector Credentials > Add Connector Credential > Data out credential.
- Select Databricks, and then click Next > Let's Start.
- In Display name, type Databricks Service Principal.
- In Description, type Credentials for Databricks export connector.
- Provide the following credentials:
- Workspace URL: example.cloud.databricks.com
- Catalog name: data_export_connector
- Schema name: example_schema
- Client ID: abcdef-123456
- Client secret: **************
- Click Authenticate Credentials.
- Click Save.
For more information about Databricks credentials, see Databricks Data Export Connector.
Step 4: Create an export connector
- In the project, on the navigation bar, click Data > Export Connectors > Create Export Connector.
- Select Databricks, and then click Next > Let's Start.
- In Display name, type Headcount Export (No Sensitive Data).
- In Description, type Export data for Headcount (excluding sensitive data and PII).
- In Destination, select Databricks Service Principal. This is the connector credential you created in Step 3: Provide connector credentials in Visier.
- Click Next.
- In Link data exports, select Headcount - Remote Workers (Detailed, No Sensitive Data). This is the Data Export you created in Step 1: Create a Data Export.
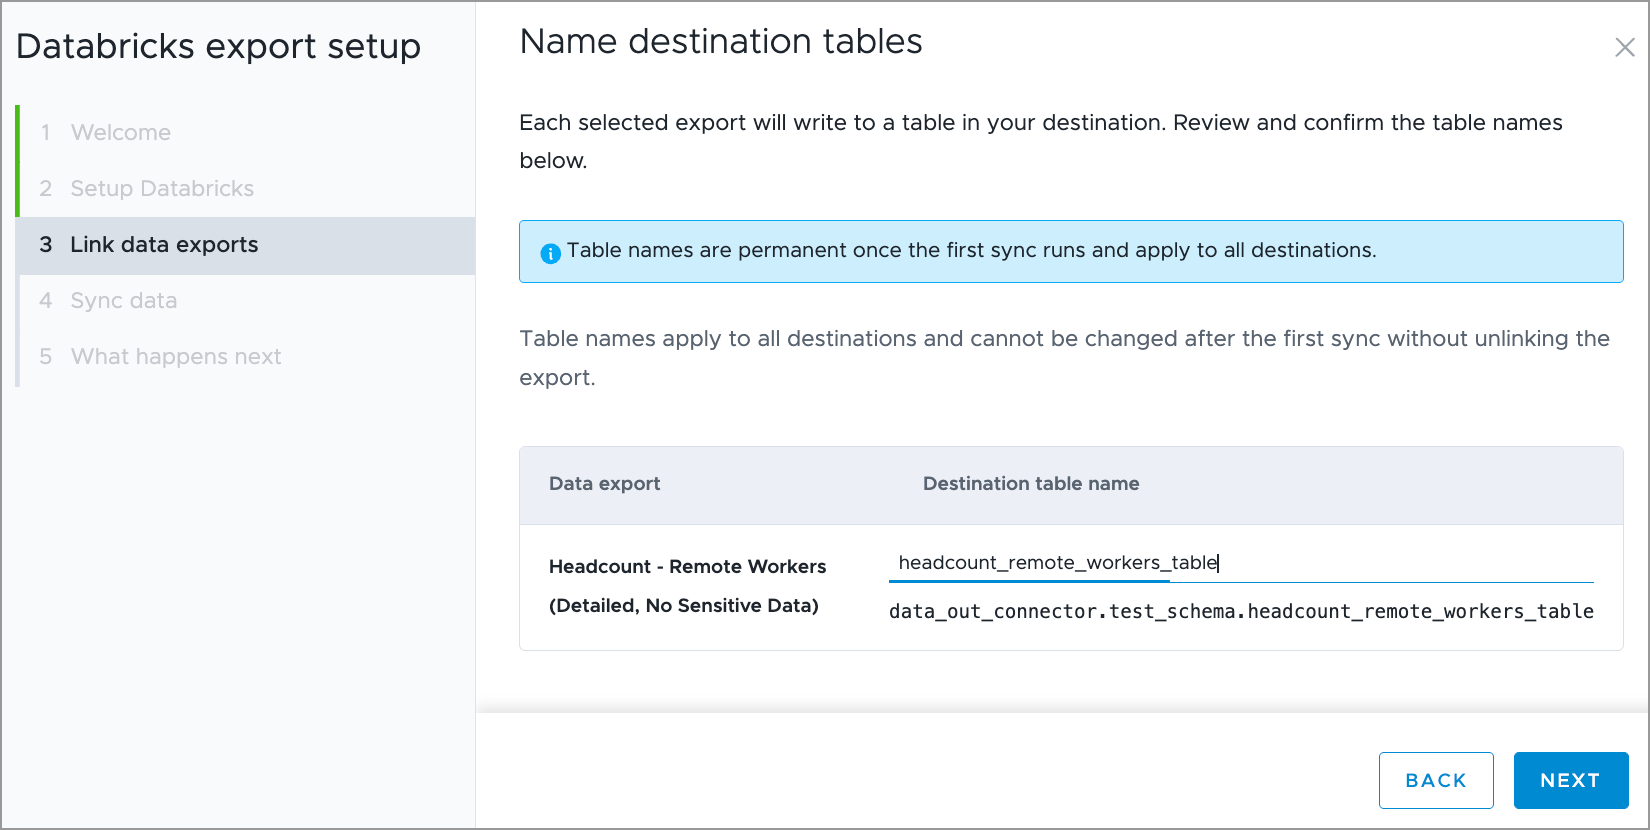
- Click Continue to Naming.
- In Destination table name, type headcount_remote_workers_table. This is the table that Visier will write data to in Databricks from the Headcount Export (No Sensitive Data) Data Export. If you add additional destinations to the export connector, this table writes to the new destination too.
- Click Next.
Step 5: Run an export connector job
Caution: Data export connectors use the data permissions of the user who ran or scheduled the data export connector job. The exported dataset contains all the data that the scheduling user is allowed to see in Visier. After the data transfers, the target system applies its own security model. Configure the appropriate access controls in your target system to restrict data visibility.
- Click Run Now. This syncs data from Visier to Databricks.
Step 6: Schedule a job
Warning: Before you continue, open Databricks and configure the appropriate access controls to restrict data visibility.
After the job runs successfully, publish the project. This makes it possible to configure a job schedule for the export connector.
-
In a project, on the navigation bar, click the Home button
 .
.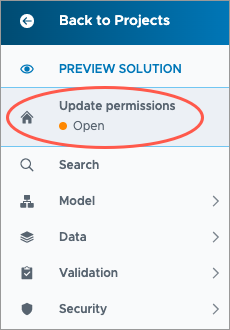
-
Click Release to Production in the upper-right corner of the project. The project must contain at least one revision before the Release to Production appears.
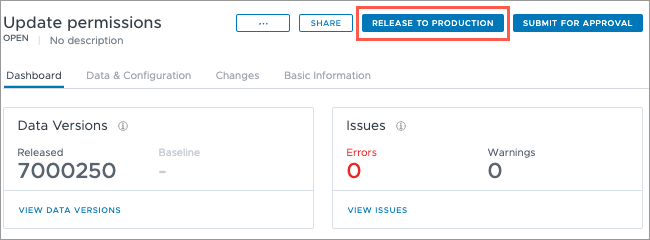
- In Display name, type Publish Databricks Export Connector.
- In Description, type Added a detailed Data Export and linked it to a Databricks data export connector.
- Click Release now.
For more information, see Publish Project Changes.
- On the global navigation bar, click Projects.
- Open the production project.
- Click Data > Export Connectors.
- Select Headcount Export (No Sensitive Data).
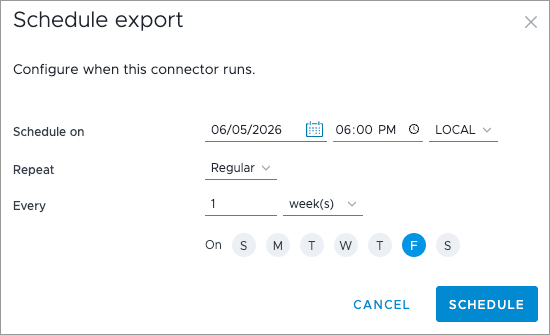
- Click Schedule.
- In Schedule on, set the following:
- Date: June 5, 2026
- Time: 6:00 PM
- Timezone: LOCAL
- In Repeat, select Regular.
- In Every, select 1 week(s) on Friday.
- Click Schedule.