
References
Learn about subject references in Visier.
Overview
The analytic model can consist of multiple analytic objects. In some cases, it may be useful to connect the information stored in one subject with another subject or event. Subject references are special properties that establish the relationship between subjects and events in the analytic model. This allows members of different subjects to link to one another through a forward or reverse reference, providing an additional layer of detail for the relationship between objects. For example, you may want to look at Applicant data when analyzing employees to understand where your top talent was sourced. In this example, the Employee object references the Applicant object to connect an Employee's data to its data as an Applicant, if available.
Tip: Comparison to SQL
In SQL, references are expressed as left outer joins. In Visier, queries are made on a single subject, so subject references allow us to reference a value from a different analytic object that matches the join criteria (key and time), if it exists.
When you create a reference between two objects in Visier, it:
- Allows you to map the ID of the referenced object from a column in your data; for example, your Applicant mapping can map the RequisitionID column to link Applicant to Requisition. This requires that your Applicant data file has a RequisitionID column.
- Allows you to add properties from the referenced object to the Detailed View visual for the first analytic object; for example, you can add Requisition ID to the Detailed View for Applicant.
-
Allows users to group or filter data in an analytic object by attributes in the referenced object; for example, you can group or filter an Applicant metric by Requisition attributes, such as grouping current applicants by requisition location.
To view an entity relationship diagram (ERD) of the references between analytic objects, navigate to Model > Analytic Objects in a project and click Diagram. For more information, see Entity Relationship Diagram.
Grouping and filtering by reverse references
In Visier, reverse references are evaluated independently from each other. This means each group by or filter is evaluated individually and any member who meets one group by or filter is included in the population, even if there are multiple conditions.
When grouping by a reverse reference, such as grouping open requisitions by application source, you can only use one group by because the platform cannot guarantee that the population with additional group bys would equal the overall value.
When filtering by a reverse reference, such as in a Breakdown of Open Requisitions by Organization filtered by Applicant > Interviewed and Applicant > Internal Applicant, the population includes all members that meet at least one filter condition, not all filter conditions. In this example, the visualization will include all applicants who have been interviewed regardless of internal status and all internal applicants regardless of interview status.
If you want your reverse reference filter to only include members who meet all filter conditions, you must create a metric with a parameter. Continuing our Open Requisitions example, to filter by interviewed internal applicants for open requisitions, do the following:
- Create a metric named Open Requisitions with Parameter.
- In the metric's Parameters tab, create a member parameter that selects the Applicant subject. Do not select a dimension. Its object name is Applicant_Attribute_Parameter.
- In the metric's Formula tab, use the following formula:
ApplicantAttribute := property(on Applicant via Requisition validUntil instant filterBy Applicant_Attribute_Parameter aggregate count(Applicant.ApplicantID))
on Requisition validUntil instant filterBy(isOpenRequisition && !isEvergreen && ApplicantAttribute > 0) aggregate count(Requisition.RequisitionID)
- Click Validate.
To check that the metric works, do the following:
- In the metric, click Preview.
- In the Visual title, click Open Requisitions with Parameter.
- Click Edit metric options.
- In the Select a metric dialog, find Open Requisitions with Parameter and click Add metric option, as shown next.
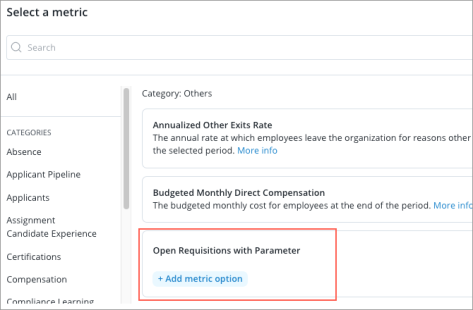
- Click Add filter, and then search for and select Interviewed.
- Click Add filter, and then search for and select Internal Applicant.
- Click Apply.
Result: The visualization updates to show the population of interviewed internal applicants for the selected time period.
Binding and non-binding references
A reference is binding or non-binding.
- Binding: A binding reference requires a value in the reference subject. Each instance of the first object must reference an instance in the referenced subject. Let's say you create a binding reference between Applicant and Requisition. Because it's a binding reference, the first object, Applicant, uses the identifier of the referenced subject, Requisition, as its own identifier to connect each applicant to a requisition. The Requisition identifier must always have a value and cannot be null. Use caution before requiring or using a binding reference. To set up a binding reference, do the following:
- In a project, on the navigation bar, click Model > Analytic Objects.
- Select the analytic object whose reference you want to make binding.
- Navigate to References and then create or select the reference.
- In the Info panel, scroll down to Settings and turn on Binding reference.
- Non-binding: A non-binding reference doesn't require a value in the reference subject. This is the default and expected behavior for most references. Let's say you create a non-binding reference between Employee and Applicant. Because it's a non-binding reference, it is not required to always have an Applicant ID connected to every employee. To make a reference non-binding, do the following:
- In a project, on the navigation bar, click Model > Analytic Objects.
- Select the analytic object whose reference you want to make binding.
- Navigate to References and then create or select a reference.
- In the Info panel, scroll down to Settings and turn off Binding reference.
Forward and reverse references
A forward reference is a connection that establishes a many-to-one relationship between objects, while a reverse reference is a connection that establishes a one-to-many relationship. Reverse references are generated automatically after a forward reference is created. For example, let's say that you want to create a reference between the Applicant and Requisition subjects. A requisition can have many applicants, so you create a forward reference from applicant to requisition (many applicants to one requisition, or many-to-one). The reverse reference from Requisition to Applicant is then created automatically to represent the relationship between an applicant and a requisition (one-to-many).
References specify a "has a" relationship. For example, Employee references Direct Manager. That is, an individual employee has a direct manager. The reverse reference is the relationship between a manager and all their direct reports. Reverse references contribute to values like span of control or group bys that answer questions such as "How many managers have an employee who is top talent?"
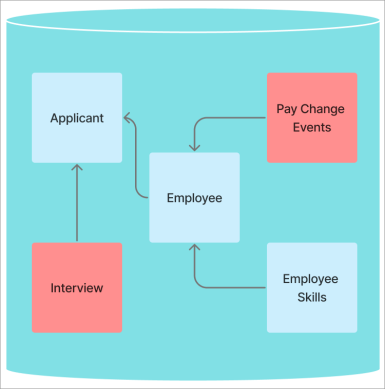
In the following diagram, Employee has a forward reference to the Applicant subject and reverse references to the Pay Change Events event and Employee Skills subject. Additionally, the Applicant subject has reverse references to the Employee subject and Interview event.
Let's say we have the following subjects in our analytic model:
- Employee: Data about the individuals who work in an organization.
- Employee Skills: Data about the skills that employees have.
To connect employee data with skills data, we would add the following subject references:
- A forward reference on the Employee Skills subject to the Employee subject that allows us to see the skills that employees have.
- After the forward reference is created, a reverse reference is automatically created on the Employee subject to the Employee Skills subject that allows us to see employees that have at least one skill.
The following relationships can be established in the analytic model:
- A subject can reference a subject, another subject, or itself
- A subject can't have a forward reference to an event
- An event can't reference another event
Intermediate joins (optional)
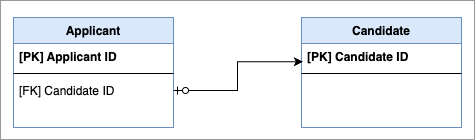
A reference allows you to map the ID of the referenced object from a column in your data; for example, your Applicant mapping can map the CandidateID column to link Applicant to Candidate. This requires that your Applicant data file has a CandidateID column. The ID and the reference are also known as primary and foreign keys. Primary and foreign key are defined as follows:
- Primary key: The unique ID that is auto-generated when you create a subject.
- Foreign key: The reference that connects with the primary key of another subject. It establishes the relationship between analytic objects.
For example, in a forward reference, the link between Applicant and Candidate is illustrated in the following diagram.
However, there are cases, especially when extending the analytic model with business data, where the source subject is not able to link to the primary key of the target subject. In these cases, you may need to create an intermediate join. An intermediate join is a subject reference with an additional property that is used to join (i.e., link) two subjects together.
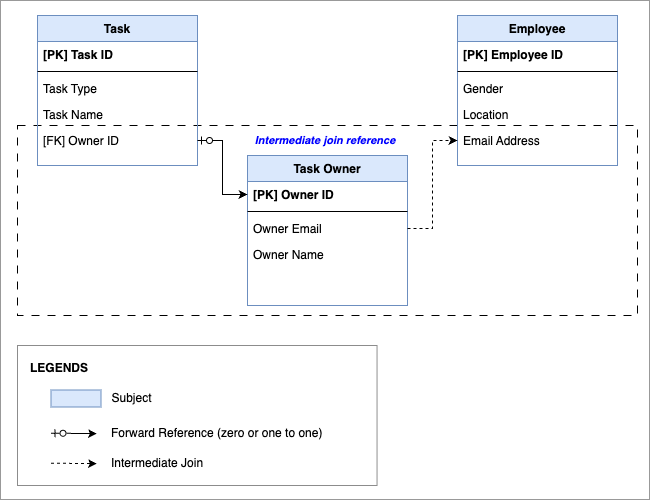
For example, let's say you are extending your analytic model with data related to tasks from an external CRM or ticketing system. You've created two subjects, Task and Task Owner, and you want to link the task data to your existing Employee subject in Visier.
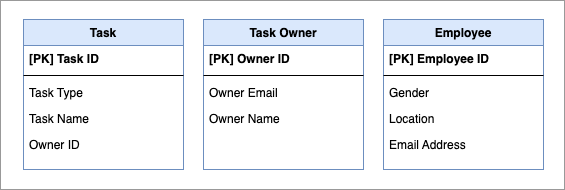
Since Task and Task Owner data originate from a CRM or ticketing system, and Employee data originates from a different HCM system, the Owner ID does not match the Employee ID. This blocks us from creating a forward reference from Owner ID on the Task subject to Employee ID on the Employee subject.
However, the Owner Email property on the Task Owner subject matches the Email Address property on the Employee subject. This additional metadata allows us to create an intermediate join using the Task Owner subject to successfully connect Task to Employee. The intermediate join reference is illustrated in the following diagram.
To add an intermediate join, do the following:
- In a project, on the navigation bar, click Model > Analytic Objects.
- Select the subject that will reference a different subject. For example, if you want Task to reference Employee, select Task.
- In the object, click References.
- Select the reference you want to add the intermediate join to. For example, Task Owner.
- In the Reference dialog, under Intermediate join, click Select Tables and Columns.
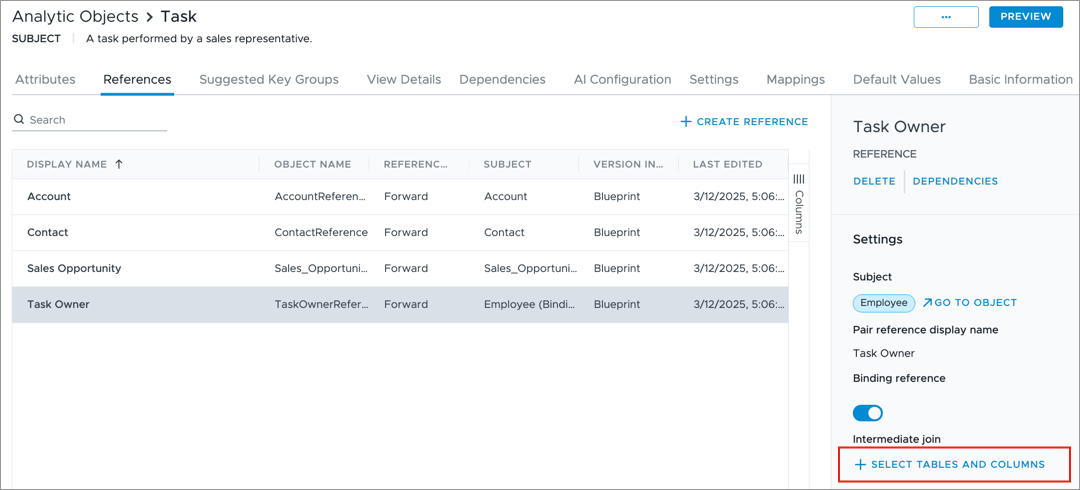
- In Select tables, select the intermediary subject. For example, Task Owner.
- In Select columns, select the properties that contain the additional metadata for both the Task Owner table and the Employee table. For example, Owner Email and Email Address.
- Click Done.
Create a reference between analytic objects
Access requirements
Profiles: Basic Model Developer
Custom profile with these capabilities: Model (Write, Simple)
Reach out to your administrator for access.
To add a subject reference from one analytic object to another, do the following:
- In a project, on the navigation bar, click Model > Analytic Objects.
- Select the object that will reference a different object; for example, if you want Applicant to reference Requisition, select Applicant.
- In the object, click References.
- Click Create Reference.
- In Display name, type a name for the reference. For example, Requisition.
- In Description, type a description. For example, The requisition being applied for.
- In Subject, search for and select the object to reference. For example, Requisition.
- Click Add.
Result: This creates a forward reference from the analytic object to the reference object; for example, a forward reference from Applicant to Requisition. A corresponding reverse reference is automatically created in the referenced object; for example, a reverse reference from Requisition to Applicant. For more information about forward references, see Forward and reverse references.
- Optional: If the reference is binding, select the reference and in the Info panel
 , scroll down to Settings and turn on Binding reference. This means that each instance of the first analytic object must have an associated value in the referenced object. For more information, see Binding and non-binding references.
 - Optional: If the reference is an intermediate join, turn on the Intermediate join toggle, then select the relevant tables and columns. For more information about intermediate joins, see Intermediate joins (optional).
After creating a reference, you can optionally adjust the analytic object's Detailed View properties to include properties from the referenced object. For instructions on how to change the properties displayed in the Detailed View visual, see Configure View Details. You can also configure the object's mappings to map columns related to the referenced object. For more information about mappings, see Add a Mapping.
When finished, publish your project to production to make the changes available to users. For more information, see Publish Project Changes.
Reference types to avoid
Visier doesn't support one-to-many and many-to-many references between objects because a member in the source object must always link to exactly one member in the target subject. All to-many references require linking a source member to multiple target subject members, which confuses grouping and filtering because the platform can't determine which of the many target members to use. This constraint is critical for analytic integrity. Visier requires a single, unambiguous path from the source object to its target subject member. If a source object links to multiple target members (such as an employee to many jobs), any measure attributed to that person (like Headcount) would have conflicting dimensional values (such as two different Job Families simultaneously), making the data unusable for grouping and filtering.
If your data contains these relationships, you can model references in the following ways.
Fix a one-to-many relationship
Think of a candidate who applies to many job requisitions. The Candidate subject links to many subject members in Requisition to represent the candidate's multiple job applications. Although Visier doesn't support one-to-many relationships, it does support many-to-one relationships. To remodel this relationship, you can simply change the reference direction: many requisitions to one candidate.
Fix a many-to-many relationship
Think of candidates and job requisitions where one candidate applies to many job requisitions and one job requisition receives many applications from many candidates. This creates a many-to-many relationship. However, when there are many candidates and many requisitions, the platform can't determine which values to use in grouping and filtering. To remodel this relationship, add an intermediate object, Applicant, that represents a single candidate's application to a single requisition. This changes the relationship into two many-to-one relationships:
- Many applications to one candidate.
- Many applications to one requisition.