
Add a Mapping
Learn how to create new mappings in a project.
Access requirements
Profiles: Data Engineer
Custom profile with these capabilities: Data (Write, Detailed)
Reach out to your administrator for access.
Overview
To connect your source data to objects in Visier, you must create mappings. Mappings define the link between your source data and Visier through column association or formula calculations. This article describes how to create new mappings and select the right settings.
Tip: To learn more, take the Visier University eLearning course: Mapping your data.
If you are conducting an initial data load, you must do the following before you add a mapping.
- Upload data files in Studio.
- Generate sources for each data file. Sources store data for your solution, for example, Employee data is stored in the Employee source. For more information, see Create a source through file upload.
- Create a project in Studio to hold your work. Projects are how Visier handles version control, allowing you to define and edit the solution separately from the current production version of the solution. For more information, see Use Projects for Version Control.
- Optional: Create a data category for the data you are uploading. A data category represents a dataset loaded into Visier that runs on a unique data load frequency. For more information, see Data Categories.
If you are uploading data files that have been previously uploaded, for example, Employee data, and you have added columns, you need to configure the existing Employee mapping. For more information, see Configure a mapping below.
Add a new mapping
Prerequisites: Your Visier tenant must contain data to map and target objects (like subjects or properties) to map data to.
- Do one of the following:
- In a project, on the navigation bar, click Data > Mappings.
- In a project, on the navigation bar, click Model > Analytic Objects. Select an analytic object and then click Mappings.
-
Click Create Mapping and do one of the following:
To
Do this
Manually map each column
Click Manual mapping.
Automatically create mappings and have AI map columns for you
Click AI mapping, select the source you want to create a mapping for, and click Create. After the mapping is created, review and fix the recommended mappings as needed. For instructions, see Configure a mapping.
Note: To automap with AI, your organization must also opt in to AI features. In the global workspace, click Settings > AI Features. The AI model used in this feature was trained on datasets that may contain historical, societal, and statistical biases and can inadvertently perpetuate these patterns in the output. Please review the outputs carefully. For more details on Visier's AI Bias prevention, see Bias Prevention and Responsible AI.
- Select the data category that the mapping belongs to. For more information, see Data Categories.
- Type a display name and description.
-
Select the mapping type, as described next.
- Regular: Mappings that convert records in a source into instances in the analytic model. Conception and termination system events are created for the analytic object from the source's records.
- Auxiliary: Mappings that augment data without the loader creating system events, such as conception or termination events.
- Correction: Mappings that update source data or contain corrected data.
- Lookup: Mappings that connect additional data to the data load target using any column as the key to join tables with the regular mapping. Lookup mappings require formulas or business rules to define the key column and properly augment the additional data. For more information, see Business Rules.
For more information about mapping types, see Mapping type.
- Select a source. For more information, see Sources.
- Select a target. This is the Visier object you want to map your data to.
Note: Not relevant if you created the mapping through Model > Analytic Objects.
- Optional: Type a target group name. This is a label that groups mappings together for updates. Jobs compare the changes between mappings in the same target group so that data in other mappings isn't considered missing or terminated. For more information, see Target group.
- If Correction mapping type, select a correction type. This defines whether the correction is an insertion, edit, deletion, or restatement of existing data. For more information, see Correction.
- Select a data file type to determine how Visier treats your file uploads. For more information, see Data file type.
- Select an override behavior. The override behavior defines how Visier uses newer records to overwrite older records. For more information, see Override behavior.
- Optional: Select or de-select Run automap (without AI). This option is selected by default and will automatically connect source columns to target properties by matching similar names. If de-selected, the automap feature will not run once the mapping is created.
- Optional: Select Create another mapping. This will generate a new Create mapping dialog after the mapping is created.
- When finished, click Create. After the mapping has been created, the next step is configuration. For more information, see Configure a mapping below.
Configure a mapping
To connect your data to Visier objects, you must configure a mapping, including its settings and mandatory properties.
Step One: Select the mapping
- Do one of the following:
- In a project, on the navigation bar, click Data > Mappings.
- In a project, on the navigation bar, click Model > Analytic Objects. Select an analytic object and then click Mappings.
- In Data category, select the data category that the mapping belongs to.
- In the left-hand panel, select the mapping.
- Optional: Enable or disable the mapping. By default, new mappings are enabled. If disabled, the mapping is not included in future data versions.
Step Two: Map properties
- In the mapping, click Map.
- Optional: In Column melting, click Add and then select the columns to melt by including or excluding them. Column melting converts multiple columns into two columns, one representing the melted column name and another representing the melted column value. For more information, see Column melting.
- Optional: To automatically connect source columns to target properties, click Automap. Choose to automap with or without AI. With AI, mappings are based on the nature of your data; without AI, they’re based on name similarity.
Note: To automap with AI, your organization must also opt in to AI features. In the global workspace, click Settings > AI Features. The AI model used in this feature was trained on datasets that may contain historical, societal, and statistical biases and can inadvertently perpetuate these patterns in the output. Please review the outputs carefully. For more details on Visier's AI Bias prevention, see Bias Prevention and Responsible AI.
- In Properties, expand the property you want to map.
Note:
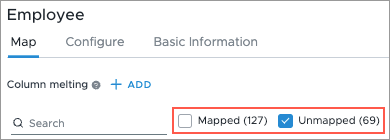
- To quickly find a specific property, use the Search box.
- To filter the list by properties that aren't mapped, de-select Mapped and select Unmapped, as shown next.
- Select one of the following:
- Map from column: Select the data column to associate with the property.
Map from formula: Type a formula to identify the data column to associate with the property and any other details about the property, such as if/else statements. You can optionally click Full Editor to write the formula in full screen, preview the record values, and use the Formula Dictionary.
Note:
- File sources use the Visier Extraction language in Map from formula. For more information about the syntax, see Visier Extraction Language (VEL).
- Table sources use SQL in Map from formula. For more information about syntax, see Use SQL with Table Sources.
- To connect a property to a lookup mapping, click the Connect property to lookup button
 . For more information about connecting a property to a lookup, see Connect property to lookup.
- To check which business rules use a property, click the View business rules button
 .
.
The dialog shows the existing business rules that use the property in the context of any other business rules for the subject. For example, if the Employee subject uses the EmployeeID property in one business rule, the dialog shows all other Employee business rules to help you understand the context of the EmployeeID business rule.
You can go to the business rule in the same tab
 or open the business rule in a new tab
  .
. - In Intermediate Properties, add any required intermediate properties. Intermediate properties allow you to use business rules to load source data for properties that aren't in Visier's analytic model. They are created only for the data load process, either for load targets in target mappings or on a per-mapping basis in lookup mappings. Because they are temporary, they do not persist after the data load is complete. In lookup mappings, you can create intermediate properties for any column in the source data and then use business rules to map those columns to analytic model properties. For example, you can create an intermediate property from the Employee A mapping, which produces an intermediate property for Employee. That same intermediate property can then be reused across other mappings targeting Employee.
Step Three: Change the settings
- In the mapping, click Configure.
- In Mapping type, select one of the following options. For more information, see Mapping type.
- Regular: Mappings that convert records in a source into instances in the analytic model. Conception and termination system events are created for the analytic object from the source's records.
- Auxiliary: Mappings that augment data without the loader creating system events, such as conception or termination events.
- Correction: Mappings that update source data or contain corrected data.
- Lookup: Mappings that connect additional data to the data load target using any column as the key to join tables with the regular mapping. Lookup mappings require formulas or business rules to define the key column and properly augment the additional data. For more information, see Business Rules.
- In Source, select the loaded data source. For more information, see Sources.
- In Target, select the Visier object to map your data to. For more information, see Understand Visier's Analytic Model.
- In Data category, select the data category that the mapping belongs to. For more information, see Data Categories.
- If the mapping is a correction, in Correction type, select Insert, Edit, Delete, or Restatement. For more information, see Correction.
- In Data file type, select Transactional profile, Transactional log, or Temporal. For more information, see Data file type.
- In Override behavior, select the behavior of newer records to overwrite older records. For more information, see Override behavior.
- Optional: In Target group, set the mapping's group. When there are multiple mappings in a target group, jobs compare the changes between mappings in the same target group so that data in other mappings isn't considered missing or terminated. For more information, see Target group.
- Optional: In Implicit mapping, select Enabled. If enabled, Visier maps source columns to properties that have the same name (case insensitive); for example, the column job_name maps to the target property Job_Name. Additionally, implicit mapping automatically maps new source columns after Visier receives new source data. Default is Disabled for all mappings except mappings created by Direct Data Intake API. You can override implicit mappings by mapping the property in the Map tab.
- Optional: In Record filter, type a formula. The record filter defines logic to select or ignore records in a source. To access a preview of the records and the formula dictionary, click Enter full screen. For more information about record filter expressions, see Record filter below.
Step Four: Validate the mapping
- To preview the included or excluded values in the property, click Preview. For more information, see Preview records in a mapping below.
- When finished, run a job to generate a data version in the project. You can then preview your changes in the solution. For more information, see Run a Job.
Connect property to lookup
In a mapping, you can replace or augment a property's values using a lookup mapping.
- Augment: Fills in empty or null values in the property with the values from the lookup mapping.
- Replace: Replaces existing values in the property with the values from the lookup mapping.
The lookup mapping joins the data tables for a target property using a different property. To make this possible, you must identify a property in the target and a property in the lookup mapping to act as keys to join the data tables. The target key and the mapping key work together to find matching records to then join data tables from the target and the lookup mapping.
This workflow generates a business rule that augments or replaces the property's values as defined by you. To connect a subject member ID property, such as EmployeeID, to a lookup mapping, see Connect subject member ID property to lookup.
Step One: Select lookup and behavior
- To connect a property to a lookup mapping, in a mapping, find the property to connect to a lookup mapping and click the Connect property to lookup button .
- In the Connect to lookup dialog, do one of the following:
To create a new lookup mapping, select Create new. You must select a source and explicitly map the EventDate property to a column or formula. If a lookup’s EventDate is later than the date of the record you are trying to augment or replace, the system may return a none or default value up until the EventDate of the lookup. For more information, see EventDate.
- To use an existing lookup mapping, select Use existing. If a lookup mapping already exists that you want to use, select it from the list or turn on Use target group and select a target group from the list.
- Select Augment or Replace.
Note: If Replace, the property must be String data type and mapped to a column or formula.
- Click Next.
Step Two: Select properties
The following screenshot shows the Select properties step.
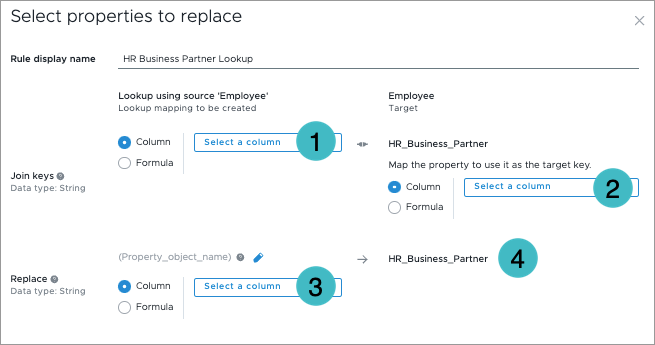
- Mapping key: The mapping property to use as the key. In the screenshot, the mapping key isn't mapped. You can map it to a column or formula for the selected source.
- Target key: The target property to use as the key. In the screenshot, HR_Business_Partner is the target key. If unmapped, you can map it to a column or formula.
- Lookup mapping property: The property whose data will augment or replace the target property's data. In the screenshot, the lookup mapping property isn't mapped. You can map it to a column or formula for the selected source.
- Target property: The property to augment or replace with data from the lookup property.
Note:
- If Replace, the target property acts as the target key joined with the mapping key. In the screenshot, the target property and target key are both HR_Business_Partner. This is so that you can completely replace the target property values. If the lookup mapping can't find a target key value in the mapping key values, the target property value is set to empty.
- If Augment, the target property is different from the target key so that you can fill in nulls or missing values in the property with values from a different property.
To complete this step, do the following:
- In Rule display name, type a name for the business rule; for example, HR Business Partner Lookup.
-
If the target property was unmapped, as shown in the following screenshot, map it now. This is the target key (as shown in the Select properties screenshot).

- If creating a new lookup mapping:
- In the top-right column, map the mapping key.
- In the bottom-right column, map the lookup mapping property. Optionally, assign the property an object name.
- If using an existing lookup mapping, in the bottom-right column, select a lookup mapping property to augment the target property.
Note: The properties in the list are the same data type as the target property (bottom-left column).
- Optional: If Augment, click Add Property to add additional lookup mapping properties to augment the target property. You can then select another target property and lookup mapping property.
Step Three: Connect the properties and review the generated business rule
- Click Next and then click Connect.
Result: Visier generates a business rule. If creating a new lookup mapping, Visier creates the lookup mapping and its properties.
- When finished, click Go to Business Rule or Done.
- Navigate to the business rule and rearrange the business rules into the correct order. For more information, see Business Rules.
Example: Let's say you want to fill in nulls or empty values for the Employee.Pay_Level_Compensation_Maximum property with values from the CompMax property. You have an existing lookup mapping called pay_levels_post_stg that has a CompMax property containing those values.
- In the Connect to lookup dialog, select Use existing.
- Click Select lookup mapping and select pay_levels_post_stg from the list.
- Select Augment and then click Next.
- In Rule display name, type Compensation Maximum Lookup.
- Click Select target key and then select JobPayCodeLevel.This tells the lookup mapping to use JobPayLevelCode as the target key to join the tables together. The lookup mapping key is the MappingKey property. This might be mapped to a JobPayCodeLevel column in the lookup mapping
- Click Select property and then select CompMax. This tells the lookup mapping to augment Employee.Pay_Level_Compensation with values from CompMax.
- When finished, click Next and then click Connect.
- Visier generates the following business rule:
-
Copy
call augmentingMapping(
    "pay_levels_post_stg",
    Employee.JobPayLevelCode,
    {
        Employee.Pay_Level_Compensation_Maximum -> "CompMax",
    }
) - Click Done.
Example: Let's say you want to replace the property Employee.Location.Location_3 with New_Location_Value, but you don't have an existing lookup mapping to do this.
- In the Connect to lookup dialog, select Create new.
- In Source, select the data source for the lookup to use to replace Employee.Location.Location_3, such as Location.
- Optional: To map EventDate for New_Location_Value, in Map 'EventDate', do one of:
- Select Map from column and then select the EventDate column from the list.
- Select Map from formula and then type dateColumn("EventDate") in the formula box.
- Select Replace and then click Next.
- In Rule display name, type New Location Lookup.
- In Lookup using source 'Location', select a column to be the mapping key, such as LocationCode.
- In Replace, click Select a column and then select New_Location_Value. This tells the lookup mapping to replace Employee.Location.Location_3 with values from New_Location_Value.
- When finished, click Next and then click Connect.
- Visier generates the following business rule:Copy
call replacementMapping(
    "Location_Lookup",
    Employee.Location.Location_3,
    "New_Location_Value"
) - Click Done.
Connect subject member ID property to lookup
If a mapping's source doesn't contain the values you need for a subject member ID, you can use Connect property to lookup to retrieve the values from a different source through lookup mappings. This process is called a static map lookup. The mapping's source must have at least one property in common with the lookup source to join the data tables.
A static map lookup has these components:
- Subject member ID property: The ID property to populate using a different source.
- Original source: The source that populates the subject member ID property's mapping.
- Lookup source: The source to use to populate the subject member ID property.
- Mapping key: The property in the lookup source that has values in common with a property in the original source; for example, Company Email. This key joins the lookup source's data table to the original source's data table in the static map lookup.
- Target key: The property in the original source that has values in common with a property in the lookup source; for example, Email Address. This key joins the lookup source's data table to the original source's data table in the static map lookup.
- Mapping value: The property in the lookup source to populate the subject member ID property.
Note: If necessary, you can use many static map lookups to traverse through multiple mappings to get the values you need, called a double static map lookup. This is necessary if the original source doesn't have a common column with the lookup source. In this case, you can use an additional lookup mapping to get from the original source to the lookup source through an intermediate source.
This workflow supports up to two levels of lookup, meaning lookup(lookup(column, file, [defaultValue])), but you can alternatively write an extraction rule that looks up more mappings if you need to. For more information, see Visier Extraction Language (VEL).
Step One: Select lookup and behavior
- In a mapping, find the subject member ID property to connect to a static map lookup and click the Connect property to lookup button .
- In the Connect to static map lookup dialog, do one of the following:
- To create a new static map lookup, select Create new. Like other mappings, you must select a source. Select the lookup source whose property to use to fill in values for the subject member ID property.
- To use an existing static map lookup, select Use existing. Select the static map lookup whose mapping key is a property that has values in common with the original source and whose mapping value is the property whose values you want to use the populate the subject member ID.
- Click Next.
Step Two: Configure lookup connection
The following screenshot shows the Configure lookup connection step.
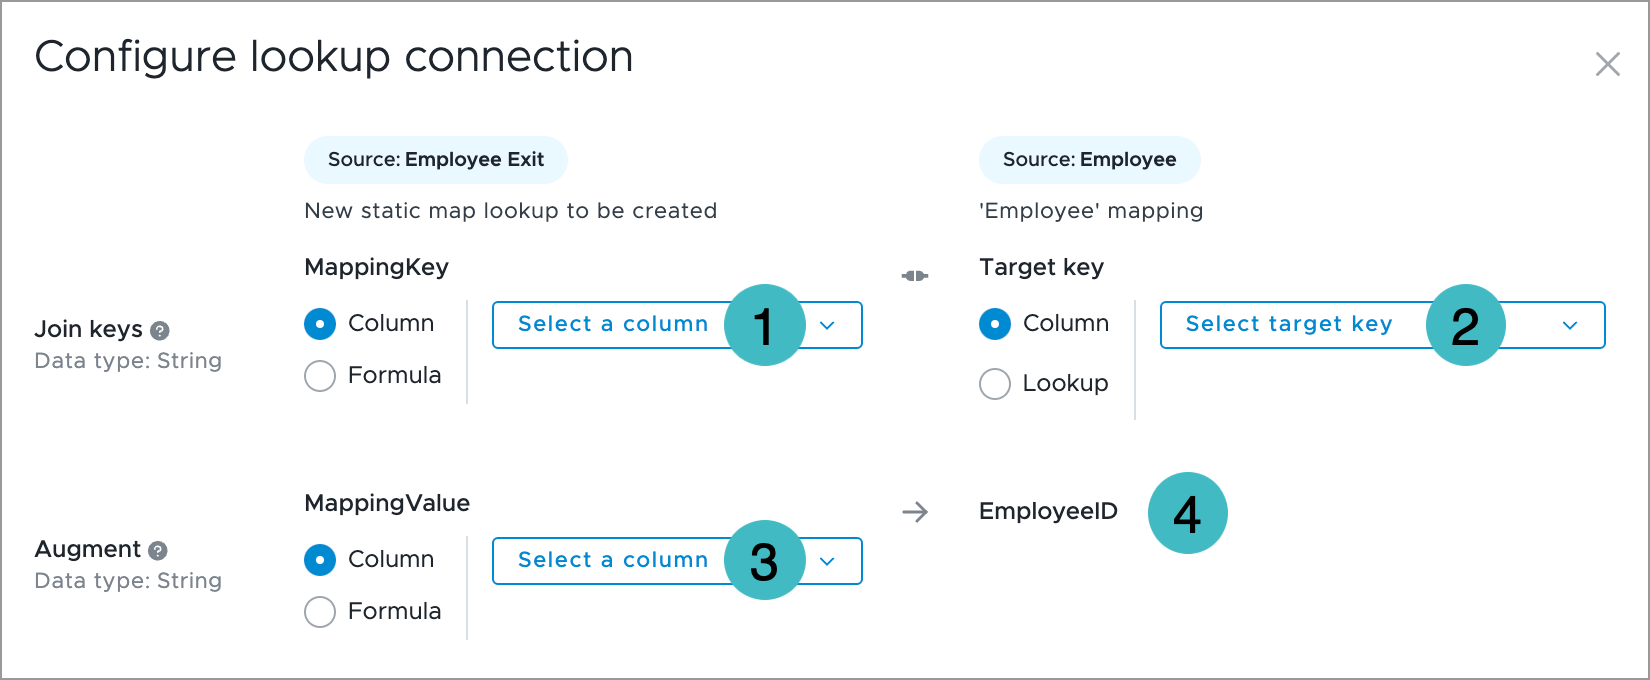
- Mapping key: The mapping property to use as the key. If using an existing static map lookup, this is already mapped. If creating a new static map lookup, select the column or formula that the lookup source has in common with the original source.
- Target key: The target property to use as the key. Select the property that the original source has in common with the lookup source. If performing a double static map lookup, select Lookup to create an intermediate static map lookup or select an existing static map lookup to traverse through to reach the target mapping value.
- Mapping value: The column or formula to retrieve values from for the subject member ID. If using an existing static map lookup, this is already mapped. If creating a new static map lookup, select the column or formula from the lookup source to use to populate the subject member ID.
- Subject member ID property: The property to populate using the static map lookup.
To complete this step, do the following:
- If creating a new static map lookup:
- In the top-left column, map the mapping key. This is the property that the lookup source has in common with the original source.
- In the top-right column, map the target key. This is the property that the original source has in common with the lookup source.
- In the bottom-left column, map the mapping value. This is the property that you want to fill in values for the subject member ID property.
- If using an existing lookup mapping, in the top-right column, map the target key. This is the property that the original source has in common with the lookup source.
- If you select Lookup when mapping the target key, repeat the previous steps to create an intermediate static map lookup. The intermediate mapping must have properties in common with the original source and the lookup source.
- When finished, click Next.
Step Three: Connect the properties and review the mapping formula
- In Connect data, click Connect.
Result: Visier generates a mapping formula for the subject member ID property and, if you selected Create new in Step One or Step Two, creates a lookup mapping.
- When finished, click Done.
- Return to the subject member ID property. It is now mapped to the mapping formula generated by Connect property to lookup.
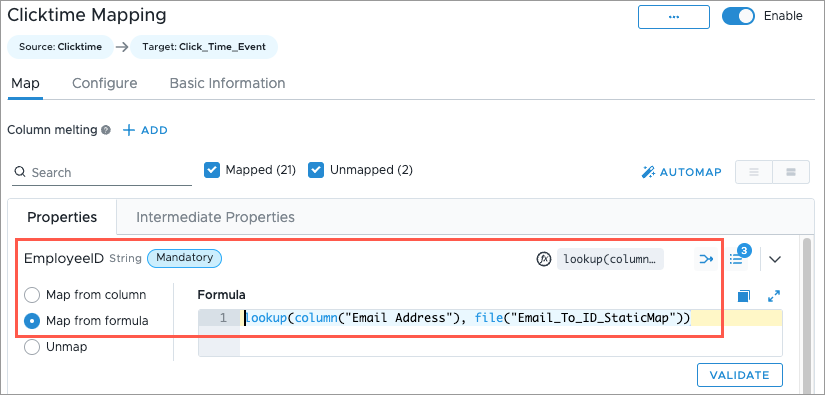
Example: Let's say you have a mapping called Clicktime Mapping. In this mapping, you have an EmployeeID property that you want to populate using the Employee Number column. However, the Clicktime source doesn't have Employee Number.
To populate EmployeeID with Employee Number, you can use a static map lookup that retrieves Employee Number values from an existing lookup mapping. You have an existing lookup mapping called Email to ID StaticMap that you can use because Email to ID StaticMap has Employee Number and a column in common with Clicktime Mapping that you can use to join the data tables. The common column is Email Address in Clicktime Mapping and Company email in Email to ID StaticMap.
In this example, the static map lookup has the following components:
- Subject member ID property: EmployeeID. This is the property you want to fill in values from Employee Number.
- Original source: Clicktime. This is the source for Clicktime Mapping.
- Lookup source: Employee (General). This is the source for Email to ID StaticMap.
- Mapping key: Company email. This is the column that has values in common with a column in the Clicktime source.
- Target key: Email Address. This is the column that has values in common with a column in the Employee (General) source.
- Mapping value: Employee Number. This is the property to use to fill in values for EmployeeID.
To create the static map lookup:
- In the Connect to static map lookup dialog, select Use existing.
- In Select static map lookup, select Email to ID StaticMap, and then click Next.
- In Configure lookup connection, in Target key, select Column.
- In the list of columns, select Email Address.
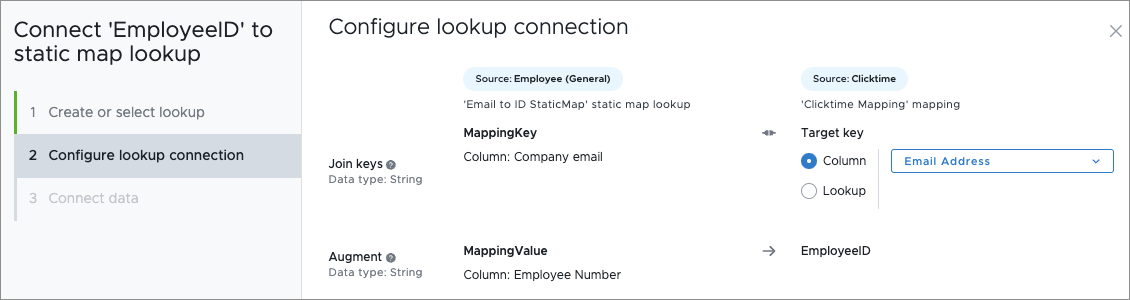
- Click Next.
- In Connect data, click Connect.
Result: The formula lookup(column("Email Address"), file("Email_To_ID_StaticMap")) is generated.
- After the mapping formula generates, click Done.
-
Return to the EmployeeID property. It is now mapped to the generated formula.
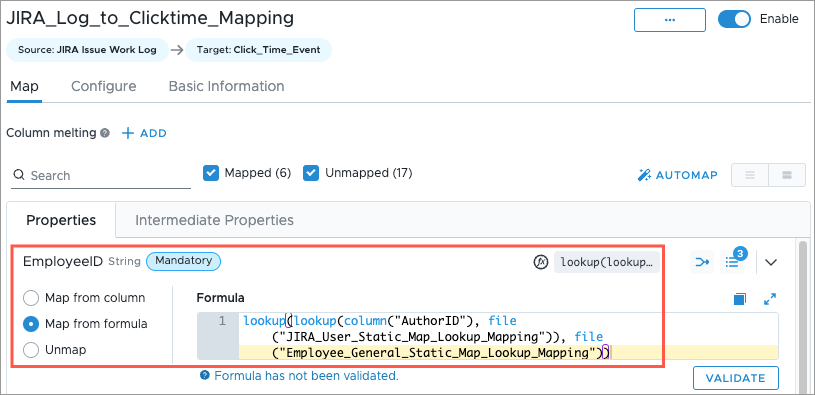
Example: Let's say you have a mapping called Jira_Log_to_Clicktime_Mapping. In this mapping, you have an EmployeeID property that you want to populate using the Employee Number column. However, the JIRA Issue Work Log source doesn't have Employee Number.
To populate EmployeeID with Employee Number, you can create a static map lookup that retrieves Employee Number values through another lookup mapping. However, no lookup mapping exists that you can use for this purpose. You must create a new lookup mapping.
Additionally, the source that has Employee Number does not have any properties in common with JIRA Issue Work Log. As a result, you must create a double static map lookup to get from JIRA Issue Work Log to Employee Number using an intermediate static map lookup.
To create the double static map lookup, you must identify two sources:
- Lookup source: The source that contains Employee Number. This source must also have a property in common with the intermediate source. In this example, you have a source called Employee (General) that has Employee Number and the property AuthorID in common with the intermediate source.
- Intermediate source: The source that has a property in common with the original source and a property in common with the lookup source. This allows you to join the data tables between the original source, the intermediate source, and the lookup source to populate EmployeeID with Employee Number values. In this example, you have a source called JIRA User that has the following properties:
- Jira_AccountID. This property has values in common with AuthorID from the JIRA Issue Work Log original source.
- Email_Address. This property has values in common with Company email from the Employee (General) lookup source.
In this example, the static map lookup has the following components:
- Subject member ID property: EmployeeID. This is the property you want to fill in values from Employee Number.
- Original source: JIRA Issue Work Log. This is the source for Jira_Log_to_Clicktime_Mapping.
- Lookup source: Employee (General). This is the source for the new static map looking you're creating.
- Mapping key: Company email. This is the column that has values in common with a column in the JIRA User intermediate source.
- Target key: Lookup. Because JIRA Issue Work Log doesn't have an email column in common with Employee (General), the target key must be looked up from an intermediate static map lookup.
- Mapping value: Employee Number. This is the property to use to fill in values for EmployeeID.
To create the double static map lookup:
- In the Connect to static map lookup dialog, select Create new.
- In Source, select Employee (General). This is the lookup source to retrieve Employee Number values from.
- Click Next.
- In MappingKey, select Column and then, in the list of columns, select Company email. This is the property that has values in common with a column in the JIRA User intermediate source.
- In MappingValue, select Column and then, in the list of columns, select Employee Number. This is the property to fill in values for EmployeeID.
- In Target key, select Lookup.
Result: The section Use static map lookup for the intermediate target key appears above the new static map lookup you are creating.
Next, you'll create the intermediate static map lookup.
- In Use static map lookup for the intermediate target key, select Create new.
- In Source, select JIRA User. This is the intermediate source to join with the Employee (General) lookup source's data table.
- In MappingKey, select Column and then, in the list of columns, select Jira_AccountID. This is the property that has values in common with the AuthorID column in the JIRA Issue Work Log original source.
- In Target key, select AuthorID. This is the original source property that has values in common with the intermediate source's property, Jira_AccountID.
- In MappingValue, select Column and then, in the list of columns, select Email_Address. This is the property to fill in values for the intermediate target key lookup.
- When finished, click Next.

Now you can connect the data to generate the mapping formula!
- In Connect data, click Connect.
Result: The formula lookup(lookup(column("AuthorID"), file("JIRA_User_Static_Map_Lookup_Mapping")), file("Employee_General_Static_Map_Lookup_Mapping")) is generated.
- After the mapping formula generates, click Done.
- Return to the EmployeeID property. It is now mapped to the generated formula.
Preview records in a mapping
Access requirements
Profiles: Data Engineer
Custom profile with these capabilities: Data (Write, Detailed) and Internal Debugging
Reach out to your administrator for access.
After mapping properties to columns or formulas and optionally applying a record filter, you can preview the records in the mapping. You can access record previews in the following ways:
- To preview values for the entire mapping, in Record filter, click Enter full screen. In the record filter dialog, the Preview tab shows the record preview. You can filter by all records, records included by the mapping's record filter, or records excluded by the record filter.
- To preview values for a specific property, expand a mapped property and then click Preview.
Note: Mappings whose extraction rule uses lookup can only preview data from some of the most recent files. The results may be incomplete.
The following screenshot shows the record preview for the entire mapping and record filter (if available). In this example, the mapping is Employee.
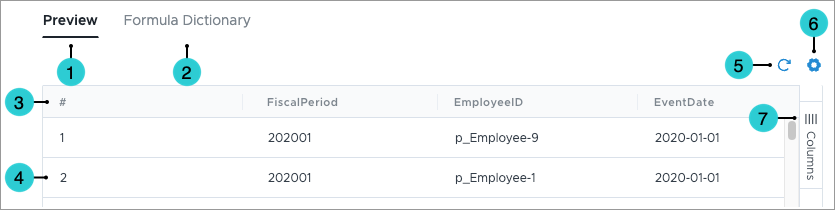
- Preview: Preview mapping records.
- Formula Dictionary: Access functions in the formula dictionary.
- Column: The columns associated with the record values.
- Row: The values associated with a record.
- Refresh: After selecting a different record view, adding a record filter, or changing the unique values setting, click Refresh to update the record preview.
- Settings: Change the file for the mapping, change the record view, or turn on unique values only.
- File: The data file from which to view records.
- Column: If column melting is set, select one of the columns to preview values for.
- Record view: The records to preview. The record views are affected by the record filter. If you select a different record view, always click Refresh to update the record preview.
- Unique values only: Whether the record preview shows all values or only unique values. If enabled, each unique value in the mapping is listed once. If you change the unique values setting, always click Refresh to update the record preview.
- Columns: Select or de-select the columns to include in the preview.
The following screenshot shows the record preview for a specific property. In this example, the property is EventDate.
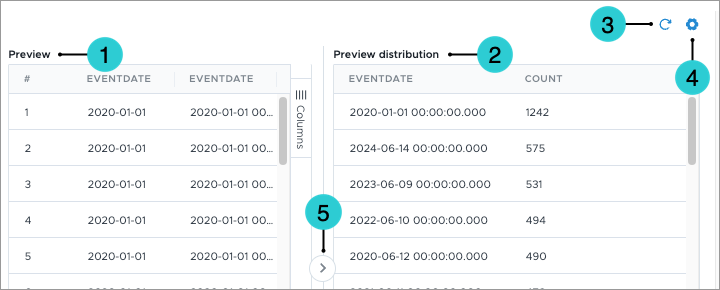
- Preview: A table containing the records in the mapping. The records in the table are affected by the Record view selection, as described next.
- Preview distribution: A table containing the count of each value in the mapping.
- Refresh: After selecting a different record view, adding a record filter, or changing the unique values setting, click Refresh to update the record preview.
- Settings: Change the file for the mapping, change the record view, or turn on unique values only.
- File: The data file from which to view records.
- Column: If column melting is set, select one of the columns to preview values for.
- Record view: The records to preview. The record views are affected by the record filter. If you select a different record view, always click Refresh to update the record preview.
- Unique values only: Whether the record preview shows all values or only unique values. If enabled, each unique value in the mapping is listed once. If you change the unique values setting, always click Refresh to update the record preview.
- Expand/Collapse: Expand or collapse the Preview table.
Record filter
Record filters are Boolean expressions used on source columns to exclude or include data. If the record filter expression evaluates to true for a record, Visier selects the record. If false, Visier ignores the record.
Each record filter expression may include the record's attributes and information associated with the source, such as the name of a file, and date of the folder containing the file.
The following table provides examples of record filter expressions.
Note: Record filters do not support static map lookups. For more information about the syntax to write record filters for file sources, see Visier Extraction Language (VEL). For more information about the syntax to write record filters for table sources, see Use SQL with Table Sources.
| Example | Record filter expression |
|---|---|
| Exclude records with blank employee IDs | column("EmployeeID") != "" |
| Exclude interns and cooperative education workers | column("EmployeeType") != "Student" |
| Exclude records for employees in Denver | column("Location-Location_3") != "Denver" |
| Exclude records with an event date before a threshold | date(column("EventDate"), dateFormat("yyyy-MM-dd")) > date("1997-07-01", dateFormat("yyyy-MM-dd")) |
| Combine two filters with Boolean operators: Exclude blank ID or students column | column("EmployeeID") != "" or column("EmployeeType") != "Student" |
| Combine two filters with Boolean operators: Exclude records with blank event date or employee ID | column("EventDate") != "" OR column("EmployeeID") != "" |
| Comment complicated logic | // This is a comment. This filter selects active employees with a start date after 1995-Jan-01. |
Column melting
Column melting is a way to combine, or melt, multiple source columns into the same analytic object property. This is done by pivoting vertical columns into horizontal records in a single mapping. This is useful when you have data in a wide format and want to map it into something that expects data in a tall format. Column melting is applied to columns with string values such as pay types like Bonus and Salary, or amount-related values like Currency. This converts multiple columns into two columns, one containing the column names and another containing the column values. This operation can be performed on new or existing columns in your project. Begin by selecting columns to melt:
- In a project click Data > Mappings.
- Select a mapping.
- Next to Column melting, click Add.
- Select columns to be melted.
- Include: Combines all selected columns into two melted columns.
- Exclude: Combines all non-selected columns into two melted columns.
- Click Done.
Next, you must map all selected columns using a formula. Different data types require different formulas, so the formula used for amount values will be different from the formula used for string values. To map your column using a formula:
- Click the column containing the amount values to be melted.
- Select Map from formula.
- Enter column(meltColumns()) into the formula field.
- Click Validate.
- Click the column containing the string values to be melted.
- Select Map from formula.
- Enter meltColumns() into the formula field.
- Click Validate.
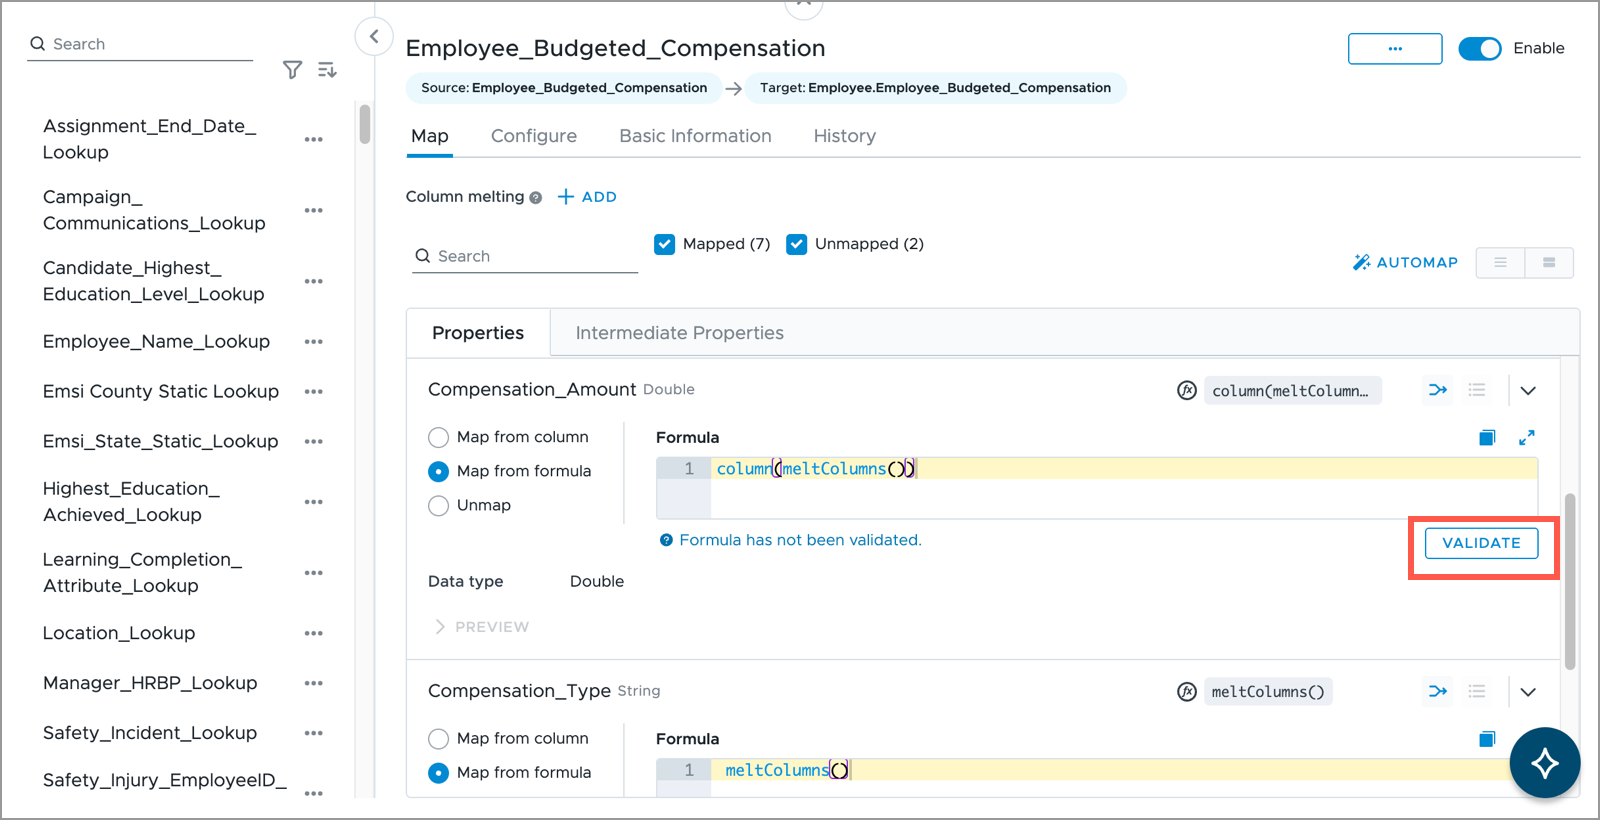
- After all property formulas have been validated, click Create Mapping.
Your data has now been converted from a wide format to a tall format. The example below uses compensation data to show how data is displayed after column melting. The Salary, Bonus, and Allowance columns in the original data are melted into the meltColumns() column. The values for the Salary, Bonus, and Allowance columns are melted into the column(meltColumns()) column.
How the data is represented in the original wide format:
|
Snapshot Date |
Employee ID |
Salary |
Bonus |
Allowance |
Currency |
|---|---|---|---|---|---|
|
2021-09-30 |
E1234 |
100,000 |
10,000 |
5,000 |
USD |
|
2021-10-31 |
E1234 |
100,000 |
10,000 |
5,000 |
USD |
How the data is represented after being melted to a tall format:
|
Snapshot Date |
Employee ID |
meltColumns() |
column(meltColumns()) |
Currency |
|---|---|---|---|---|
|
2021-09-30 |
E1234 |
Salary |
100,000 |
USD |
|
2021-09-30 |
E1234 |
Bonus |
10,000 |
USD |
|
2021-09-30 |
E1234 |
Allowance |
5,000 |
USD |
|
2021-10-31 |
E1234 |
Salary |
100,000 |
USD |
|
2021-10-31 |
E1234 |
Bonus |
10,000 |
USD |
|
2021-10-31 |
E1234 |
Allowance |
5,000 |
USD |
EventDate
The EventDate property represents the effective date of change, such as:
- Profile change event: An update to an attribute, such as a name change or department move.
- Regular event: A specific point-in-time occurrence, for example, a Compensation_Payout.
Because the platform processes data chronologically, an EventDate is required for all mappings, with the exception of static map lookups which have no time axis. For more information, see Static mapping.
For more information about how Visier processes source data, see Data Processing.