
Sources
Sources store data for your solution and are used to map to data load targets, such as analytic objects.
Access requirements
Profiles: Data Engineer
Custom profile with these capabilities: Data (Read, Simple)
Reach out to your administrator for access.
Overview
Data that you send to Visier is stored in sources. For example, Employee data is stored in the Employee source. Each time a new Employee data file is sent to Visier, it is added to the Employee source. Sources are the building blocks for data in Visier. They are the raw materials to map your data to Visier's analytic model.
Tip: To learn more, take the Visier University eLearning course: Loading data manually.
Visier supports the following source types:
- File sources: File-based containers that use regex and override behavior to manage data. For more information about acceptable files, see Data File Guidelines.
- Table sources: Row-based containers that support incremental updates and SQL transformations during sync. For more information, see Use SQL with Table Sources.
The following table describes the differences between the behavior of each source type.
|
File sources |
Table sources |
|---|---|
|
Each data transfer or extraction outputs to a unique file. |
Each data transfer or extraction directly modifies the same table. |
|
Use Visier Extraction Language to query records in a source's Records tab or SQL to query sources in the Data > Query room. For more information, see Query Source Data. |
Use Spark SQL to interact with the table data. For more information, see Use SQL with Table Sources. |
|
To delete an individual's data, such as for GDPR compliance, open a Visier Technical Support ticket to remove the information one-by-one from every extracted file. |
To delete an individual's data, such as for GDPR compliance, use a DELETE SQL query on the table without contacting Visier Technical Support. Note: The snapshot retention period specifies how long to keep previous snapshots of tables before permanently deleting them. You can set the retention period between 1 and 180 days. The default is 3 days. |
|
The data is available in the Data Transfers room. For more information, see Navigate Studio. |
The data is available in the associated table source in the Sources room. For more information, see Sources. |
In the Sources room, you can:
- Select a source.
- Create new sources.
- Export or import source definitions.
- View how many columns and records are in a source.
- View the time that the source was created and the time that the last file was loaded to the source.
- See if the source is used in production, in a project, or not used.
After you select a source, you can see its information and settings, as shown in the following screenshot.
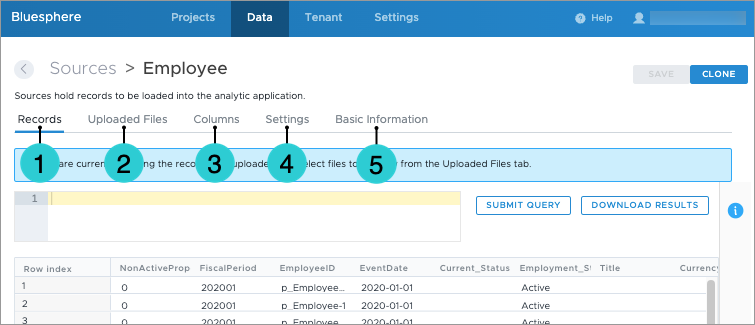
- Records: All the data records in the source. To add or remove records from a source, you must upload new data files or exclude previously-uploaded files from the source. For more information, see Add or Remove Records from a Source.
- Uploaded Files: All the data files connected to the source. You can preview, download, include, exclude, and delete files from the source.
- Columns: The columns that the source's data files can contain. You can create new source columns, edit a column's data type, and set whether a column is mandatory and allows empty values. For more information, see Source Column Settings.
- Settings: The settings for the source. For more information, see Source Settings.
- Basic Information: The display name, object name, and description of the source.
Tip: To see how your existing sources connect to mappings, rules, and objects in Visier, see Data Flow Visualization.
Frequently asked questions
How do I remove a file that accidentally went to an existing source?
If the data file name matches the regex of an existing source, the source attempts to load the data file. To remove the file from the source it connected to, do one of the following:
- Delete the file from the Data Transfers room. This removes the file from the source and the Data Transfers room.
- Delete the file from the source's Uploaded Files tab. This removes the file from the source and the Data Transfers room.
Next, check the source's regex in the source's Settings tab. The regex tells the source which files to load. For more information, see File regex. Then, rename the file locally with a name that doesn't match an existing source's regex and upload it to Visier again. It shouldn't connect to the source anymore!
I uploaded one file, but I see it listed multiple times in Data Transfers. Why is this happening?
If multiple source regexes are broad enough, more than one source may attempt to load the same file. The following screenshot shows that the file employee.csv connected to two sources: Employee and Employee_Exit. Because two sources received the employee.csv file, both sources now contain a copy of the file.
![]()
More commonly, the following screenshot shows that the file employee.csv connected to the intended source, Employee, but failed to connect to another source.
![]()
To learn why the error occurred, in the Issues column, click Error. In this scenario, the Supervisory Hierarchy source attempted to load the file because its regex, Employee.*/.csv, is too broad.
![]()
We recommend that you delete the file you weren't expecting, and then look into renaming the file so it isn't caught by multiple regexes in the future or updating your regexes to be more specific. For more information, see File regex.
What's the safest way to augment my existing data?
If you want to add new properties to a subject that already has data in Visier, do one of the following:
- Create a new source for the additional data. This is the safest way because any new data that you add is contained in a different source than your existing data in production, so your production data is not impacted. For more information, see Create a Source.
- Add a new column to the data file. If you add a new column to your data file that regularly gets sent to Visier, Visier detects the new column and adds it to the source columns. By default, Visier sets the new column as not mandatory. If the source is used in production, be cautious about adding new data columns or changing the column settings because it will impact your production version the next time a data version generates. A new column impacts your production version after you map it to a Visier object in a project. For more information, see Add a Mapping.
Warning: Do not set the new column as mandatory. The source's column settings define what is expected for all data files connected to the source, including files that the source previously received. If you set the new column as mandatory in the source, all previous data files that do not contain the column will be excluded! For more information, see Source Column Settings.
How can I test a restatement file for an existing production source?
In situations where you need to correct data that is already in Visier, usually you'd correct data as part of your regular rolling restatements. However, let's say you need to correct an older time period that isn't covered by your rolling restatements anymore.
You might choose to do the following workflow if you have a complex data loading routine where the production source is used in multiple mappings because this workflow avoids the time-consuming and error-prone process of recreating multiple mappings for testing purposes.
Caution: We only recommend this approach for users who are comfortable working with production sources and including and excluding files.
Prerequisites:
- Have your restatement files ready.
- Check your regular data loading schedule and how long it takes to run a processing job. For more information, see Jobs. Do this workflow when there are no processing jobs currently running and you have enough time before the next processing job runs.
- Check the regex of the source for which you want to restate data. Give your restatement data files easily-identifiable names that will not be caught by the existing source's regex. You can usually prefix the filename with TEST_ or RESTATE_ to avoid the regex.
In this workflow, you will upload test restatement files and manually connect them to the production source.
- In the global workspace, in Data > Data Transfers, upload your test restatement file. The file should not be caught by your existing production source's regex. You should see a warning that the file is not connected to any sources.
- Hover over the file and, in the Actions column, click the Reassign button
 to manually assign the file to the production source.
 - In the Reassign dialog, select the production source and click Assign. If successful, the data file won't have any warnings or errors in the Data Transfers room.
Then, you'll create a draft project and run a processing job in the project.
- Navigate to Projects and then create a new project. For more information, see Create a Project.
- In the project, on the navigation bar, click Data > Data Categories.
- Run a job for the data category that processes your production source. For more information, see Run a Job.
- On the navigation bar, click Data > Jobs to monitor the progress of the job. For more information, see Jobs.
After the job completes, you will go back to the source and exclude the test restatement file from the source to prevent it from being included in your regularly scheduled data load. This ensures that you won't impact production while testing the restatement files, but you have a data version in a project that includes the test files so you can validate your work.
- After the job completes successfully, on the navigation bar, click Back to Projects.
- On the global navigation bar, click Data > Sources.
- Select the production source and then click Uploaded Files.
- Exclude the test restatement file. For more information, see Exclude files from a source.
Next, return to your project to validate the data version. After you've validated the restatement at your own pace, you can include the file in the source for future data loads. Do one of:
- Go back to the source and include the restatement file. The next scheduled data load will process the restatement file.
- Rename the restatement file locally to match your production file naming pattern and then upload the file again.
In this section