
Business Rules
A business rule transforms existing data.
Access requirements
Profiles: Data Engineer
Custom profile with these capabilities: Data (Write, Detailed)
Data required: Access to all data such as the Super Admin permission
Reach out to your administrator for access.
Note: You can assign the Data (Read, Simple) profile capability to provide view-only access to the Rules room.
Overview
You can use business rules to add, remove, or edit data in your event stream. This prepares the data for use in Visier.
Note: The event stream is a set of stages that represents your data in Visier throughout the process of applying rules to the data. When debugging data issues, you can look at the event stream to view data after each stage. For more information, see Debug Inspector.
Business rules transform subject data in Visier. For example, you can write business rules for the Employee subject to transform your employee data before the data becomes visible to users. Each business rule defines logic that is applied to one member of a subject at a time.
Example: If an employee experiences an increase in pay level, add a promotion event.
when changeIn(Pay_Level) and (currentValueOf(Pay_Level) > previousValueOf(Pay_Level))
    add Promotion(Promotion_Reason := "Pay Level Increase")
This rule states that whenever a change to the Pay_Level property happens on the Employee subject and the current value of the Pay_Level property is greater than the previous Pay_Level value, add a Promotion event with the Promotion_Reason property set to "Pay Level Increase".
Create a business rule
- In a project, on the navigation bar, click Data > Rules > Business Rules.
- Click Create Rule.
- Select the data category that the rule belongs to. For more information, see Data Categories.
- Select Business rule.
- Type a display name and description.
- Select the subject that the rule applies to.
- Optional: In Formula, type the business rule formula. If you aren't ready to add the formula, you can add the formula after creating the rule. For more information, see Visier Business Rule Language (VBRL) and Business Rules Examples.
- When finished, click Done.
Configure an existing business rule
- In a project, on the navigation bar, click Data > Rules > Business Rules.
- In Data category, select the appropriate data category.
- Optional: To change the order of the rules, click the Reorder button
 and then, in the Reorder business rules dialog, click and drag a rule to reorder it. When finished, click Done.
 - Select a rule from the list.
Note: If you hover over a rule, you can do the following actions:
- Add to custom content export: Add the rule to the list of custom content available for export. For more information about the custom content export, see Export Custom Content.
- Delete: Delete the rule.
- Do any of the following:
- Enable or disable the rule. By default, new rules are enabled. If enabled, the rule is active and will run against the subject's data during data load jobs.
- To change the subject that the rule is applied to, in Subject, select a new subject.
- In the formula editor, write or change the rule's formula. The formula defines the transformations to make to the data. When finished, click Validate.
Note: To learn how to write a business rule formula, explore the Formula dictionary below the formula editor.
- When finished, click Preview. You can use the business rule preview tool to validate your rule against real data without generating a new data version. For more information, see Preview the business rule below.
- When finished, publish your project to production.
Preview the business rule
Access requirements
Profiles: Data Engineer
Custom profile with these capabilities: Data (Read, Detailed) and Internal Debugging
Reach out to your administrator for access.
Business rule preview is a tool used to check the output of a new or modified business rule without having to run a new data version, which greatly reduces time spent during business rule authoring.
Note:
- Users must have access to all data, such as the Super Admin permission . Full data access is crucial for efficient and accurate validation. To identify where the transformation has gone wrong, you must have visibility to all events passing through the system.
- Before creating a new business rule or modifying an existing rule, make sure you run a data version with one of the following Generate debugging info settings:
- For stages and records
- For stages, records, and rules
- For more information about Generate debugging info, see Schedule a Job.
Business rules are run on an event stream sample that exist per subject. Event stream samples can be edited. Most of the time, the sample should be imported from debug inspector partitions.
To access business rule preview:
- Open a project.
- Navigate to Data > Rules.
- Select a rule from the list.
- Click the Preview tab found below the rule formula.
The following image shows the different options that are available when setting up the business rule preview.
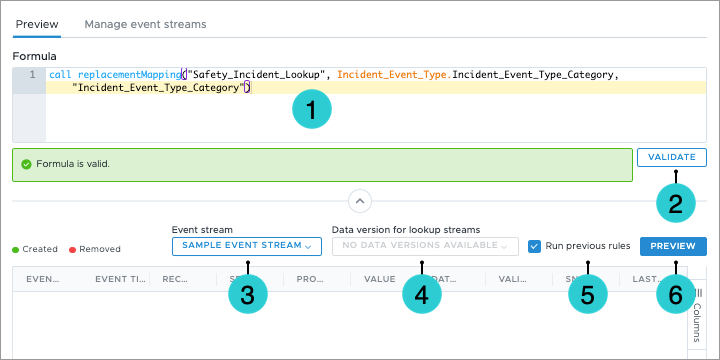
- Formula: The business rule formula.
- Validate: An action to check that the formula is valid.
- Event stream: A sample event stream to test the rule. The preview checks the event stream to see if the rule does anything, and shows what the rule will do. You must create an event stream before running the business rule preview tool. For more information, see Manage event streams.
- Data version for lookup streams: The data version that you want to pull lookup stream information from.
- Run previous rules: An optional action to run the rules preceding the selected business rule.
- Preview: An action to preview the business rule with the selected settings.
After selecting your business rule preview settings and clicking Preview, the table below will populate with information about the subject, including:
- Event Type: The type of event that occurred. This can be Profile Change, Conception, Termination, or Regular. For more information, see Debug inspector columns.
- Event Time: The date and time that the event occurred.
- Record Period ID: The date and time that the record experienced an event.
- SEQ #: If set during data extraction, this indicates the sequence number of the event.
- Property Name: The object name of the property that experienced an event.
- Value: The new value of the property.
Manage event streams
In the business rule preview, you can create test event streams to validate that the business rule is working as expected. Before you can use the business rule preview tool, you must first create an event stream through which to run the business rule. In the event stream, you can specify fake data or bad data to test the business rule.
You have the following options to add events to the test event stream:
- Add event: This allows you to specify the event type, event date, and any properties associated with the event.
- Import events: This allows you to use a specific data version, event stream stage and substage, and subject ID on which to run the business rule.
After you create an event stream and add or import events in the stream, you can then use the event stream in business rule preview. To use business rule preview, see Preview the business rule.
Create an event stream
- In a project, on the navigation bar, click Data > Rules > Business Rules.
- Select a rule from the list.
- Click Manage event streams > Create event stream.
- Optional: To change the event stream display name, click the More button > Edit, and then type a new display name and click Done.
Result: The test event stream is created and ready to add or import events.
Add event
- In a project, on the navigation bar, click Data > Rules > Business Rules.
- Select a rule from the list.
- Click Manage event streams.
- Select the event stream in which you want to add a new event, and then click Add Event.
- In the Add event dialog, in Event type, select one of the following event types.
- Profile Conception: Indicates the first time a profile exists for temporal data. Not applicable to transactional data.
- Profile Termination: Indicates the first timestamp that a profile doesn't exist for temporal data. Not applicable to transactional data.
- Profile Change: Indicates a change in an attribute. For example, an employee's last name.
- Event: Indicates a change to a specific event. For example, a change to an employee's compensation payout.
- In Event date, set the date that the test event should occur.
- If Profile Change, select the property on which you want to test a change and then type the change value.
- Optional: To add additional events, select Add another event.
- When finished, click Add.
Import events
- In a project, on the navigation bar, click Data > Rules > Business Rules.
- Select a rule from the list.
- Click Manage event streams.
- Select the event stream in which you want to import events, and then click Import Events.
- In the Import events dialog, in Data version, select the data version in which to add the test events.
- In Stage, select the data pipeline stage in which to start the event stream from. For more information about stages, see Event stream loader.
- In Substage, select the substage to preview. Available if the data version was generated with debugging information for stages, rules, and records. For more information about generating debugging info, see Schedule a Job.
- In Subject ID, type the ID of the subject to test the business rule on.
- When finished, click Import.