
Create a Process Concept
Learn how to create, configure, and customize a process concept.
Access requirements
Profiles: Basic Model Developer
Custom profile with these capabilities: Model (Write, Simple)
Reach out to your administrator for access.
Overview
When building or modifying a process concept, you must first customize the process stages and outcomes. The stages classify what part of the process a member is in; for example, if an applicant's application has been reviewed, they are in the Reviewed stage. The outcomes classify the end of the process, such as Hired or Rejected for the applicant process. You can also define metrics to make calculations based on the stages and outcomes, such as Count in Applied Stage or Time to Success.
After you set up the stages and outcomes, you can then configure the concept by selecting which dimension members belong to each stage or outcome.
For a tutorial that walks you through creating a new concept, see Create New Employee Attributes and Metrics.
Create a process concept
- Do one of the following:
In a project, on the navigation bar, click Model > Concepts.
In a project, on the navigation bar, click Model > Analytic Objects.
Select an object.
In Attributes, click Create Attribute > Concept.
- Select Process, and then click Next.
- Select an analytic object, and then click Next.
-
Type a display name and description.
- Click Create.
Customize a process concept
For an analysis unique to your organization, customize your process concept by modifying or adding ways to structure processes through stages, outcomes, metrics, and properties.
-
In a project, on the navigation bar, click Model > Concepts.
-
Select a process concept.
- In the Customize tab under Status dimension, click Select Dimension to pick a dimension to track the process concept.
- Choose a dimension from the list. This determines the pipeline that the process concept represents.
- Create stages and outcomes for the process. See Add stages and outcomes.
- Create metrics and properties for the process. See Add metrics and properties.
- Optional: Select a participation selection concept. See Select a participation concept.
- Optional: Select an on hold selection concept. See Select an on hold concept.
- Optional: Enable or disable the stagnation toggle. See Set the stagnation duration.
Example: Applicant Process
Let's say you've created a process concept on the Applicant subject. To customize the concept, you select the status dimension Applicant Stage. This defines your Applicant Process concept as tracking the progress of an applicant through applicant stages (such as applied, interviewed, offered).
Add stages and outcomes
Stages and outcomes track the process and end result of a subject through your process pipeline.
Add stages
Use stages to track the progress of subjects through the process concept's pipeline.
-
In a project, on the navigation bar, click Model > Concepts.
-
Select a process concept.
-
Navigate to Customize.
- Under Structure, click Stages>Add Stage.
-
Type a display name and description.
- Add as many stages as required.
- Click Add.
Example: In the Applicant Process, the stages are Pre-Applied, Applied, Screened, Qualified, Interviews Started, Interviews Completed, Selected, Offered, Offer Accepted, Background Checked.
Add outcomes
Use outcomes to indicate the end result of a subject's process journey.
-
In a project, on the navigation bar, click Model > Concepts.
-
Select a process concept.
-
Navigate to Customize.
- Under Structure, click Outcomes.
- Hover over Success or Fail.
- Click the Add success/fail outcome button
 to add an outcome to the process concept.
 -
Type a display name and description.
- Click Add.
Reorder stages and outcomes
Optional: Change the order of the process stages and outcomes.
- Click Reorder.
- Drag and drop into your preferred order.
- Click Save.
Example: In the Applicant Process, the success outcome is Hired Yet to Start and the fail outcomes are Abandoned, Rejected, and System Rejected.
Add metrics and properties
Metrics and properties calculate data for a process concept.
Example: In the Applicant Process, examples of metrics are Count in Applied Stage or Time to Success, and examples of properties are Time in Applied Stage and Latest Applicant Process Stage.
Add metrics
Process concepts have associated metrics for calculating aspects of the process concept. You are able to add new metrics or modify any existing metrics to answer your unique business concerns. Metrics aid in analysis of the process concept.
-
In a project, on the navigation bar, click Model > Concepts.
-
Select a process concept.
- Click Customize>Metrics>Add Metric.
-
Type a display name and description.
- Click Add.
- Select the metric to open the Info panel.
- Under Metric Settings, click Edit to change the metric formula.
Note: You can also modify the data type, time granularity, and additive type for each metric. Click View more settings to see a full list of modifiable settings.
Add properties
Properties are associated with process concepts to describe a relationship between subject member properties and the subject members in the process pipeline. For example, you could add the Hiring Manager property to the Applicant Process concept to associate hiring managers with specific applicants.
-
In a project, on the navigation bar, click Model > Concepts.
-
Select a process concept.
- Click Customize>Properties>Add Property.
-
Type a display name and description.
- Click Add.
- Select the new property to open the Info panel.
- Under Property Settings, click Edit to change the property formula.
Note: You can also modify the data type for each property. Click View more settings to see a full list of modifiable settings.
Select a participation concept
The participation setting defines the population that will take part in this process, such as nurses, physicians, or full-time employees.
-
In a project, on the navigation bar, click Model > Concepts.
-
Select a process concept.
-
Navigate to Customize.
- Under Participation, click Select Concept.
- Select a concept from the list.
- Click Select.
Example: In the Applicant Process, if you only want to include external applicants in the process, you can select External Applicant.
Select an on hold concept
On hold specifies the condition when the process is placed on hold. The time spent while on hold may be excluded via the metric formula. This allows the solution to filter out members who are on hold from the pipeline calculations so counts are not skewed by members who remain on hold in a stage for an extended period of time.
Example: In the Sales Process, a sales opportunity may be put on hold due to legal reasons or the key contact left the organization. While the opportunity is not progressing through the pipeline, we shouldn't let it skew our perception of progress and efficiency.
-
In a project, on the navigation bar, click Model > Concepts.
-
Select a process concept.
-
Navigate to Customize.
- Under On hold, click Select Concept.
- Select a concept from the list.
- Click Select.
Set the stagnation duration
Stagnation is the number of days that a member can be in a stage without any changes before they are flagged as Stagnant.
Example: In the Applicant Process, you can set the stagnation duration to raise a flag when applicants are sitting in the Applied stage without being contacted for more than five days.
-
In a project, on the navigation bar, click Model > Concepts.
-
Select a process concept.
-
Navigate to Customize.
- Click the stage to open the Info panel.
- Under Settings, enable the Stagnation toggle.
- Enter a number and select a time unit to be the minimum amount of time a member can be in that stage before becoming stagnant.
Configure a process concept
To modify a process concept, configure the dimension members that track the various stages and outcomes within your selected population.
To configure a process concept:
-
In a project, on the navigation bar, click Model > Concepts.
-
Select a process concept.
- In the Configure tab, click the stage or outcome you want to configure to expand it.
- Search for and select members to base the stage or outcome on.
Tip: To make sure you don't map the same member to multiple groups, turn on Highlight duplicates. This highlights any members that are in more than one group so that you can identify and remove duplicates where necessary.
The following screenshot shows an example of the configuration area for a process concept.
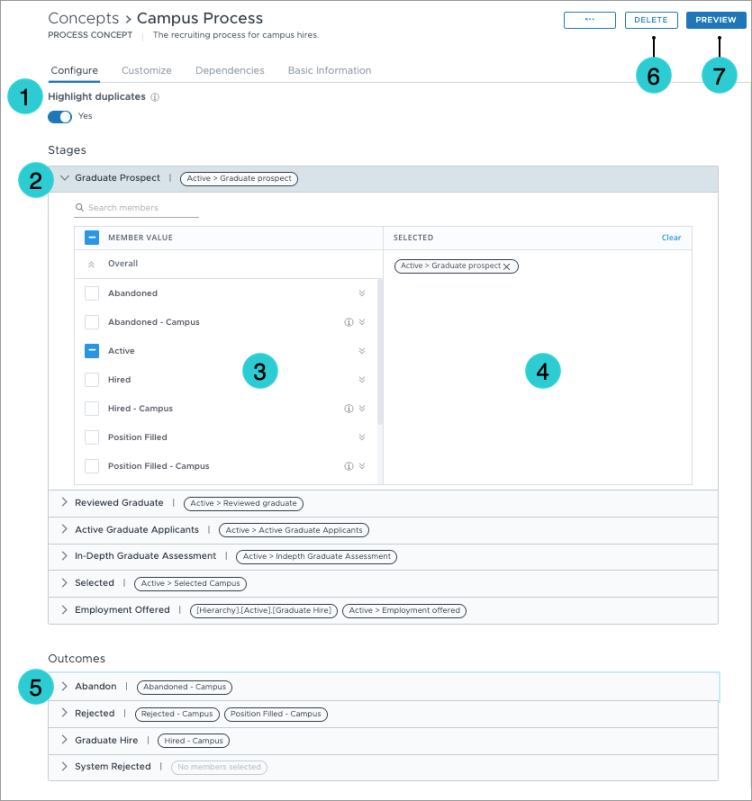
- Highlight duplicates: A toggle that helps you see which members are included in more than one stage or outcome.
- Stage: A stage represents each step in the process. In the above screenshot, stages in the Campus Process concept include Graduate Prospect, Reviewed Graduate, and Employment Offered, among others. Stages are added, deleted, and reordered in the Customize tab.
Note: To customize the stages, contact Visier Technical Support.
- Member values: The values available to use in the process concept. Each member value should be mapped to one stage or outcome.
- Selected member values: The selected member values. These are the values that will be included when analyzing the stage or outcome in the solution.
-
Outcome: An outcome represents the outcome of the process. In the above screenshot, outcomes in the Campus Process include Abandon, Rejected, and Graduate Hire, among others. Outcomes are added, deleted, and reordered in the Customize tab.
Note: To customize the outcomes, contact Visier Technical Support.
- Delete: A button to delete the concept.
- Preview: A button to preview the concept in the solution.
Automated concept configuration
Prerequisites: Your organization must opt in to AI features. In the global workspace, click Settings > AI Features.
Use Automap to configure concepts based on AI recommendations. With automap, Visier can detect unconfigured values and intelligently suggest configurations. The AI model used in this feature was trained on datasets that may contain historical, societal, and statistical biases and can inadvertently perpetuate these patterns in the output. Please review the outputs carefully. For more details on Visier's AI Bias prevention, see Bias Prevention and Responsible AI.
To configure a concept with automap:
- In a project, on the navigation bar, click Model > Concepts.
- Select a calculation, process, or member selection concept from the list.
- In the Configure tab, click Automap.
Result: Visier determines whether any of the unconfigured values belong to an existing concept member. If so, Visier includes the values appropriately. To see the summary, click View Summary.
- Optional: Review the mapped values and unmap any values if necessary.
Automap can only be used to include values, for selection concepts you must exclude values manually. Automap remembers your mapping preferences. If you've previously mapped or unmapped members manually, automap will respect those choices and won't automatically remap them.
To reset the configuration and apply automap, click the More options button ![]() > Reset configurations.
> Reset configurations.
Note: Automap is available for selection concepts with under 200 members and process/calculation concepts with under 50 members.
Validate a concept
Access requirements
Profiles: Basic Model Developer
Custom profile with these capabilities: Model (Read, Simple)
Data required: Access to data you're validating
Reach out to your administrator for access.
Previewing your concept allows you to quickly look at your concept as a visual to determine whether its components are configured correctly. To preview your new concept, its associated analytic object must have a default metric. For more information, see Default metric.
-
In a project, on the navigation bar, click Model > Concepts.
-
Select a concept.
- In the upper-right corner, click Preview.
Note: The visual won't display if the concept was configured incorrectly.
Process concept functions
Understand the functions available to write your process concept metric formulas.
| Name | Purpose | Example |
|---|---|---|
| ProcessConcept | Filter by participants of the process. | filterBy(Campus_Process) |
| ProcessConcept.IsStagnant | Filter by stagnant participants. | filterBy(Campus_Process.IsStagnant) |
| ProcessConcept.IsOnHold | Filter by on-hold participants. | filterBy(Campus_Process.IsOnHold) |
| ProcessConcept.IsSuccess | Filter by participants who are in a “Success” outcome. | filterBy(Campus_Process.IsSuccess) |
| ProcessConcept.IsFailure | Filter by participants who are in a “Fail” outcome. | filterBy(Campus_Process.IsFailure) |
| ProcessConcept.Stage.StageName | Filter by participants in a particular stage. | filterBy(Campus_Process.Stage.Applied) |
| ProcessConcept.Stage.OutcomeName | Filter by participants in a particular outcome. | filterBy(Campus_Process.Stage.Hired) |
| ProcessConcept.AtOrPastStage.StageName | Filter by participants at or beyond a stage. | filterBy(Campus_Process.AtOrPastStage.Applied) |