
API Authentication
Learn about authentication methods with Visier APIs.
Overview
To use Visier's public APIs, you must first authenticate yourself as a Visier user who is allowed to use Visier APIs. You can authenticate yourself in several ways, including OAuth 2.0 with Open ID Connect (OIDC) or Basic authentication (username and password).
Caution: When passing your credentials to authenticate yourself, always put credentials in the request body. Do not pass sensitive data like authentication credentials in API URLs.
The following sample request shows the correct way to pass authentication credentials. In this basic authentication example, the username and password credentials are passed in the request body.
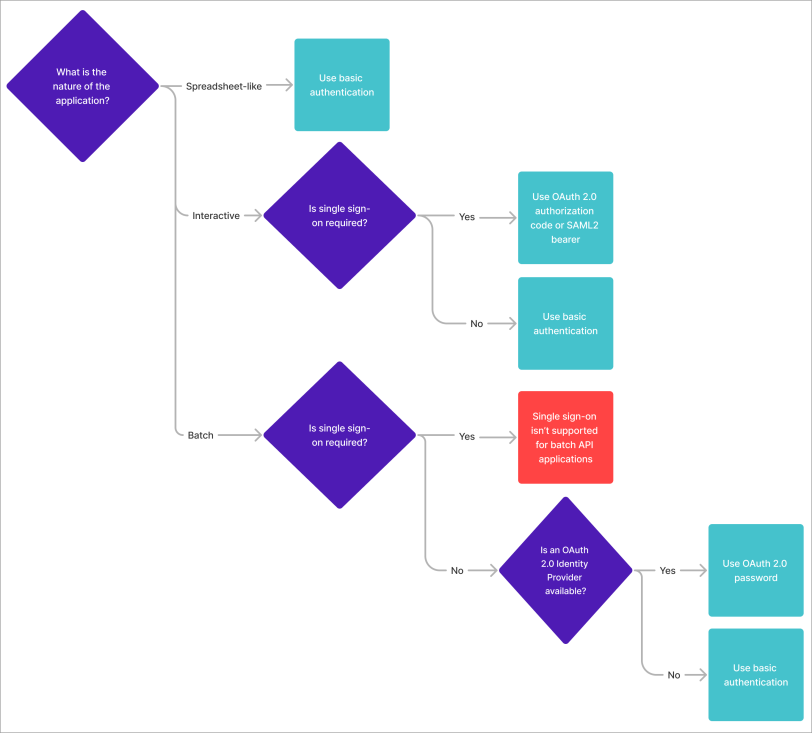
curl -X POST --url https://jupiter.api.visier.io/v1/admin/visierSecureToken -d "username=john@jupiter.com" -d "password=Password123"The following diagram describes the decisions to make to choose the right authentication method for you. Before using the diagram, familiarize yourself with these terms:
- Application: The method through which you're accessing Visier APIs.
- Spreadsheet-like: Access to Visier APIs through a spreadsheet; for example, the Data Export API.
- Interactive: Access to Visier APIs through a third-party application; for example, the Power BI and Tableau connectors.
- Batch: Access to Visier APIs through HTTP; for example, calling Visier APIs through Postman.
After you receive authentication tokens, such as a security token or JSON Web Token (JWT), you can pass the tokens in the headers of your API call to authenticate the call. For more information about headers, see API Headers.
In addition to the authentication token, every API call requires an API key. API keys are unique to your Visier tenant; every API user in your Visier tenant uses the same API key to authorize API calls. For more information, see Generate an API Key.
You must also know your tenant's vanity name to make API calls.
To find your vanity name:
- Go to the global workspace in Studio, click Settings > Single Sign-On. Then, under Single Sign-On, find your service provider endpoint; for example, https://jupiter.visier.com/VServer/auth. In this example, jupiter is the vanity name.
OAuth 2.0 with Open ID Connect (OIDC)
You can use OAuth 2.0 to authenticate with Visier APIs. If using OAuth 2.0, you must pick one grant type to authenticate with.
Access requirements
You or an administrator must register a client application.
After registering a client application, use the OAuth 2.0 credentials to authenticate with Visier APIs, such as the client ID, client secret, and callback URI.
Reach out to your administrator for access.
Visier supports the following OAuth 2.0 grant types:
authorization_code: Enables three-legged OAuth. We recommend this authentication method as the most secure because it delegates authentication to a designated IdP, meaning the client application doesn't access the password.password: Enables two-legged OAuth. We provide the password grant type for backwards compatibility and only recommend usingpasswordwhere it is not possible to useauthorization_code.saml2-bearer: Enables SAML OAuth. We recommend this method if you enabled single sign-on (SSO) with Visier.
To use OAuth 2.0 with OIDC authentication, see "OAuth2" in API Reference.
Authorization code
The following diagram shows the OAuth 2.0 authorization code grant sequence.
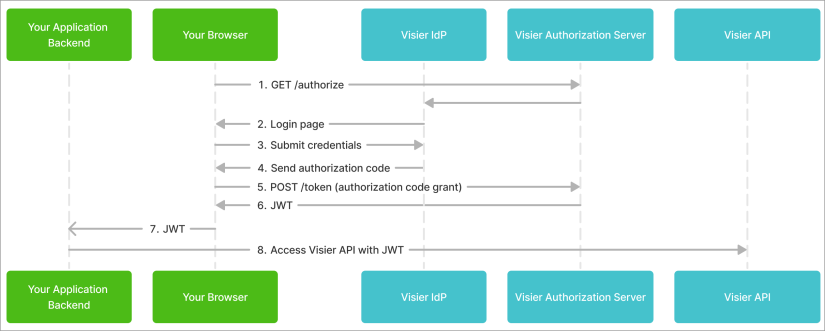
Enables three-legged OAuth. We recommend this authentication method as the most secure because it delegates authentication to a designated IdP, meaning the client application doesn't access the password.
The authorization_code grant type requires a registered callback URI that the authorizing server will call with an authorization code. That authorization code is then used to request the JWT. You can then pass the JWT as a bearer token in your API calls.
Tip: For an example of this authorization method, see OAuth 2.0 Authorization Code Grant Type.
The following sample request shows how to request an authorization code.
import { NextResponse } from 'next/server';
const clientId = process.env.VISIER_CLIENT_ID
const host = process.env.VISIER_HOST
export async function GET() {
const isDefined = id => id !== undefined && id !== ""
if (isDefined(clientId) && isDefined(host)) {
const url = `${host}/v1/auth/oauth2/authorize?client_id=${clientId}&response_type=code`
return NextResponse.json({ url });
}
console.error("Missing either Client ID or host);
return new Response({ message: "Missing OAuth 2.0 credentials" }, { status: 401 })
}The following sample request shows calling the callback URI with an authorization code to request the JWT.
"use client";
import { useRouter, useSearchParams } from "next/navigation";
import React, { useEffect, useState } from "react";
import useCredsStore from "@/store/credsStore";
export default function Callback() {
// Extracting the code from the query parameters
const router = useRouter();
const searchParams = useSearchParams();
const code = searchParams.get("code");
// States for authentication
const [isAuthenticated, setIsAuthenticated] = useState(false);
// Extracting state setters from the credentials store
const [setJWT, setConfig] = useCredsStore((s) => [s.setJWT, s.setConfig]);
// Client credentials from environment variables
const clientId = process.env.NEXT_PUBLIC_CLIENT_ID;
const clientSecret = process.env.NEXT_PUBLIC_CLIENT_SECRET;
// Token exchange function
const callToken = async () => {
try {
const response = await fetch("/oauth2/token", {
method: "POST",
headers: {
"Content-Type": "application/x-www-form-urlencoded",
},
body: new URLSearchParams({
grant_type: "authorization_code",
client_id: clientId,
client_secret: clientSecret,
code: code || "",
}),
});
if (response.ok) {
const responseBody = await response.json();
// Setting JWT and config from the token response
setJWT(responseBody.access_token);
setConfig({
idToken: responseBody.id_token,
refreshToken: responseBody.refresh_token,
tokenType: responseBody.token_type,
expiresIn: responseBody.expires_in,
});
setIsAuthenticated(true);
} else {
console.error("Token request failed:", response.status, await response.text());
}
} catch (error) {
console.error("Error during token request:", error);
}
};
// Effect to handle token call
useEffect(() => {
if (!isAuthenticated && code) {
callToken();
}
}, [isAuthenticated, code]);
// Redirect once authenticated
useEffect(() => {
if (isAuthenticated) {
router.replace("/");
}
}, [isAuthenticated]);
return <p>Redirecting...</p>;
}The following sample request shows how to pass the JWT as a bearer token to authorize your Visier API call.
import axios from 'axios';
/**
* General wrapper for making Visier Public API calls.
*
* @param {*} req Request definition containing the Visier API request details
* @returns The response payload from the Visier API
*/
export async function POST(req) {
const delegateRequestBody = await req.json();
const instance = makeInstance(delegateRequestBody);
let responsePromise;
switch (delegateRequestBody.method) {
case 'POST':
responsePromise = instance.post(delegateRequestBody.url, delegateRequestBody.body).then(makeSuccesResponse).catch(makeErrorResponse)
break;
case 'GET':
default:
responsePromise = instance.get(delegateRequestBody.url).then(makeSuccesResponse).catch(makeErrorResponse)
break;
}
return responsePromise;
}
/**
* Make an axios instance from the provided request details.
*
* @param {*} req
*/
const makeInstance = req => {
const config = req.config;
const configWithAuth = {
...config,
headers: {
...config.headers,
Authorization: req.auth
}
}
return axios.create(configWithAuth);
}
const makeSuccesResponse = response => {
return new Response(JSON.stringify(response.data), { status: response.status})
};
const makeErrorResponse = error => {
return new Response(error, { status: error.status })
}Password
The following diagram shows the OAuth 2.0 password grant sequence.
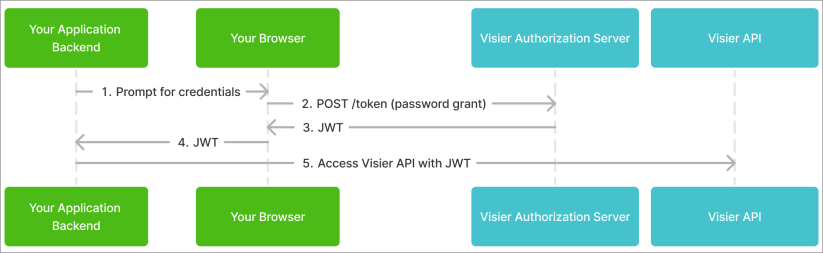
Enables two-legged OAuth. We provide the password grant type for backwards compatibility and only recommend using password where it is not possible to use authorization_code.
The password grant type requires a client ID, client secret, username, and password to log in with. It returns a JWT that you can then pass as a bearer token in your API calls.
Tip: For an example of this authorization method, see OAuth 2.0 Password Grant Type.
The following sample request shows how to use the password grant type to request a JWT.
# Assign local variables
vhost=$VISIER_HOST
client_id=$VISIER_CLIENT_ID
client_secret=$VISIER_CLIENT_SECRET
vuser=$VISIER_USERNAME
vpassword=$VISIER_PASSWORD
grant_type="password"
# Compose request body and request token from password grant
body="grant_type=$grant_type&client_id=$client_id&scope=read&username=$vuser&password=$vpassword"
JWT=$(curl -s -X POST \
"$vhost/v1/auth/oauth2/token" \
-H "Content-Type: application/x-www-form-urlencoded" \
-d $body \
-u "$client_id:$client_secret")
export JWTSAML2 bearer
The following diagram shows the OAuth 2.0 SAML2 bearer grant sequence.
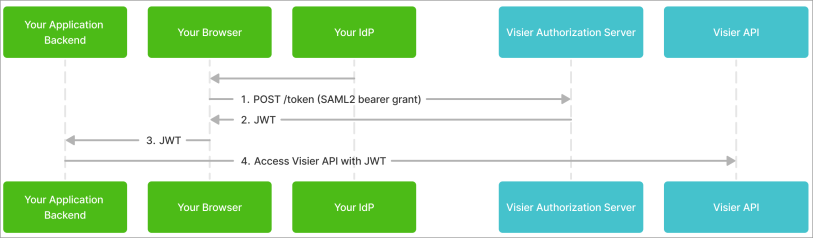
Enables SAML OAuth. We recommend this method if you enabled single sign-on (SSO) with Visier.
The saml2-bearer grant type requires a client ID, client secret, and Identity Provider (IdP).
Tip: For an example of this authorization method, see Visier OAuth Sample.
The following sample request shows how to use the saml2-bearer grant type to request a JWT.
const express = require('express');
const bodyParser = require('body-parser');
const axios = require('axios');
const app = express();
const port = process.env.PORT || 3000;
if (!(process.env.VISIER_HOST && process.env.VISIER_CLIENT_ID && process.env.VISIER_CLIENT_SECRET)) {
console.error("Define VISIER_HOST, VISIER_CLIENT_ID, and VISIER_CLIENT_SECRET environment variables.");
process.exit(1);
}
app.use(bodyParser.urlencoded({ extended: true }));
app.use(bodyParser.json());
// Endpoint called by the client Identity Provider (IdP) to exchange the SAMLResponse for a JWT
app.post('/visier-jwt', async (req, res) => {
try {
const { SAMLResponse } = req.body;
// Construct OAuth token request
const tokenEndpoint = `${process.env.VISIER_HOST}/v1/auth/oauth2/token`;
const grantType = 'urn:ietf:params:oauth:grant-type:saml2-bearer';
const options = {
method: 'post',
url: tokenEndpoint,
data: {
grant_type: grantType,
assertion: SAMLResponse,
client_id: process.env.VISIER_CLIENT_ID,
client_secret: process.env.VISIER_CLIENT_SECRET,
},
headers: {
'Content-Type': 'application/x-www-form-urlencoded',
},
}
// Issue the OAuth token request
const response = await axios(options);
// Extract JWT from the response
const access_token = response.data.access_token;
// Call an API using the JWT for authentication to provde that the JWT is valid
const endpointUrl = `${process.env.VISIER_HOST}/v1/data/model/metrics/employeeCount`
const headers = {
Authorization: 'Bearer ' + access_token
}
const metricResponse = await axios.get(endpointUrl, { headers });
const metric = metricResponse.data
res.status(200).json({ metric });
} catch (error) {
console.error('Error requesting JWT:', error.message);
res.status(500).json({ error: 'Internal server error', message: error.message });
}
});
app.listen(port, () => {
console.log(`Server running at http://localhost:${port}`);
});Basic authentication
Basic authentication requires your Visier username and password to authenticate you. It returns an ASID token that you can use in your API calls.
Access requirements
Custom profile with these capabilities: Legacy API Restricted
Reach out to your administrator for access.
To authenticate with basic authentication, see "Basic Authentication" in API Reference. Basic authentication is equivalent to the OAuth 2.0 password grant type, but password doesn't require Legacy API Restricted.
The following sample request shows how to use basic authentication to request a secure ASID token.
curl -X POST --url https://jupiter.api.visier.io/v1/admin/visierSecureToken -d "username=john@jupiter.com" -d "password=Password123"If successful, you'll get the following sample response that returns a security token.
After you retrieve your security token, subsequent calls to the API use the ASID token in a cookie to indicate an authenticated session, as shown in the following sample request.
curl -X POST --url https://jupiter.api.visier.io/v1/data/query/aggregate -H "apikey:12345" -H "Cookie:VisierASIDToken=abc123" --data '{
"query": {
"source": {
"metric": "employeeCount"
},
"timeIntervals": {
"fromInstant": "1593561600000",
"intervalPeriodType": "MONTH",
"intervalCount": 12
}
},
"options": {
"calendarType": "GREGORIAN_CALENDAR"
}
}'Tip: The security token has a 60 minute expiration window. Ensure that you systematically request a new security token when one expires. If your call uses an expired token, the response returns HTTP error code 401 (Unauthorized).