Manage Email Push Schedules in the Analyses Room
Check the status of your deliveries and edit existing schedules.
Manage your analysis schedules and check the status of your deliveries in the Analyses room. Administrators can manage all scheduled analyses for a tenant in Studio. For more information, see Manage Email Push Schedules.
Access requirements
Users with this permission capability:
-
Schedule Analysis
-
Share Analysis
Reach out to your administrator for access.
View schedules
-
On the navigation bar, click Analyses
 .
. -
In the Analyses room, click the Scheduled by me tab.
Tip:
- Click the column headers to sort analyses in ascending or descending order by the analysis name, next scheduled delivery, and the latest successfully delivery.
- Quickly open an analysis by hovering over the analysis name and clicking the View analysis button
 .
. - Quickly create a new analysis schedule by hovering over the analysis name and clicking the Add schedule button
 .
.
Check the status of your deliveries
- In the Scheduled by me tab, to see the list of scheduled deliveries, select the analysis by clicking the Expand button
 .
. -
Select a schedule to see the status of the delivery, a summary of the recipients, and statistics that will help you track its performance.
- If a delivery was unsuccessful, do the following:
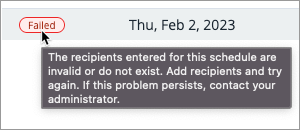
- Hover over the Failed or Canceled icon in the Status column to see why the delivery attempt was unsuccessful.

- Make changes to the schedule based on the message.
- Optional: If you want to make up for the missed delivery, create a new schedule for the analysis using the Deliver Now setting.
- Hover over the Failed or Canceled icon in the Status column to see why the delivery attempt was unsuccessful.
Note:
- Deliveries might fail due to no recipients, too many recipients, and system failures. For more information, see Analysis Email Push Failure Reasons.
- Deliveries will be marked as Completed when an analysis has been successfully sent to at least one recipient. We recommend that you check the Sent Rate to ensure that the analysis has been successfully sent to the majority of your recipients.
- All users can opt out of analysis emails. If users opt out, there may be discrepancy between the Recipient Count and User Count. For example, let's say you added three users to your analysis schedule and one of the users has opted out of analysis emails, you'll see a count of 2 recipients and 3 users.
- The Sent Rate is based on the best-effort delivery model. This means we cannot guarantee the analysis was delivered to a recipient's primary inbox. For more information, see Analysis Email Push Engagement Rates.
See unsubscribed recipients
View a list of recipients who have unsubscribed from an analysis schedule. This list does not include recipients that have opted out of all analysis emails. Download the Application Logs to see detailed subscription activity including when they unsubscribed and whether they have resubscribed. For instructions, see Application Logs.
- In the Scheduled by me tab, select the analysis you want to review by clicking the Expand button
 .
. - On the right side of the schedule you want to review, click the More button
 > Unsubscribed users.
Note:
- Recipients that have resubscribed are included in the calculation of the Unsubscribed Rate. However, they will not be included in the list of unsubscribed users.
- Administrating tenants will see the number of unsubscribed users grouped by tenant at the administrating tenant level.
Change a schedule
- In the Scheduled by me tab, to see the list of scheduled deliveries, select the analysis you want to change a schedule for by clicking the Expand button
 .
. - On the right side of the schedule you want to change, click the More button
 > Edit.
 -
To turn off a recurring schedule, on the right side of the schedule name, click the More button
 and then turn off the Schedule active toggle.
Note: Deliveries that are in progress when the recurring schedule is turned off will carry to completion.
Delete a schedule
Note: Deliveries that are in progress when the schedule is deleted will carry to completion.
- In the Scheduled by me tab, to see the list of scheduled deliveries, select the analysis you want to delete a schedule for by clicking the Expand button
 .
. - On the right side of the schedule you want to delete, click the More button
 > Delete.
