
Create a Data Export
Create Data Exports to use Visier metrics and data outside of the solution.
Access requirements
Permission with these capabilities: Author Data Exports
Reach out to your administrator for access.
Overview
Data Exports are versioned or unversioned, depending on where you create the Data Export (in a project or in the solution experience).
Versioned Data Exports are created in a project and are subject to the project lifecycle and content package access. By creating a Data Export in a project, you can publish the Data Export to all users who have access to Data Exports and its associated content package. Versioned Data Exports are useful if you want to expose a Data Export to all users
Unversioned Data Exports are created in the Data Exports room in the solution experience. By creating a Data Export in the solution experience, that Data Export is only available to you and any users or user groups that you share the Data Export with. Unversioned Data Exports are useful if you want to expose a Data Export to a select few users or user groups, or even just for yourself!
There are two types of Data Exports to chose from:
- Aggregated Data Export: Retrieve data containing metric values. For example, Headcount and Resignation Rate.
- Detailed Data Export: Retrieve data containing attribute values for individual subjects (such as employees, candidates, and requisitions) and events (such as starts, exits, and pay changes).
The data security context of the user is applied when they consume the Data Export. For more information, see How data security works with Data Exports.
Tip:
- You can also duplicate an existing Data Export and use it as a starting point. In the Data Exports list, hover over the Data Export you want to duplicate and then click the Copy button
 on the Quick Actions toolbar.
 - Watch this video to learn how to get data out of Visier via a Data Export.
- You can create up to 1,000 data exports per project and per user, except free trial tenants, which have a maximum of 5 data exports. These maximums are the default, however, contact Visier Technical Support to request limit adjustments.
Create an Aggregated Data Export
- Do one of the following:
- To create a versioned Data Export, open a project and navigate to Model > Data Exports.
- To create an unversioned Data Export, open the solution experience and, on the navigation bar, click Data Exports
 .
.
-
Click New Data Export.
-
Add a title and description for your Data Export.
- In the visual title, click the Data Export picker and select Aggregated Data Export.
- Build a Data Table that includes the metric data that needs to be leveraged. For more information, see Table Visual.
-
Click the Time picker to set the time window and time context. If you want the Data Export to continuously display the latest data, select the Update automatically to check box and select a time period option.
-
When you're finished, click Save and Close.
- If creating in a project, do the following:
- Optional: To enable the Data Export in API calls, in the Data Export's Basic Information tab, select Active.
- Add the Data Export to a content package. For more information, see Content Packages.
- Publish the project to production. For more information, see Publish Project Changes.
- Share the Data Export with others by doing any of the following:
- Generate the link to the Data Export and share it with others. For more information, see Generate a Data Export Link.
Note: To copy a Data Export link, the Data Export must be Active.
- If the Data Export was created in a project, set it to Active in the Data Export's Basic Information tab.
- If the Data Export was created in the solution experience, set it to Active in the Data Exports room .
- In the Data Exports room, click the Share button
 in the Quick Actions menu. You can select the users or user groups to give Viewer access to the Data Export. You can also access this option when editing the Data Export by clicking the More Actions button
  .
.Note: The Share button
is only available to the Data Export owner. The Data Export must be created in the solution experience (unversioned).
- Generate the link to the Data Export and share it with others. For more information, see Generate a Data Export Link.
Note:
- An Aggregated Data Export can contain up to 300,000 cells. The application provides a preview of the first 100,000 cells.
-
When consuming an Aggregated Data Export, you may notice differences in how the data is structured in Visier and your third-party tool or web application:
- Columns that contain mixed data types will be exported as strings. For example, if a column in the Aggregated Data Export contains strings (Exceptional, Good, Poor) and numbers (10.3% 39.0%, 89.7%). The data type for this column in the third-party application will be string.
- Currency codes and percentage symbols will not be included when you consume the Aggregated Data Export.
For example, the currency codes and percentage symbols appear alongside the amount in the Aggregated Data Export.
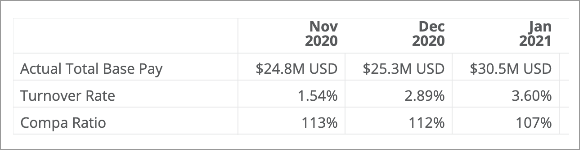
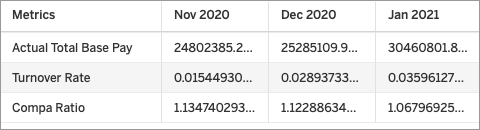
However, you will only see the amount in the third-party application, as shown in the following screenshot.
Create a Detailed Data Export
- Do one of the following:
- To create a versioned Data Export, open a project and navigate to Model > Data Exports.
- To create an unversioned Data Export, open the solution experience and, on the navigation bar, click Data Exports .
-
Click New Data Export.
-
Add a title and description for your Data Export.
- In the visual title, click the Data Export picker and select Detailed Data Export.
- In the visual title, select the subject or event you want to analyze.
- Build a Data Table that includes the attribute data that needs to be leveraged. Click the Table Settings button
 to add or remove attributes in the Side panel.
 -
Click the Time picker to set the time window and time context. If you want the Data Export to continuously display the latest data, select the Update automatically to check box and select a time period option.
-
When you're finished, click Save and Close.
- If creating in a project, do the following:
- Optional: To enable the Data Export in API calls, in the Data Export's Basic Information tab, select Active.
- Add the Data Export to a content package. For more information, see Content Packages.
- Publish the project to production. For more information, see Publish Project Changes.
- Share the Data Export with others by doing any of the following:
- Generate the link to the Data Export and share it with others. For more information, see Generate a Data Export Link.
Note: To copy a Data Export link, the Data Export must be Active.
- If the Data Export was created in a project, set it to Active in the Data Export's Basic Information tab.
- If the Data Export was created in the solution experience, set it to Active in the Data Exports room .
- In the Data Exports room, click the Share button in the Quick Actions menu. You can select the users or user groups to give Viewer access to the Data Export. You can also access this option when editing the Data Export by clicking the More Actions button .
Note: The Share button
is only available to the Data Export owner. The Data Export must be created in the solution experience (unversioned).
- Generate the link to the Data Export and share it with others. For more information, see Generate a Data Export Link.
Note: A Detailed Data Export can contain up to 7.5 million cells. The application provides a preview of the first 100 rows.