
Define a Cohort
Define the criteria for your cohort population.
Access requirements
Permission with these capabilities: Change Analysis Context
Reach out to your administrator for access.
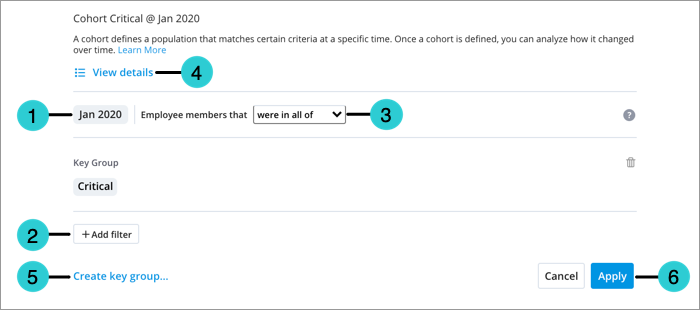
The Cohort dialog is where you'll define criteria to build your cohort population. To open the Cohort dialog, create a cohort or select the cohort token in the analysis context. For more information, see Create a Cohort.
Use the following workflow to define your cohort in the Cohort dialog:
- Set the time context.
- Add filters.
- Optional: Select the complement of the population to create a cohort that consists of subject members that don't meet (were not in all of) your filter criteria.
- Preview the cohort population.
- Optional: Save the cohort as a key group for later use.
- When finished click Apply.
For more information, see How Cohorts are Calculated.
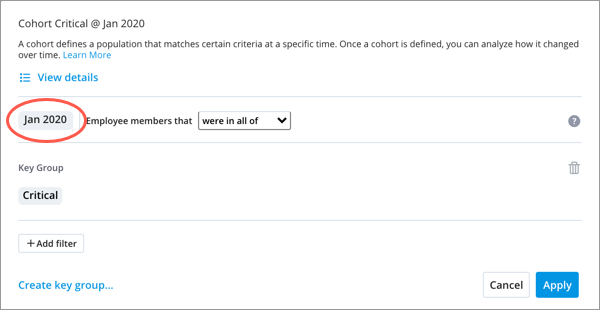
Set the time context
Select the time interval where members of the cohort share a common set of attributes or experienced a common event.
You have the option of setting a fixed or dynamic time context:
- When using a fixed time context, the population of the cohort will remain constant as new data is loaded into the app.
- When using a dynamic time context, the population of the cohort will change as new data is loaded into the app. This allows you to monitor specific cohort scenarios without having to manually change the time context each time. For example, to analyze the ongoing impact of learning in your organization, you may want to analyze the performance of employees who completed a training course 12 months ago. The cohort population will automatically change based on the visual time, so you don't have to update the filter as time passes. As a result, you can repeat the analysis without having to recreate the cohort.
To set the time context:
- In the Cohort dialog, click the Time picker.
- Switch between time context options by clicking Set a fixed time or Make dynamic in the lower-left corner of the Time picker.
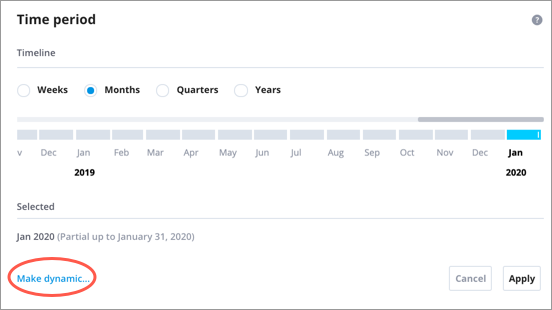
- Do one of the following:
- Set a fixed time context by selecting the time granularity and time period. For more information, see The Time Context.
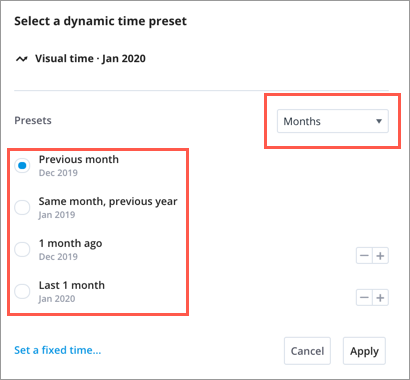
- Set a dynamic time context by selecting the time granularity and a time preset:
- Previous period: Filter based on the previous day, week, month, quarter, or year relative to the visual time.
- Same period, previous year: Filter based on the same day, week, month, or quarter from the previous year relative to the visual time.
- N period ago: Allows you to filter based on a specific point in time in the past relative to the visual time.
- Last n periods: Allows you to filter based on a specific time range in the past relative to the visual time.
- When finished, click Apply.
Note:
-
The time granularity that you define when setting a dynamic time context will be used to calculate the cohort population even if the selected time granularity at the chart or analysis level is different.
- If a chart is added to an analysis and it contains a cohort that is defined using a dynamic time context, the time context set at the analysis level will be used as the reference point to calculate the cohort population. For more information, see How the dynamic cohort time context is applied at the analysis level.
To illustrate how the various dynamic time presets are calculated, let's say you may want to analyze the performance of employees who completed a training course. We will use the visual time of January 2020 as the reference point in the following examples:
| Dynamic Time Preset | Example |
|---|---|
| Previous period | If the dynamic time context is set to the previous month, the cohort population will include employees who completed a training course in December 2019. |
| Same period, previous year | If the dynamic time context is set to the same month, previous year, the cohort population will include employees who completed a training course in January 2019. |
| N period ago | If the dynamic time context is set to 3 months ago, the cohort population will included employees who completed a training course in October 2019. |
| Last n periods | If the dynamic time context is set to last 6 months, the cohort population will include employees who completed a training course from August 2019 to January 2020. |
Define the population by adding filters
Note:
You can add filters to define your cohort population based on:
- Subject member attributes (for example, Employee attributes such as Location and Tenure)
- Event occurrences (for example, Promotions and Pay Changes)
- Changes to attribute values (for example, change in Location from New York to Vancouver)
To define cohorts based on subject member attributes and event occurrences:
- In the Cohort dialog, click Add filter.
- In the Filter picker, select the attribute values that define your cohort population. For more information, see Filters.
- When finished click Apply.
- Repeat steps 2 and 3 to add more filters.
Note: If your cohort definition contains a key group, the key group will be broken down into individual filters when the cohort is applied.
You can also define your population based on changes to a subject member's attributes. These changes represent events that are not explicitly captured in the data model. For example, a change in an employee's job name is not a distinct event occurrence in the data model. However, you may want to see how many employees who had their job name changed in the last year are still with the organization today.
To define cohorts based on attribute changes:
Note:
- The following attributes cannot be used with this option:
- Range attributes such as Age and Compensation.
- Parent-child attributes such as Organization Hierarchy and Supervisory Hierarchy.
- You must select an attribute change option before you can search and browse the available attributes.
- In the Cohort dialog, click Add filter.
- In the lower-left corner of the Filter picker, click Filter using changes.
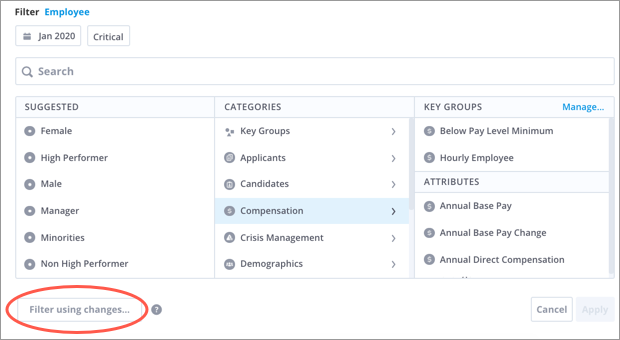
- Select one of the following options:
Option Description Changed from Include any subject member who experienced an attribute change from the selected attribute values during the cohort time context.
For example the cohort, Employee > Changed from > Job Name: Executive Director @ Jan 2019 will include employees whose job name changed from Executive Director to another value in 2019.
Changed to Include any subject member who experienced an attribute change to the selected attribute values during the cohort time context.
For example the cohort, Employee > Changed to > Job Name: Executive Director @ Jan 2019 will include employees whose job name changed to Executive Director from another value in 2019.
Any Change Include any subject member who experienced an attribute change in the selected values during the cohort time context.
For example the cohort, Employee > Any change > Job Name @ Jan 2019 will include employees whose job name changed in 2019.
Was created Include any subject member whose record appears in the data for the first time during the cohort time context. Was terminated Include any subject member whose record is removed from the data during the cohort time context. - When finished selecting the attribute values, click Apply.
Select the cohort complement
You can quickly create a cohort complement that contains subject members who are outside of the population that you've defined using filters. Cohort complements can act as your control group, a population that did not experience the same event as your cohort. You can compare a cohort with its complements to determine if there are any significant differences in results and behavior.
Example:
- Cohort: Employees who completed a training course 12 months ago.
- Cohort complement: All employees except those who completed a training course 12 months ago.
To create a complement of the population:
- In the Cohort dialog, click the Complement box to the right of the Time picker.
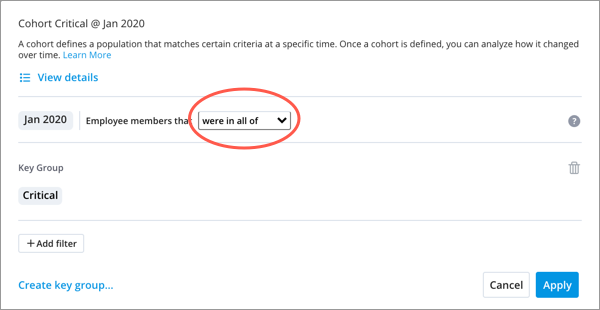
- Select Were not in all of.
Preview the cohort population
To preview the population that is defined by your cohort:
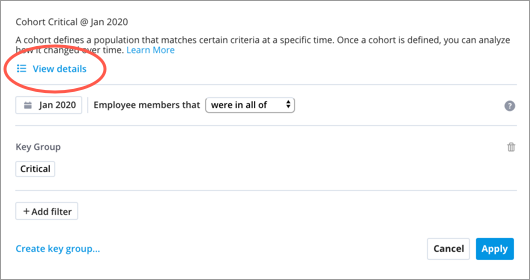
- After you've added a filter to define your cohort, click View details in the Cohort dialog.
Note: If your cohort definition uses a dynamic time context, the chart's time context will be used as the reference point to calculate the Detailed View population. For example, if the time context is December 2017 and the dynamic time context for your cohort is 12 months ago, the Detailed View population will be based on December 2016.