
Prototypes
Add your own data to Visier to explore new insights in a private, isolated environment.
Access requirements
Permission with these capabilities: Prototypes
Reach out to your administrator for access.
Prerequisites: An administrator must contact Visier to enable target security. For more information, see Set Access.
Overview
The Prototypes room lets you add your own data to Visier. You do not need help from an administrator or IT expert. Prototypes are a quick way to see new data in Visier without requesting a formal production update.
Common use cases include:
- Ad-hoc analysis: Break down data from a one-time spreadsheet.
- Testing ideas: See if training scores relate to sales performance before making a permanent change.
- Speed: Do everything yourself in one place.
- Avoiding spreadsheets: Use Visier's tools instead of complex pivot tables.
Previously, only administrators could add data. Now, users with the Prototypes capability can upload data in a safe and private environment. You can connect prototype data to production data and then visualize the data. Because it's a prototype, your work won't change or break the production version.
Prototypes are for your eyes only. You cannot share them or publish them to production. To make prototype data available to others, share the data files with your administrator to implement them officially, such as through the File Upload Using the Solution process.
Tip: Each user may have a maximum of 20 prototypes. If you reach the maximum, you can delete prototypes to continue creating new ones.
Create a prototype
- On the navigation bar, click Prototypes
 > New prototype.
 - Type a name for the prototype.
- Optional: Type a description for the prototype.
- Click Next.
Result: Visier prepares an isolated environment for you to experiment with new data.
- In the prototype dialog, click Get started.
Upload your data file
- In the New prototype dialog, click Choose file.
- Select your data file.
- Click Next.
Prototypes supports files:
- In CSV, XLSX, or XLS format.
- Up to 4 MB.
- Up to 10 files per prototype. You can delete uploaded files to make room for more files. To delete uploaded files, see Data source.
For more information about file requirements, see Data File Guidelines.
Set up your data
After Visier reads your data file, configure the data structure.
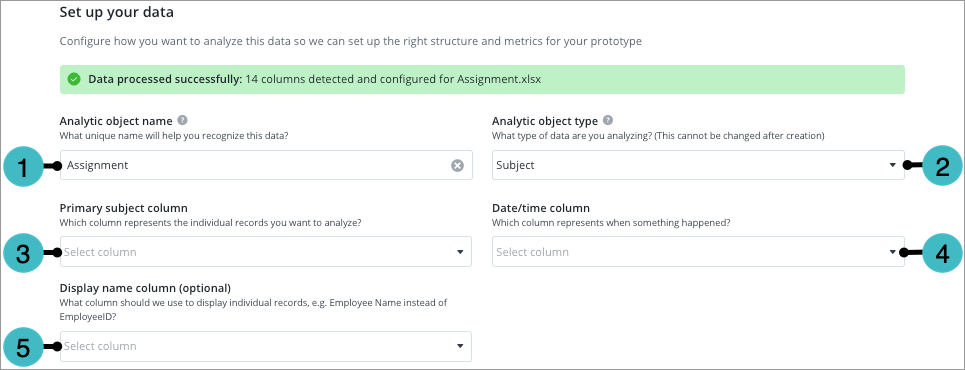
The following screenshot shows the set up for a subject.
-
Type a unique name in Analytic object name. An analytic object is a container for your data. It represents what you want to analyze.
- Select an Analytic object type from the list.
- Select Subject for an entity that changes over time, for example, employees, applicants, requisitions, learning items, and sales opportunities.
- Select Event for something that happens at a specific moment in time and may be associated with one or more individuals, such as an exit.
- Select the Primary subject column. This is the unique identifier that represents individual records, such as an Employee ID.
-
Select the Date/time column. This represents when something happened in the data.
- Optional: Select the Display name column. This displays individual records in visualizations, such as Full Name. If blank, the Primary subject column is used to display individual records.
- Click Next.
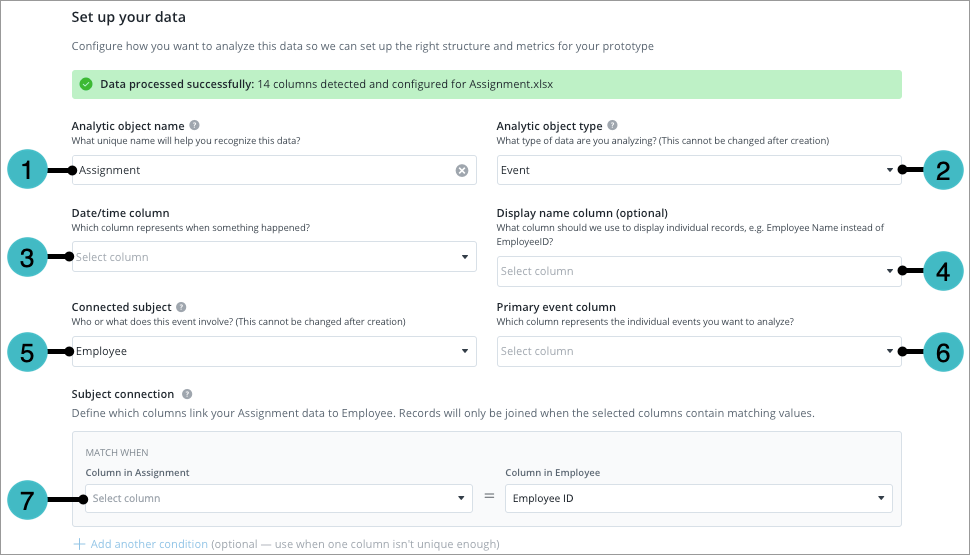
The following screenshot shows the set up for an event.
-
Type a unique name in Analytic object name. An analytic object is a container for your data. It represents what you want to analyze.
- Select an Analytic object type from the list.
- Select Subject for an entity that changes over time, for example, employees, applicants, requisitions, learning items, and sales opportunities.
- Select Event for something that happens at a specific moment in time and may be associated with one or more individuals, such as an exit.
-
Select the Date/time column. This represents when something happened in the data.
- Optional: Select the Display name column. This displays individual records in visualizations, such as Full Name. If blank, the Primary subject column is used to display individual records.
- Select the Connected subject. This is the subject that the event happens to. For example, Exit events happens to the Employee subject.
- Select the Primary event column. This is the unique identifier that represents individual records, such as an Event ID.
- Define the Subject connection. This is the column or columns that link your prototype data to the connected subject. For example, if the Column in prototype is Email, select the connected subject's Email (or equivalent) column. You can add additional conditions if one column isn't unique enough to connect the datasets.
- Click Next.
Confirm attributes
Choose the columns to include in the prototype.
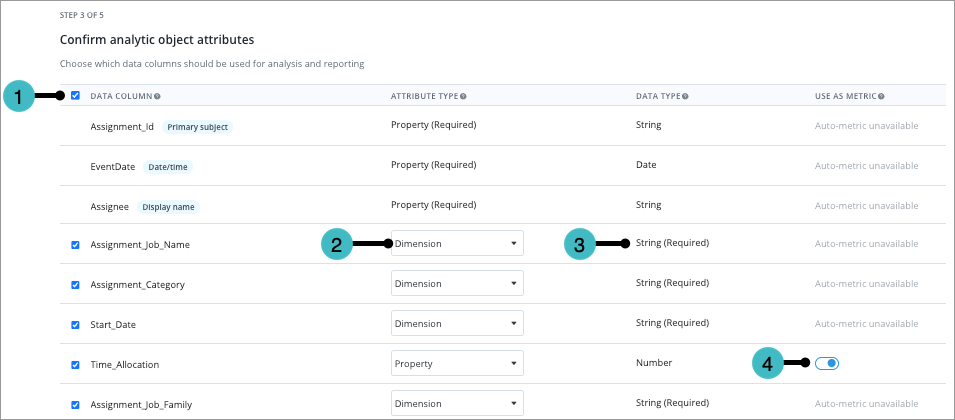
- Select a Data column to include it. If you don't select a column during this step, you can include it later in the prototype settings. By default, Visier includes all data columns.
- Select an Attribute type.
- Select Property for unique values like names. Some columns can only be properties. For those columns, you cannot change the attribute type. For more information about properties, see Properties.
- Select Dimension for categories like gender or department. Prototypes only support single-level leveled dimensions. For more information about dimensions, see Dimensions.
To decide whether to create a dimension or property, consider the following characteristics.
Dimension
Property
- The attribute groups data. For example, the Age Range dimension groups employees into specific age ranges based on the Age in Months property.
- The attribute will be used as a filter or group by in visualizations.
- The attribute can be used in other objects, like concepts or custom dimensions.
- The attribute evaluates the analytic object on a per-ID basis. For example, the Age property evaluates on each employee ID to provide an age for every employee.
- The attribute won't be used as a group by in visualizations.
- The attribute can be used in other objects, like metric formulas or dimensions.
- Review the Data type. Visier detects this automatically. You cannot change the data type in this step, but you can configure it later in the prototype settings. For more information about data types, see Data Types.
- Turn Use as metric on or off. Visier generates metrics for numeric properties, such as Count and Average metrics. Additionally, Visier creates at least one count metric based on the Primary subject column.
- Click Next.
Process and open your prototype
Next, Visier validates the data quality and creates the secure environment. This usually takes a few minutes. When finished, the prototype dialog previews the number of data rows, attributes, and generated metrics in the prototype.
To continue, click Explore prototype.
The following diagram shows a newly created prototype.
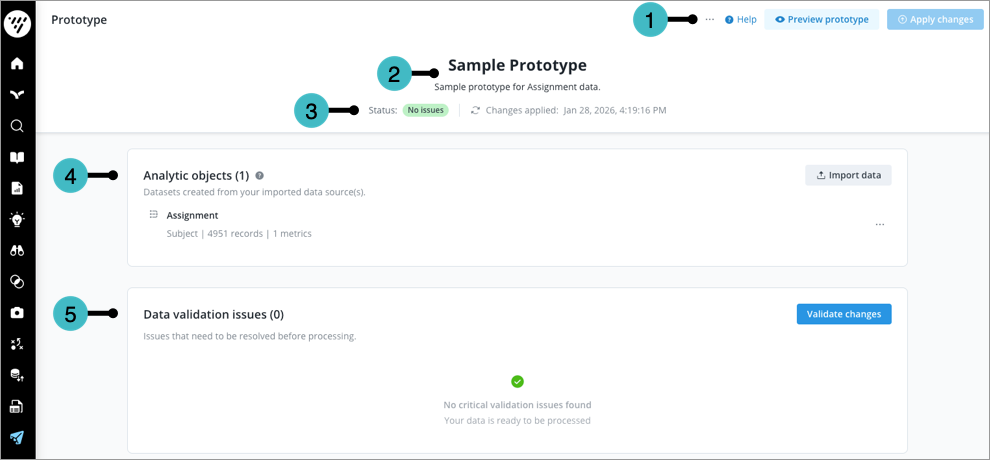
- Actions: The actions you can take in the prototype.
- More: Edit the prototype display name and description or delete the prototype.
- Help: Visit Visier's help documentation.
- Preview prototype: View the data in visualizations. Optionally, download the visualizations to edit or share the data outside of Visier.
- Apply changes: Update the preview data. Only available if you've made a change that requires data updates, such as creating references.
Note: While applying changes, Preview prototype is still available. The preview data won't show the latest version until after Apply changes is finished.
- Name and description: The prototype's display name and description.
- Status information: Details about the prototype, including data validation issues and the last updated time.
- Analytic objects: The analytic objects in the prototype.
- Click Import data to create another analytic object or to add data to an existing analytic object in the prototype. A prototype may contain a maximum of 10 files. When adding more data to an existing prototype:
- The new file must have the same columns and file format as the very first file you uploaded.
- If you import a new file with the same event date as a previously-loaded file, any records for an existing subject member ID is replaced by the matching record in the new file. For more information about replacing old data, see Override behavior.
- Select an analytic object to view and manage its data source (columns, data records, uploaded files), configuration, and any generated metrics. For more information, see Manage your analytic object.
- Click Import data to create another analytic object or to add data to an existing analytic object in the prototype. A prototype may contain a maximum of 10 files. When adding more data to an existing prototype:
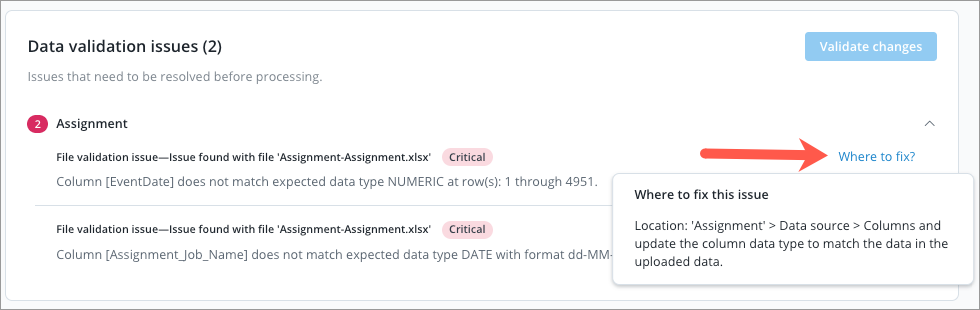
- Data validation issues: Any issues in the data.
- Click Validate changes after making changes to check whether the prototype has data issues.
- If there are issues, review the issue description and click Where to fix? for the location to resolve the issue, as shown in the following screenshot.
Manage your analytic object
You can change your data source, metrics, and attributes in the prototype view.
Data source
Visier detects if each column's data type is a date, number, or string. You can manually change this in the analytic object's data source.
Open the data source
- In your prototype, under Analytic objects, select an analytic object.
- Under Data source, click View.
Change a column's data type
- Open the Details tab in the source details panel.
- Select a column.
- Select a new Data type and click Update. The data type must match the data in the data file column.
- Return to the prototype and click Validate changes.
Download the data source
Do one of the following:
- In the data source, click Export data source. This downloads the entire data source in its original format.
- In the Source files tab of the source details panel, click the More button
 > Download source file. This downloads the specified data file in its original format.
Delete a data source
- Open the Source files tab in the source details panel.
- Click the More button > Delete source file.
- Click Delete.
- Return to the prototype and click Apply changes. This removes the file from the prototype data version.
You can delete data files to remove data from the prototype or to allow additional file uploads if you've reached the maximum of 10 files per prototype.
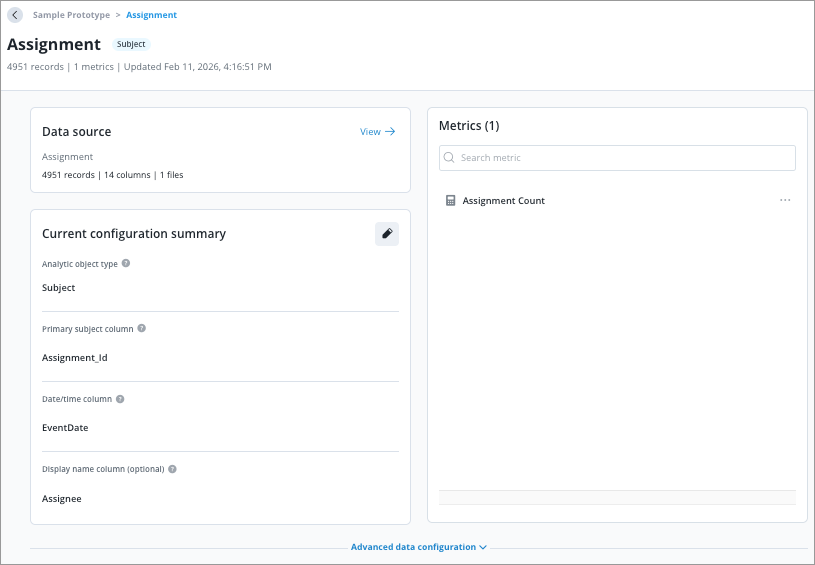
Current configuration summary
The columns you selected during prototype creation to represent the analytic object. In the configuration summary, you can change the primary subject column, date/time column, and display name column.
- In Current configuration summary, click the Edit button
 .
. - Select a different column for any of the available configurations.
- When finished, click Apply.
- Return to the prototype and click Validate changes.
- Click Apply changes. This updates the prototype data version with your analytic object changes.
Metrics
The Metrics panel lists the metrics for the prototype. You can create, edit, and delete metrics.
Create a metric
- In the Metrics panel, click Create metric.
- Type a metric name.
- Do one of the following:
- To generate a metric that calculates Average, Count, Median, Min, Max, or Sum, select the Calculation type and Data column.
- To write a metric formula using Visier Formula Language, click Write custom formula (advanced). For more information, see Metric formulas. After entering the formula, click Validate to verify that the metric formula is valid.
- Click Create metric.
Edit a metric
- In the Metrics panel, click a metric.
- In the Edit metric dialog, do any of the following:
- Change the Metric name.
- Change the Calculation type.
- Change the Data column.
- Change the Custom formula. Only available for custom formulas (advanced).
- Click Save metric.
Delete a metric
In the Metrics panel, hover over a metric and click the More button ![]() > Delete metric > Delete. Deleting a metric cannot be undone.
> Delete metric > Delete. Deleting a metric cannot be undone.
Advanced data configuration
During prototype creation, Visier creates attributes (dimensions and properties) based on the columns in the data file. In advanced data configuration, you can:
- Manually change the attribute types and their data types in the analytic object's advanced data configuration.
- Create new attributes after adding more data columns or by selecting previously deselected columns.
- Add references between analytic objects in the prototype and existing production analytic objects.
Open advanced data configuration
- In your prototype, under Analytic objects, select an analytic object.
- Scroll down to the bottom.
- Expand Advanced data configuration.
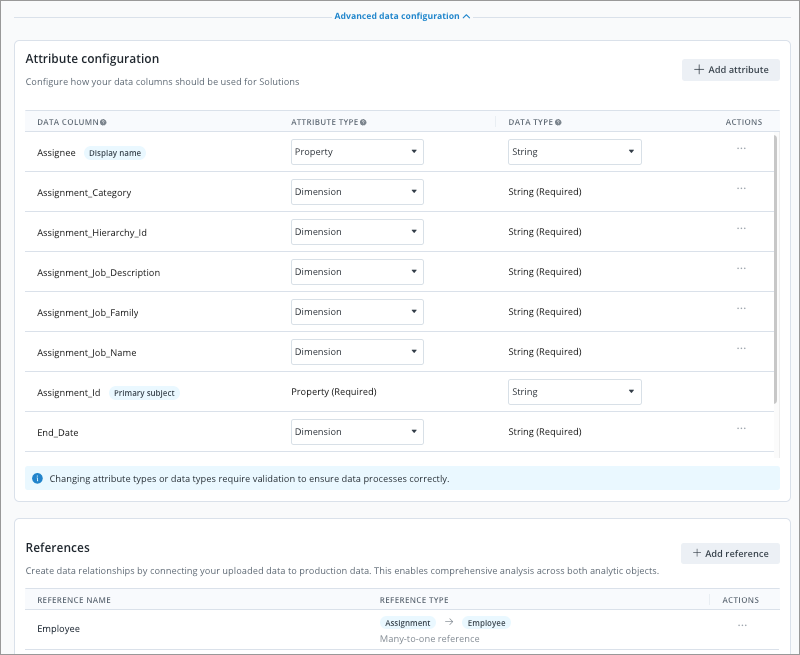
Configure existing attributes
In Attribute configuration, do any of the following:
- Change the attribute type.
- Change the data type. The list only includes data types that are compatible with the data type of the column. For example, if the column is a string, an attribute can be a string, large text, URL, or other string type.
- In Actions, click the More button > Delete attribute > Delete. If you want to get an attribute back after deleting it, you can find it in Add attributes.
- Return to the prototype and click Validate changes.
Add attributes
- In Attribute configuration, click Add attribute.
- Select a column from the data source. If the column isn't in the list, you might need to import more data with additional columns.
- Select whether the data is a property (individual value) or dimension (grouping category).
- Select a data type for the column.
- Click Create attribute.
- Return to the prototype and click Validate changes.
- Click Apply changes. This updates the prototype data version with your attribute changes.
Add references
Link your new file to existing Visier data with references. Create references between your prototype and production data. When referencing production data from a prototype, you will only see data that you have permission to view. A reference makes production data available in your prototype, as shown in the following screenshot where an Assignment prototype references Employee data. For more information about references, see References.
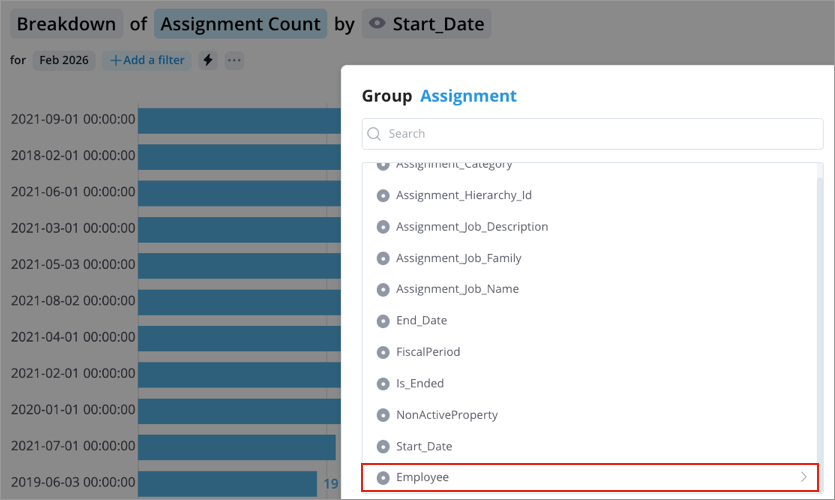
For example, connect a project assignment prototype to existing employee data. This requires that the employee project assignment data file contains a column that corresponds to the Employee subject's primary key. That is, the Assignee column must contain an Employee ID for each project assignment. To create the reference, link the Assignee column to Employee.
- In References, click Add reference.
- Select a Reference type.
- Prototype to other dataset reference: Links multiple rows in your prototype data to one row in production data or other prototype data.
- Other dataset in prototype to prototype reference: Links multiple rows in another prototype object's data to one row in the selected object's data.
- Select the dataset to link the prototype to.
- Type a name for the reference.
- In Match conditions, select the Column in prototype that connects to the other dataset. For example, if the Column in prototype is Email, select the connected subject's Email (or equivalent) column. You can add additional conditions if one column isn't unique enough to connect the datasets.
- Click Add reference.
- Return to the prototype and click Validate changes.
- Click Apply changes. This updates the prototype data version with the references.
Edit references
After adding references to a prototype, you can return later to edit them. In References, hover over a reference and click the More button ![]() > Edit reference.
> Edit reference.
You can change an existing reference's display name and match conditions. You can't change the reference type, including the reference direction and dataset. To change the reference type, delete the reference and add a new reference with the correct settings.