
Use SQL with Table Sources
Use SQL expressions to manage your source data.
Access requirements
Profiles: Data Engineer
Custom profile with these capabilities: Data (Write, Detailed)
Data required: Access to the sources you're managing
Reach out to your administrator for access.
Overview
Sources are the building blocks for data in Visier. They are the raw materials to map your data to Visier's analytic model.
Visier supports the following source types:
- File sources: File-based containers that use regex and override behavior to manage data. For more information about acceptable files, see Data File Guidelines.
- Table sources: Row-based containers that support incremental updates and SQL transformations during sync. For more information, see Use SQL with Table Sources.
The following table describes the differences between the behavior of each source type.
|
File sources |
Table sources |
|---|---|
|
Each data transfer or extraction outputs to a unique file. |
Each data transfer or extraction directly modifies the same table. |
|
Use Visier Extraction Language to query records in a source's Records tab or SQL to query sources in the Data > Query room. For more information, see Query Source Data. |
Use Spark SQL to interact with the table data. For more information, see Use SQL with Table Sources. |
|
To delete an individual's data, such as for GDPR compliance, open a Visier Technical Support ticket to remove the information one-by-one from every extracted file. |
To delete an individual's data, such as for GDPR compliance, use a DELETE SQL query on the table without contacting Visier Technical Support. Note: The snapshot retention period specifies how long to keep previous snapshots of tables before permanently deleting them. You can set the retention period between 1 and 180 days. The default is 3 days. |
|
The data is available in the Data Transfers room. For more information, see Navigate Studio. |
The data is available in the associated table source in the Sources room. For more information, see Sources. |
|
Exclude or delete uploaded files individually. Files load in order by snapshot time. |
Use the Reset action to roll the table back to a particular timestamp. This rolls back all changes since the timestamp. You can't easily undo actions or apply changes out of order. Tables do not keep a complete history of every action. |
|
Optionally enable Snap to midnight setting to move the snapshot time to the start of the day. |
Actions are applied strictly in order. |
|
Files uploaded manually or by SFTP connect to the source using a file regex. |
Because you upload files directly into a table source, files uploaded manually in the Data Transfers room or by SFTP cannot connect to the source. |
You can create table sources:
- Using data connectors. For more information, see Data In Connectors.
- With Visier APIs. For more information, see Table Source API.
- Manually. For more information, see Manually create a table source.
Difference from file sources
You can use Spark SQL to query, upsert, replace, commit, rollback, and process data. SQL expressions tell Visier how to map and replace data. File sources use Visier Extraction Language (VEL) and Override behavior.
A table source temporarily stores data while you commit the data to Visier, then discards the files. Table sources are better for near real-time data processing because they do not track individual files indefinitely and can efficiently handle updates and deletions. As a result, the volume of data to process is much lower.
Table sources support near real-time data freshness through data connectors. When enabled, Visier monitors the source system to retrieve the latest changes instead of waiting for the next scheduled data load. The freshness of your data depends on a variety of factors, including monitoring frequency, volume of the data changes received, and your organization's data architecture.
To discuss the feasibility of enabling near real-time data streaming for your tenant, contact your Customer/Partner Success Manager. For more information, see Enable near real-time data.
Near real-time data is available with the following connectors:
About transactions
To bring data into a table source, start a transaction. A transaction is a temporary container that stores data and SQL actions, such as inserting or replacing data in the table source. An open transaction is a write transaction or a read transaction.
- Write transaction: The transaction makes changes to a table source. One write transaction can be open at a time. Close a transaction by committing the transaction and processing the data. In an API call, specify tablesToModify to lock tables for writing during the transaction.
- Read transaction: The transaction can view data within a table source. While a SQL job processes changes to a table source, a read transaction will only see the data available prior to the job. In an API call, omit tablesToModify to make the transaction read-only.
About input files
A data file that you upload to a table source transaction is an input file. An input file can contain data to insert into your sources, IDs to match against to change or delete rows, or any other input for your SQL query.
SQL expressions reference input files in the transaction by the id field (set in the job's inputs array), not the filename.
Example: An input file is declared as "id": "new_employees" in the inputs field. SQL expressions reference this file as new_employees, regardless of the input file's filename.
If the id contains special characters such as dots or hyphens, wrap the ID in backticks; for example, `my-input.csv`.
Add data to a table source
Prerequisites: Connect your source data to objects in Visier. For more information, see Add a Mapping. If mapping by formula, use SQL expressions instead of VEL.
Use connectors to add data
If your table source is associated with a data connector, the table source receives new data after a data connector extraction job runs. For more information, see Run a Data Connector Extraction Job.
After a successful extraction job, the data is available in the associated table source in the Sources room. For more information, see Sources.
Use APIs to add data
- Start a transaction: POST /v1alpha/data/table-sources/transactions. For more information and code samples, see Start a transaction.
- Upload a file to the transaction: PUT /v1alpha/data/table-sources/transactions/{transactionId}/inputs/{filename}. For more information and code samples, see Upload an input file to a transaction.
- Apply SQL expressions and process the data: POST /v1alpha/data/table-sources/transactions/{transactionId}/jobs. For more information and code samples, see Run a SQL job within a transaction.
Manually add data
- On the global navigation bar, click Sources.
- Select the table source and click Records.
- In Temporary Data, click Add Files.
- Select the files to upload.
- In SQL Commands, type the SQL expressions to apply to the source. For an example of potential SQL expressions, see SQL examples.
- Click Execute SQL. The expression moves to Current Transaction.
- Optional: To remove SQL expressions, in Current Transaction, click Rollback.
- When finished, click Commit.
- To process the data, run a job. For more information, see Run a Job.
Define column settings
Assign each column a data type and optionally designate one column as the primary timestamp.
Use APIs to define columns
Define the columns array in any of the following API calls:
- Create a table source: POST /v1alpha/data/table-sources/tables. For more information and code samples, see Create a table source.
- Update a table source: PUT /v1alpha/data/table-sources/tables/{tableId}. For more information and code samples, see Update a table source.
Manually define columns
When you access a table source in the Sources room, you can create columns, assign column data types, and choose the primary timestamp. For more information, see Manually create a table source.
Edit key-value pairs
View and change the user-defined key-value pairs for a table source. In addition to key-value pairs, a table source's Table Properties tab displays the source's number of records, last updated date, and data size.
Use APIs to edit key-value pairs
- Retrieve a table source's existing key-value pairs: GET /v1alpha/data/table-sources/tables/{tableId}/metadata. In the response, look for metadata. For more information and code samples, see Retrieve table source metadata.
- Run a SQL job with the setMetadata action. POST /v1alpha/data/table-sources/transactions/{transactionId}/jobs. For more information and code samples, see setMetadata.
Manually edit key-value pairs
- On the global navigation bar, click Sources.
- Select the table source and click Table Properties.
- In Key/Value Metadata, do any of the following:
- To add a new key-value pair, click Add Pair. Type a key and value.
- To change an existing key-value pair, type a new key or value.
- To delete a key-value pair, click the Delete button
 .
.
- To revert your changes without saving, click Reset.
- To save your changes, click Commit. This executes the changes to the table source.
Set the snapshot retention period
Table sources use copy-on-write to keep all changes made to the table for a period of time. You can set the number of days to keep snapshots for a table before permanently deleting them. You cannot reset the table to a timestamp older than the retention period because older snapshots are permanently deleted.
Use APIs to set the snapshot retention period
Define the snapshotRetentionDays field in any of the following API calls:
- Create a table source: POST /v1alpha/data/table-sources/tables. For more information and code samples, see Create a table source.
- Update a table source: PUT /v1alpha/data/table-sources/tables/{tableId}. For more information and code samples, see Update a table source.
Tip: Want to revert the table source to a particular timestamp? If a snapshot exists for that time, call POST /v1alpha/data/table-sources/transactions/{transactionId}/jobs and use the reset action to restore the table as of the specified timestamp.
Manually set the snapshot retention period
- On the global navigation bar, click Sources.
- Select the table source and click Settings.
- In Snapshot retention (days), type the number of days to keep snapshots for the table source. Must be between 1 and 180 days. If blank, the default is 7 days.
- When finished, click Save.
Use materialized views
Limited AvailabilityA materialized view is a table source that automatically updates based on a SQL query that references other tables. When tables used in the query change, the materialized view updates to reflect those changes. A materialized view is a separate, independent source that remains linked to its upstream dependencies. The platform monitors these dependencies to ensure that the downstream view stays up to date whenever the upstream data changes. The materialized view receives the delta of any upstream changes based on the dependency's join condition. When a write transaction opens for an upstream table, the materialized view locks until the transaction commits or rolls back. This prevents pushing conflicting changes to the view.
A materialized view can have automatic or manual updates. When upstream tables are linked as dependencies, any change to an upstream source triggers an automatic refresh of the downstream materialized view. Alternatively, you can manually refresh the view using the Regenerate action.
In the materialized view, you can:
- Join, union, or aggregate data from disparate upstream tables. For example, combine HRIS data with recruitment or payroll tables.
- Build self-healing data pipelines where downstream transformation layers automatically refresh in response to upstream data ingestion, reducing manual intervention.
- Pre-compute complex SQL transformations and joins into a materialized view with SQL. This allows for transformations that aren't possible with source mappings and business rules.
You can use materialized views manually in Studio or use the Table Source API to manage your materialized views.
Manually configure a materialized view
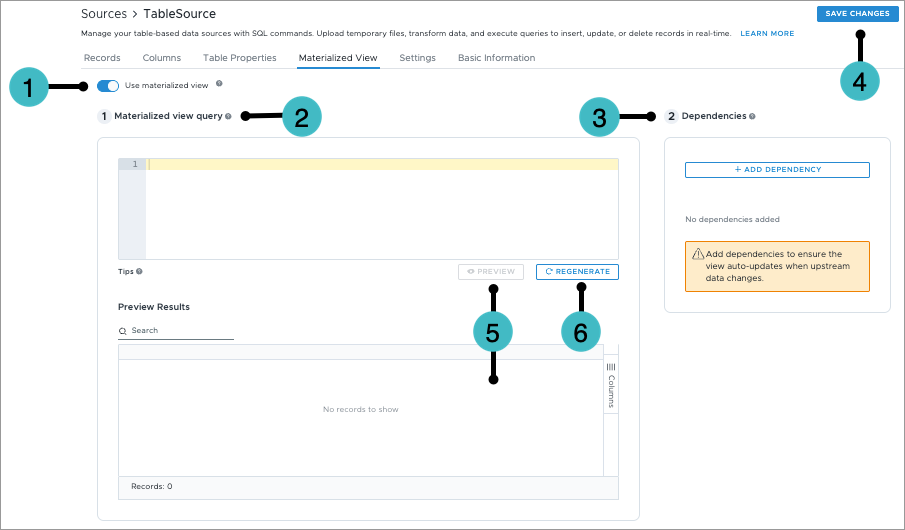
- Use materialized view: Turn on to turn the table source into a materialized view.
- Materialized view query: The workspace editor where you write and execute the Spark SQL syntax to define the view's logic.
-
Dependencies: The upstream table sources for the view. Dependencies enable automated data synchronization. When you add a dependency, select the upstream table and set a filter condition. The filter condition correlates the upstream table's changed rows (input) to rows in the materialized view (output).
CopySample filter conditioninput.EmployeeID = output.EmployeeID AND input.EventDate = output.EventDate - Save Changes: Commits all changes made to both the SQL query logic and the defined upstream dependencies. If there are changes to the query, saving regenerates the table. If your query changes the columns, you'll be prompted to review and correct the columns.
- Preview: A data validation table that displays a sample of the resulting dataset based on the current SQL query before committing changes.
- Regenerate: Re-executes the query and refreshes the dataset during troubleshooting, query updates, or when manual data fetching is required. Must save changes before regenerating.
Use APIs to configure a materialized view
- Use materialized view and set dependencies: POST/v1alpha/data/table-sources/tables. The following code sample shows the materializedView object and dependencies.CopySample code: Enable a materialized view
"materializedView": {
"enabled": true,
"query": "SELECT id, a, b FROM table1 JOIN table2 ON table1.id = table2.id",
"dependencies": [
{
"upstreamTable": "table1",
"joinFilter": "input.id = output.id"
}
]
} - Optional: Regenerate the view: POST/v1alpha/data/table-sources/tables/{tableId}/regenerate. This manually updates the materialized view based on upstream tables.
For more information, see "Table Source" in API Reference.
Best practices for materialized views
We recommend the following best practices for using SQL in materialized views.
Avoid SELECT *
Do not use SELECT * in the materialized view's join condition. If used and an upstream table's columns change, the view will break. To change a materialized view's column, see Manually create a table source.
Match null column values
In SQL, NULL = NULL is never true. To match null column values, consider using IS NOT DISTINCT FROM instead of =.
Use table sources with analytic tenants
Administrating tenants can use table sources to prepare files and data jobs for their analytic tenants. Visier runs a SQL dispatching job after you commit data. You must specify the tenants to dispatch. The maximum number of tenants per job is 5000. Use APIs to manage table sources for your tenants. For more information, see Table Source API.
Option 1: Tenant-specific data
Upload data intended for a specific tenant. Specify the tenant in the TargetTenantID API header. This is best if your data is already separated by tenant.
Option 2: File distribution
Use file distribution API settings to split data based on column values. The data file must contain a tenant code column populated with the tenants that will receive data.
To distribute files:
- Call the POST /v1alpha/data/table-sources/transactions/{transactionId}/jobs endpoint and set the tenants parameter to the tenants for which to run the job.
- Optional: Specify the inputDistributionMode as one of DISTRIBUTE_FILES or DISTRIBUTE_ROWS, as described in the next sections.
- Call the POST /v1alpha/data/table-sources/tables or PUT /v1alpha/data/table-sources/tables/{tableId} endpoint and set the canChildrenInherit and canChildrenInheritData API parameters to true at the administrating tenant level.
DISTRIBUTE_FILES
Distribute data to multiple tenants based on the file path. Use this for file containers like ZIP files. The input filename must exist under subdirectories. The directory name is the tenant name. This is similar to File Upload Using SFTP where a ZIP file contains one folder per analytic tenant.
// inputs array:

{
  "filename": "Employee.csv",
  "format": {
    "csv": {
      "header": true
    }
  },
  "inputDistributionMode": "DISTRIBUTE_FILES",
  "fileContainerName": "Employee.zip"
}

// File structure for Employee.zip:

WFF_administratingTenant~analyticTenant1/
  Employee.csv
WFF_administratingTenant~analyticTenant2/
  Employee.csv
If prependAdminTenantCode is true, use the directory names analyticTenant1/ and analyticTenant2/ without the WFF_administratingTenant~ prefix.
DISTRIBUTE_ROWS
Distribute data by splitting rows based on the tenant code column. Each tenant only receives their intended rows. This is equivalent to Distribute Source Files to Analytic Tenants.
// inputs array:

{
  "filename": "Employee.csv",
  "format": {
    "csv": {
      "header": true
    }
  },
  "inputDistributionMode": "DISTRIBUTE_ROWS",
  "tenantCodeColumn": "TenantCode"
}

// File structure for Employee.csv:
TenantCode,EmployeeID,Name
WFF_administratingTenant~analyticTenant1,302123,Brian
WFF_administratingTenant~analyticTenant2,302123,Roger
If prependAdminTenantCode is true, use the directory names analyticTenant1/ and analyticTenant2/ without the WFF_administratingTenant~ prefix.
Option 3: Source inheritance
Use source data inheritance to share read-only data with tenants, such as for lookup data. Analytic tenants cannot change the source. They see the same data as the administrating tenant.
Make modifications to inherited table sources at the administrating tenant level. After changing a table source, run a job for your analytic tenants using the POST /v1alpha/op/jobs/processing-jobs endpoint. The Table Source API can start processing jobs at the administrating tenant level, but cannot trigger processing jobs for analytic tenants.
At the administrating tenant level, set the following API parameters to true when creating or updating a table source.
- canChildrenInherit: Analytic tenants inherit the table definition.
- canChildrenInheritData: Analytic tenants inherit the table data.
- filterInheritedDataByTenant: Analytic tenants only see data from inherited table data for rows where exactly one column of type TENANT_ID or CUSTOMER_ID matches their own tenant code. canChildrenInheritData must be true.
Alternatively, you can enable source inheritance in Studio:
- In the administrating tenant, on the global navigation bar, click Data > Sources.
- Select a table source.
- Navigate to Settings.
- In Inheritance mode, select one of the following:
- Table design only: Analytic tenants inherit the table definition. This is equivalent to canChildrenInherit.
- Full table data (shared): Analytic tenants inherit the table data. This is equivalent to canChildrenInheritData.
- Table data filtered by tenant: Analytic tenants only see data from inherited table data for rows where exactly one column of type TENANT_ID or CUSTOMER_ID matches their own tenant code. This is equivalent to filterInheritedDataByTenant.
- When finished, click Save.
This is equivalent to Make Source File Data Inheritable by Analytic Tenants for file sources.
SQL examples
This section provides sample SQL expressions to use in table source queries and mapping formulas. For more information about SQL functions, see Apache Spark SQL Functions.
Table source mapping formulas have protective limitations. They cannot use functions that change row counts or depend on table order. For a list of SQL functions that are not supported, see Unsupported SQL functions.
Samples in this section use the following table.
-- employee_custom_data
-- Columns: employee_id (STRING), badge_number (STRING), office_floor (INTEGER),
--          is_remote (BOOLEAN), effective_date (DATE)
SELECT
SELECT employee_id, badge_number, office_floor, effective_date
FROM employee_custom_dataSELECT employee_id, badge_number, office_floor, effective_date
FROM employee_custom_data
WHERE effective_date >= '2026-01-01'
AND is_remote = falseSELECT office_floor,
COUNT(*) AS headcount,
SUM(CASE WHEN is_remote THEN 1 ELSE 0 END) AS remote_count
FROM employee_custom_data
WHERE effective_date = '2026-01-01'
GROUP BY office_floor
ORDER BY office_floorSELECT e.employee_id,
e.badge_number,
n.office_floor,
n.is_remote,
n.effective_date
FROM new_employees n
LEFT JOIN employee_custom_data e
ON e.employee_id = n.employee_id
AND e.effective_date = n.effective_dateSELECT employee_id, badge_number, office_floor, is_remote, effective_date
FROM (
SELECT *,
ROW_NUMBER() OVER (PARTITION BY employee_id ORDER BY effective_date DESC) AS rn
FROM employee_custom_data
) ranked
WHERE rn = 1INSERT
INSERT INTO employee_custom_data
SELECT employee_id, badge_number, office_floor, is_remote, effective_date
FROM new_employeesINSERT INTO employee_custom_data (employee_id, badge_number, office_floor, is_remote, effective_date)
VALUES ('E001', 'B-1042', 3, false, '2026-03-01')INSERT INTO employee_custom_data
SELECT n.employee_id, n.badge_number, n.office_floor, n.is_remote, n.effective_date
FROM new_employees n
WHERE NOT EXISTS (
SELECT 1
FROM employee_custom_data e
WHERE e.employee_id = n.employee_id
AND e.effective_date = n.effective_date
)UPDATE
UPDATE employee_custom_data
SET is_remote = true
WHERE office_floor = 0MERGE INTO employee_custom_data AS target
USING new_employees AS source
ON target.employee_id = source.employee_id
AND target.effective_date = source.effective_date
WHEN MATCHED THEN
UPDATE SET
office_floor = source.office_floor,
is_remote = source.is_remoteNote: UPDATE only supports a WHERE clause. UPDATE does not support join-based updates. Use MERGE with a WHEN MATCHED clause to update existing rows from a source view without inserting new rows.
DELETE
DELETE FROM employee_custom_data
WHERE effective_date = '2025-12-31'DELETE FROM employee_custom_data
WHERE employee_id NOT IN (
SELECT employee_id FROM new_employees
)DELETE FROM employee_custom_data
WHERE (employee_id, effective_date) IN (
SELECT employee_id, effective_date
FROM new_employees
WHERE is_deleted = true
)The above example processes a CDC feed where the input file includes an is_deleted column. This removes target file rows that have a matching key in the source file and are flagged for deletion.
MERGE
MERGE INTO employee_custom_data AS target
USING new_employees AS source
ON target.employee_id = source.employee_id
AND target.effective_date = source.effective_date
WHEN MATCHED THEN
UPDATE SET
badge_number = source.badge_number,
office_floor = source.office_floor,
is_remote = source.is_remote
WHEN NOT MATCHED THEN
INSERT (employee_id, badge_number, office_floor, is_remote, effective_date)
VALUES (source.employee_id, source.badge_number, source.office_floor, source.is_remote, source.effective_date)A single MERGE statement can handle updates and inserts but cannot delete rows that are absent from the source. To implement a full sync, run a MERGE for the upsert followed by a separate DELETE for rows no longer present in the source. These can be submitted as two separate query actions in the same job.
// Upsert from the source file
MERGE INTO employee_custom_data AS target
USING new_employees AS source
ON target.employee_id = source.employee_id
AND target.effective_date = source.effective_date
WHEN MATCHED THEN
UPDATE SET
badge_number = source.badge_number,
office_floor = source.office_floor,
is_remote = source.is_remote
WHEN NOT MATCHED THEN
INSERT (employee_id, badge_number, office_floor, is_remote, effective_date)
VALUES (source.employee_id, source.badge_number, source.office_floor, source.is_remote, source.effective_date)
// Delete rows that are no longer in the source file
DELETE FROM employee_custom_data
WHERE employee_id NOT IN (SELECT employee_id FROM new_employees)The following example processes a CDC feed where the input includes an op column indicating the operation type:
- 'I' for insert.
- 'U' for update.
- 'D' for delete.
This removes rows matched by key that are flagged for deletion, updates other matched rows are updated, and inserts unmatched rows that are not deletions.
MERGE INTO employee_custom_data AS target
USING new_employees AS source
ON target.employee_id = source.employee_id
AND target.effective_date = source.effective_date
WHEN MATCHED AND source.op = 'D' THEN
DELETE
WHEN MATCHED AND source.op != 'D' THEN
UPDATE SET
badge_number = source.badge_number,
office_floor = source.office_floor,
is_remote = source.is_remote
WHEN NOT MATCHED AND source.op != 'D' THEN
INSERT (employee_id, badge_number, office_floor, is_remote, effective_date)
VALUES (source.employee_id, source.badge_number, source.office_floor, source.is_remote, source.effective_date)MERGE INTO employee_custom_data AS target
USING new_employees AS source
ON target.employee_id = source.employee_id
AND target.effective_date = source.effective_date
WHEN MATCHED AND (
target.office_floor <> source.office_floor OR
target.is_remote <> source.is_remote
) THEN
UPDATE SET
office_floor = source.office_floor,
is_remote = source.is_remote
WHEN NOT MATCHED THEN
INSERT (employee_id, badge_number, office_floor, is_remote, effective_date)
VALUES (source.employee_id, source.badge_number, source.office_floor, source.is_remote, source.effective_date)Spark SQL for column mappings
Use these expressions in the SELECT list of a query to transform or derive column values before writing them to a table source.
String functions
SUBSTR(employee_id, 1, 3) AS id_prefixREGEXP_REPLACE(badge_number, '[^A-Za-z0-9]', '') AS badge_cleanSPLIT(location_code, '-')[0] AS region_codeCOALESCE(department_name, 'Unknown') AS department_nameCOALESCE(department_name, 'Unknown') AS department_nameDate and time functions
YEAR(effective_date) AS year
MONTH(effective_date) AS month
DAYOFWEEK(effective_date) AS day_of_weekConditional expressions
CASE
WHEN office_floor >= 10 THEN 'Executive'
WHEN office_floor >= 5 THEN 'Senior'
ELSE 'Standard'
END AS floor_tierNULLIF(badge_number, 'N/A') AS badge_numberCOALESCE(preferred_name, legal_name, employee_id) AS display_nameNumeric functions
CASE WHEN total > 0 THEN ROUND(part / total * 100, 1) ELSE 0.0 END AS pctType casting
Hashing and anonymization
SHA2(employee_id, 256) AS employee_id_hashUnsupported SQL functions
Table source mapping formulas have protective limitations. They cannot use functions that change row counts or depend on table order.
Unsupported in mapping formulas and source queries
Table sources do not support the following functions in any way.
- Data definition language (DDL): CREATE, DROP, ALTER
- Procedures: CALL
- Table properties: TBLPROPERTIES
- Insecure functions: These functions expose sensitive information or allow arbitrary code execution, and are not supported.
- current_catalog
- current_database
- current_schema
- current_user
- java_method
- raise_method
- raise_error
- reflect
- try_reflect
- user
- version
Unsupported in mapping formulas
You can use the following functions in source queries but not in mapping formulas.
Aggregating functions
- array_agg
- bitmap_or_agg
- bitmap_construct_agg
- count
- count_if
- count_min_sketch
- cume_dist
- histogram_numeric
- hll_sketch_agg
- hll_union_agg
- kurtosis
- grouping
- grouping_id
- sum
- avg
- min
- max
- collect_list
- collect_set
- approx_count_distinct
- first
- last
Set generating functions
- explode
- explode_outer
- inline
- inline_outer
- json_tuple
- posexplode
- posexplode_outer
- stack
Side effect functions
- curdate
- current_date
- current_timestamp
- localtimestamp
- monotonically_increasing_id
- now
- rand
- randn
- random
- session_window
- shuffle
Window functions
- row_number
- rank
- dense_rank
- ntile
- lag
- lead
- cume_dist
- percent_rank