
Design by Organization
Learn how to use the organizations view to add, remove, move, or edit entire organizations.
Access requirements
Permission with these capabilities: Organization Design
Reach out to your administrator for access.
Overview
Use organizations view to model changes at a high level, focusing on the structure and total costs of entire organizations. This view provides a big-picture look at your organization, allowing you to add, remove, edit, or reorganize the structure as needed. Each node in this view represents a specific organization and displays aggregate values for budgeted cost, total positions, and vacant positions.
Note: The positions and organizations views use different hierarchies, so a structural change in one view doesn't carry over to the other. Moving an organization in the organizations view doesn't move its positions in the positions view, and moving a position doesn't move its organization.
To access the organizations view:
- Open a scenario in the Organization Design room.
- Select Organizations view.
Add organizations
- Click an organization, then click the Add organization button
 .
.Result: A new organization is created under the parent organization.
- Click the new organization.
- In the Organization details panel, you can edit the details of the organization. For more information, see Edit organization details.
Remove organizations
- Click an organization, then click the Remove organization button
 .
. -
Select one of the following:
- Leave positions without an organization. This will place those positions in the No organization panel
 and the organization in the Holding area
  .
. - Move positions to another organization.
- Leave positions without an organization. This will place those positions in the No organization panel
To add them back, click and drag the organization or position back into the canvas. Drag multiple positions back into an organization by:
- Holding Shift to select a continuous range (click the first and last position).
- Holding Ctrl/Cmd to select specific, individual positions.
Move organizations
Move organizations by doing one of the following:
- Click and drag an organization under a new parent organization.
- Click an organization, then click the Move organization button
 and search for the new parent organization to move it to.
Moving an organization will relocate that specific organization only. Moving a parent organization relocates its entire reporting chain.
Edit organization details
-
Click an organization to open the Organization details panel.
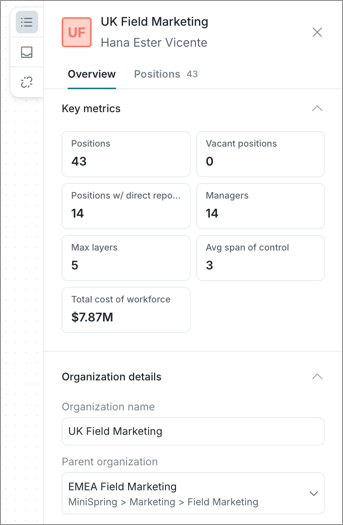
- In the Overview panel, you can:
- Hover over key metrics to compare Scenario, Baseline, and Difference values. Scenario and Baseline compare the current values based on your modeled changes against the original values from when you first created the project, while Difference shows the difference between the two. A dash (-) indicates no difference. You can also view a detailed metric breakdown. For more information, see Generate a Metric Breakdown.
Edit the details of the organization such as name, parent organization, and organization head.
Tip: Look for purple change indicators on nodes to see which ones you've edited:
- A purple indicator in the corner means the organization has been edited.
- A purple dot on the bottom means a sub-organization has been edited.
- In the Positions panel, you can:
- View the positions and employees within the selected organization.
- Select a position and drag it into a new organization.
- Search by employee name or position.
Add positions to an organization
To add positions to an organization, do one of the following:
- In the organizations view:
- Click an organization.
- In the Organization details panel, click the Positions tab.
Drag and drop a position into an organization.
Result: In the positions view, the position node shows the new organization in its position details.
- In the positions view, you can:
- Add a new position and select the organization in the Add positions dialog. For more information, see Add positions.
- Edit an existing position and change the organization in the position details. For more information, see Edit position details.
Customize nodes
You can customize the appearance of nodes to display the information most relevant to your goals. Examples of data you can include on nodes are key metrics, employee and position details, and more. Node sizes can also be adjusted if content is cut off.
To customize nodes:
- In a scenario, click the Settings button
 .
. -
Under Nodes, select the properties you want to display on position or organization nodes. You can select up to 5 properties to display on a node.
Note: For properties with named levels (such as Location, which has levels like Country, State, and City), you can select specific levels to include. Under Added properties, click the Filter button
 next to the property to select the level that is displayed in your nodes.
 - Click the Back button
 to return to the scenario.