
Design by Position
Learn how to use the positions view to manage individual positions and edit specific position details.
Access requirements
Permission with these capabilities: Organization Design
Reach out to your administrator for access.
Overview
Positions view is the default view for modeling changes to your organization. Each node in this view represents a specific position. This is where you can manage individual employee assignments, handle position vacancies, and refine the specific attributes of every position in your organization.
Note: The positions and organizations views use different hierarchies, so a structural change in one view doesn't carry over to the other. Moving an organization in the organizations view doesn't move its positions in the positions view, and moving a position doesn't move its organization.
To access the positions view:
- Open a scenario in the Organization Design room.
- Select Positions view.
Add positions
- Click a position, then click the Add position button
 .
. -
In the Add positions dialog, select the number of positions you want to add.
-
Fill in the Position details, such as job name, pay level, and manager status.
-
Click Add position to add your positions.
Tip: Click Add another before clicking Add position to continue adding positions. If selected, the creation panel will stay open, pre-filled with your last configuration. This lets you quickly edit and add similar positions.
Result: The vacant positions you added are created under the selected node.
In the Position details panel, you can edit the details of the position. For more information, see Edit position details.
Move positions
Move positions by doing one of the following:
- Click and drag a position under a new manager.
- Click a position, then click the Move position button
 and search for the new manager to move them to.
Moving a position with no direct reports will relocate that specific position only. Moving a position with direct reports relocates its entire reporting chain.
Duplicate positions
You can duplicate a position multiple times to quickly build out a new team.
- Click a position, then click the Duplicate position button
 .
.Result: A vacant copy of the position and its attributes (job name, location, cost) is created under the manager.
- Click the duplicated position.
- In the Position details panel, you can edit the details of the position. For more information, see Edit position details.
Tip: You can quickly add an assignee to a vacant position by clicking the position and then clicking the Add employee button  .
.
Remove positions or employees
- Click a position, then click the Remove position button
 or Remove employee button
  .
.Result: The position or employee is moved to the holding area. If you removed an employee, the employee is moved to the holding area, but their position remains on the canvas as a vacancy with its associated costs. Optionally, you can specify the change type in the Position details panel to clarify why the decision was made.
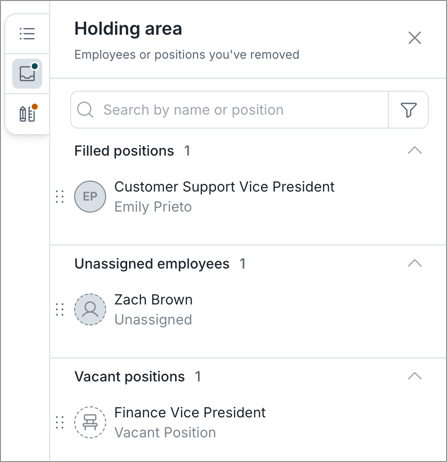
To add them back, click and drag the employee or position from the holding area back into the canvas. You can:
- Drag an employee onto a vacant position to assign them to it.
- Drag an employee onto a filled position to create a new position for them reporting to that position.
- Drag a position (filled or vacant) onto a position to have it report to that position.
Edit position details
-
Click a position to open the Position details panel.
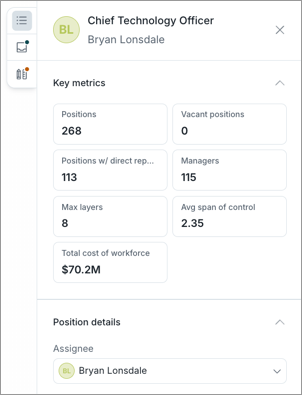
- In the Position details panel, you can:
- Hover over key metrics to compare Scenario, Baseline, and Difference values. Scenario and Baseline compare the current values based on your modeled changes against the original values from when you first created the project, while Difference shows the difference between the two. A dash (-) indicates no difference. You can also view a detailed metric breakdown. For more information, see Generate a Metric Breakdown.
Edit the details of the position such as assignee, job name, organization, location, and budgeted cost. When you change an employee's organization in the Position details panel, the change appears in the Positions panel in the organizations view.
Tip: Look for purple change indicators on nodes to see which ones you've edited.
- A purple indicator in the corner means the position has been edited.
- A purple dot on the bottom means a direct report has been edited.
When editing an attribute in the position details, you may need to assign an attribute value—such as a new Pay Level or Location—that does not yet exist in your current data. You can create these new values on the fly to keep your structure accurate.
To create a new attribute value:
- In the Position details panel, under Position details, click an attribute value. For example, Pay Level 10.
- Type the name of the new value. For example, Pay Level 12.
- Click Add.
Some attributes, such as Location, require additional steps to ensure they roll up correctly in your location hierarchy. For example, if you want to add Kyoto as a new city, you'll need to provide all the members of the location hierarchy such as the Region, Country, State, City, and Site.
Hide employees
Click the Hide employees button  to remove employee names from the canvas. This allows for unbiased structural planning by focusing on positions rather than individuals.
Organization Design is built on a position-based data model, which means that you can create, move, or delete positions independently of the employees who fill them. When you are finished modeling and ready to export, the export captures the changes made to these positions, ensuring your organization structure remains accurate regardless of individual staffing changes.
Focus on position
To focus on specific positions within a scenario, do one of the following:
- Double-click a node.
- Click the Focus on node button
 .
.
Result: Direct reports will be brought up horizontally for a clearer view.
To leave focus mode, click the job name above the node.
Customize nodes
You can customize the appearance of nodes to display the information most relevant to your goals. Examples of data you can include on nodes are key metrics, employee and position details, and more. Node sizes can also be adjusted if content is cut off.
To customize nodes:
- In a scenario, click the Settings button
 .
. -
Under Nodes, select the properties you want to display on position or organization nodes. You can select up to 5 properties to display on a node.
Note: For properties with named levels (such as Location, which has levels like Country, State, and City), you can select specific levels to include. Under Added properties, click the Filter button
 next to the property to select the level that is displayed in your nodes.
 - Click the Back button
 to return to the scenario.
Design principles and custom checks
Design principles are organizational rules that an administrator sets up to help you design your scenarios. If your administrator has set up design principles, you will see any issues within your scenario that violate those principles in the Design principles panel  .
.
Additionally, you can create your own scenario-specific validation rules with custom checks. For more information about how to review design principles and set up custom checks, see Review Design Principles.