Create a Selection Concept
Learn how to create, configure, and customize a selection concept.
Access requirements
Profiles: Basic Model Developer
Custom profile with these capabilities: Model (Write, Simple)
Reach out to your administrator for access.
Overview
When building or modifying a selection concept, you can set whether the concept selects a population using a calculation formula or member selection.
- Calculated: Selects population members using a formula. If the concept uses numeric- or date-based data or uses AND/OR conditions, use "calculated". No additional configuration.
- Member: Selects population members through explicit member selection. If the concept uses text-based data, use "member". Add dimensions to the concept and select the dimension members to include in the population.
Example: Let's say you want to create a concept that includes all employees who were born within a specific time range, such as between 1981 to 1996. In Visier, you have a property called Birth Date that records each employee's birth year. The Birth Date property uses date data. When creating a 1981-1996 selection concept, you can select "calculated" and write the formula date("1981-01-01") <= Employee.Birth_Date && Employee.Birth_Date <= date("1996-12-31").
Example: Let's say you want to create a concept that selects all active applicants. However, your organization has two applicant pipelines: the normal applicant process and the campus process for students. In Visier, you already have two process concepts that represent the normal applicant process and the campus process. To select all active applicants with a selection concept, you can select "calculated" and write a formula that excludes all applicant and campus stages that are considered inactive: exclude(members(Normal_Process.Stage, List(List("Hired_Yet_To_Start"),List("Rejected"),List("Abandoned")))) && exclude(members(Campus_Process.Stage, List(List("Graduate_Hire"), List("Rejected"), List("Abandon")))) This formula uses AND conditions (&&) to specify the members to exclude.
Example: Let's say you want to create a concept that selects all current employees. Your organization has text-based data that describes each employee's Employment Status. To select all current employees, in the Customize tab, you can select "member" and add the dimension "Employment Status". In the Configure tab, select the Employment Status values "Active" and "On Notice". This means the Current Employees concept includes all employees whose employment status is Active or On Notice in the population.
Tip:
- Watch this video to learn how to configure selection and calculation concepts.
- For a tutorial that walks you through creating a new concept, see Create New Employee Attributes and Metrics.
Create a selection concept
- Do one of the following:
In a project, on the navigation bar, click Model > Concepts.
In a project, on the navigation bar, click Model > Analytic Objects.
Select an object.
In Attributes, click Create Attribute > Concept.
- Select Selection.
- If using dimension members to define the concept, select Member. If using a formula to define the concept, select Calculated.
- Click Next.
- Select an analytic object, and then click Next.
-
Type a display name and description.
- Click Create.
Customize a selection concept
To customize a selection concept, decide whether the concept is calculated or member. If calculated, write the formula. If member, choose the dimension from which to select members to include in the concept's population. You can then select the dimension members in the Configure tab.
Tip: You can convert a selection concept from Member to Calculated or Calculated to Member at any time. To convert a selection concept:
-
In a project, on the navigation bar, click Model > Concepts.
- Select a selection concept.
- In the Customize tab, select Member or Calculated.
- In the Convert dialog, do one of the following:
- If Calculated to Member, check that the correct analytic object is selected and then click Convert. After the conversion, you can continue with regular customization. For more information, see Member selection.
- If Member to Calculated, click Convert. After the conversion, you can write the calculated formula. For more information, see Calculated.
Member selection
Member selection allows you to pick which dimension members the concept will select for the population. Dimension members correspond to data values in your source columns. First, select the correct dimensions for the concept. After selecting the dimensions, you can then select the members. For more information, see Configure a selection concept.
-
In a project, on the navigation bar, click Model > Concepts.
- Select a selection concept.
- In the Customize tab, select Member.
- In Selected dimensions, click Add Dimensions.
- Select the dimensions needed for your concept.
Note: If the selected dimensions are shared, the selection concept will automatically be applied to analytic objects that share all of the selected dimensions.
- Click Add.
Example: Employment Type
Let's say you want to create a concept that selects all part-time employees. In the concept's Customize tab, add the Employment Type dimension. You chose the Employment Type dimension because it's connected to the column in your source data that defines part-time or full-time employment types. Next, you can select all part-time values in the Configure tab. For more information, see Configure a selection concept.
Calculated
Calculated allows you to write a formula that selects values. If you choose calculated, no configuration is required.
-
In a project, on the navigation bar, click Model > Concepts.
- Select a selection concept.
- In the Customize tab, click Calculated.
- Type a formula in the formula box.
- Click Validate.
Example: Generation X
Let's say you want to create a calculated selection concept that selects individuals who are part of Generation X. In the concept's Customize tab, write the formula: DateOfBirth <= date(“1965-01-01”) && DateOfBirth >= date(“1979-12-31”). This selects all individuals whose date of birth is between January 1, 1965 and December 31, 1979, defined as Generation X.
Configure a selection concept
To configure a member selection concept, include and exclude values from your data (known as "dimension members"). There is no configuration for calculated selection concepts. For more information, see Calculated.
Note:
- For a tutorial that walks you through configuring concepts, see Configure Concepts After Loading New Data.
To configure a member selection concept:
-
In a project, on the navigation bar, click Model > Concepts.
- Select a selection concept.
- In the Configure tab, click a dimension member to configure.
- To include members in your concept, select all the applicable members from the Include list.
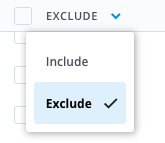
- Optional: Choose members to exclude by clicking the Include/Exclude arrow and selecting Exclude.
The following screenshot shows an example of the configuration area for a member selection concept.
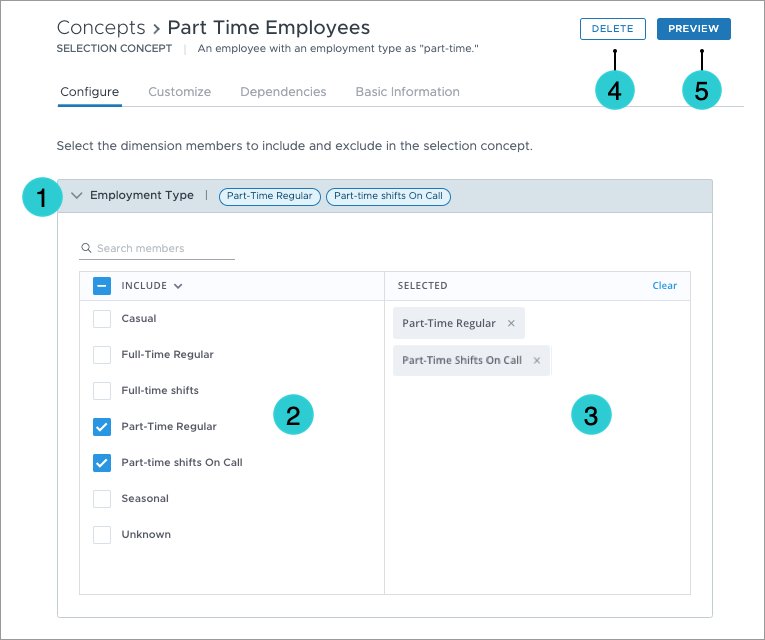
- Dimension: The dimension or dimensions that the selection concept uses. This can be modified in the Customize tab.
-
Include/Exclude: The dimensions members to include or exclude in the selection concept.
Note: You can toggle the Include button to Exclude if you want to exclude members from the concept.
- Selected: The selected dimension members. These are the members that will be included or excluded when analyzing the concept in the solution.
- Delete: A button to delete the concept.
- Preview: A button to preview the concept in the solution.
Automated concept configuration
Prerequisites: Your organization must opt in to AI features. In the global workspace, click Settings > AI Features.
Use Automap to configure concepts based on AI recommendations. With automap, Visier can detect unconfigured values and intelligently suggest configurations. The AI model used in this feature was trained on datasets that may contain historical, societal, and statistical biases and can inadvertently perpetuate these patterns in the output. Please review the outputs carefully. For more details on Visier's AI Bias prevention, see Bias Prevention and Responsible AI.
To configure a concept with automap:
- In a project, on the navigation bar, click Model > Concepts.
- Select a calculation, process, or member selection concept from the list.
- In the Configure tab, click Automap.
Result: Visier determines whether any of the unconfigured values belong to an existing concept member. If so, Visier includes the values appropriately. To see the summary, click View Summary.
- Optional: Review the mapped values and unmap any values if necessary.
Automap can only be used to include values, for selection concepts you must exclude values manually. Automap remembers your mapping preferences. If you've previously mapped or unmapped members manually, automap will respect those choices and won't automatically remap them.
To reset the configuration and apply automap, click the More options button ![]() > Reset configurations.
> Reset configurations.
Note: Automap is available for selection concepts with under 200 members and process/calculation concepts with under 50 members. Selection concepts with more than one dimension are not supported.
Validate a concept
Access requirements
Profiles: Basic Model Developer
Custom profile with these capabilities: Model (Read, Simple)
Data required: Access to data you're validating
Reach out to your administrator for access.
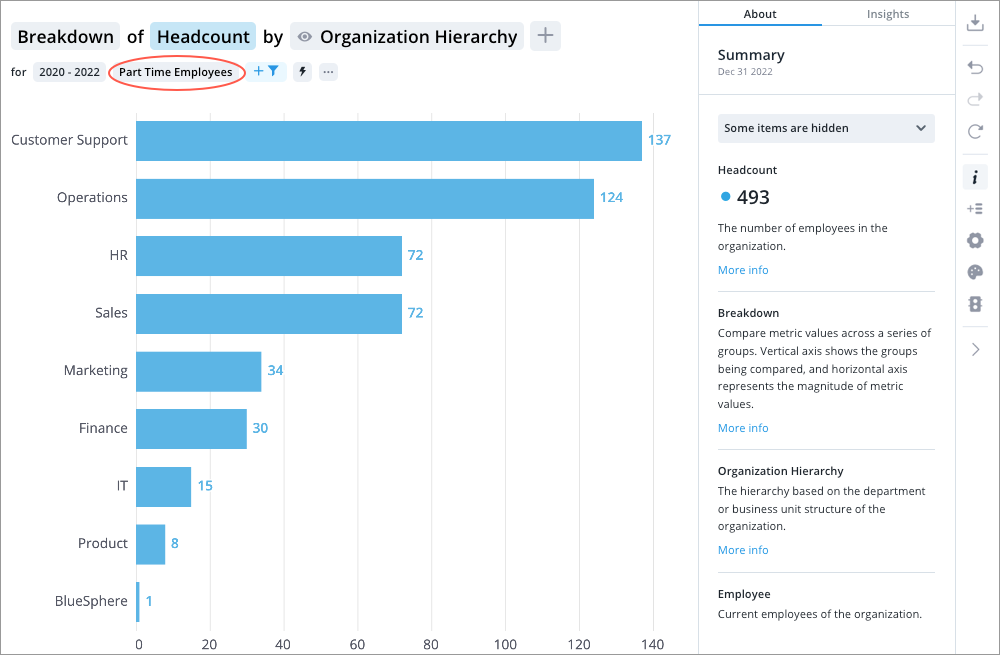
Previewing your concept allows you to quickly look at your concept as a visual to determine whether its components are configured correctly. To preview your new concept, its associated analytic object must have a default metric. For more information, see Default metric.
-
In a project, on the navigation bar, click Model > Concepts.
-
Select a concept.
- In the upper-right corner, click Preview.
Note: The visual won't display if the concept was configured incorrectly.
The following screenshot shows a preview of the Part Time Employees concept in a Breakdown of Headcount by Organization Hierarchy filtered by Part Time Employees. It shows that in 2020-2022, the organization had 493 Part Time Employees (defined in the concept as any employees whose Employment Type is Part-Time Regular or Part-Time Shifts On Call).