Create a Lookup Mapping
Connect a property to a lookup mapping to augment or replace its values using data from another source.
Access requirements
Profiles: Data Engineer
Custom profile with these capabilities: Data (Write, Detailed)
Reach out to your administrator for access.
Overview
In a mapping, you can replace or augment a property's values using a lookup mapping.
- Augment: Fills in empty or null values in the property with the values from the lookup mapping.
- Replace: Replaces existing values in the property with the values from the lookup mapping.
The lookup mapping joins the data tables for a target property using a different property. To make this possible, you must identify a property in the target and a property in the lookup mapping to act as keys to join the data tables. The target key and the mapping key work together to find matching records to then join data tables from the target and the lookup mapping. This workflow generates a business rule that augments or replaces the property's values as defined by you.
To connect a subject member ID property, such as EmployeeID, to a lookup mapping, see Create a static map lookup.
Create a lookup mapping
Select lookup and behavior
- To connect a property to a lookup mapping, in a mapping, find the property to connect to a lookup mapping and click the Connect property to lookup button .

- In the Connect to lookup dialog, do one of the following:
To create a new lookup mapping, select Create new. You must select a source and explicitly map the EventDate property to a column or formula. If a lookup’s EventDate is later than the date of the record you are trying to augment or replace, the system may return a none or default value up until the EventDate of the lookup. For more information, see EventDate.
- To use an existing lookup mapping, select Use existing. If a lookup mapping already exists that you want to use, select it from the list or turn on Use target group and select a target group from the list.
- Select Augment or Replace.
Note: If Replace, the property must be String data type and mapped to a column or formula.
- Click Next.
Select properties
The following screenshot shows the Select properties step.
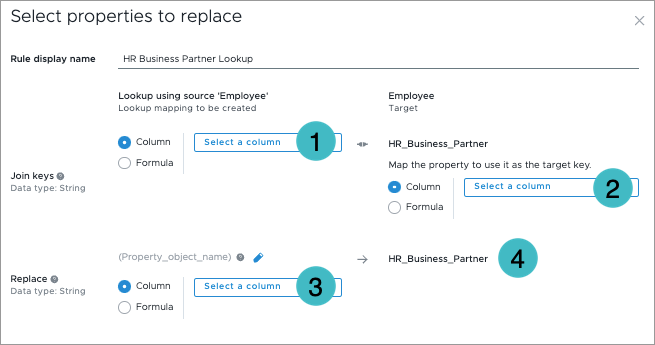
- Mapping key: The mapping property to use as the key. In the screenshot, the mapping key isn't mapped. You can map it to a column or formula for the selected source.
- Target key: The target property to use as the key. In the screenshot, HR_Business_Partner is the target key. If unmapped, you can map it to a column or formula.
- Lookup mapping property: The property whose data will augment or replace the target property's data. In the screenshot, the lookup mapping property isn't mapped. You can map it to a column or formula for the selected source.
- Target property: The property to augment or replace with data from the lookup property.
Note:
- If Replace, the target property acts as the target key joined with the mapping key. In the screenshot, the target property and target key are both HR_Business_Partner. This is so that you can completely replace the target property values. If the lookup mapping can't find a target key value in the mapping key values, the target property value is set to empty.
- If Augment, the target property is different from the target key so that you can fill in nulls or missing values in the property with values from a different property.
To complete this step, do the following:
- In Rule display name, type a name for the business rule; for example, HR Business Partner Lookup.
-
If the target property was unmapped, as shown in the following screenshot, map it now. This is the target key (as shown in the Select properties screenshot).

- If creating a new lookup mapping:
- In the top-right column, map the mapping key.
- In the bottom-right column, map the lookup mapping property. Optionally, assign the property an object name.
- If using an existing lookup mapping, in the bottom-right column, select a lookup mapping property to augment the target property.
Note: The properties in the list are the same data type as the target property (bottom-left column).
- Optional: If Augment, click Add Property to add additional lookup mapping properties to augment the target property. You can then select another target property and lookup mapping property.
Connect the properties and review the generated business rule
- Click Next and then click Connect.
Result: Visier generates a business rule. If creating a new lookup mapping, Visier creates the lookup mapping and its properties.
- When finished, click Go to Business Rule or Done.
- Navigate to the business rule and rearrange the business rules into the correct order. For more information, see Business Rules.
Example: Let's say you want to fill in nulls or empty values for the Employee.Pay_Level_Compensation_Maximum property with values from the CompMax property. You have an existing lookup mapping called pay_levels_post_stg that has a CompMax property containing those values.
- In the Connect to lookup dialog, select Use existing.
- Click Select lookup mapping and select pay_levels_post_stg from the list.
- Select Augment and then click Next.
- In Rule display name, type Compensation Maximum Lookup.
- Click Select target key and then select JobPayCodeLevel.This tells the lookup mapping to use JobPayLevelCode as the target key to join the tables together. The lookup mapping key is the MappingKey property. This might be mapped to a JobPayCodeLevel column in the lookup mapping
- Click Select property and then select CompMax. This tells the lookup mapping to augment Employee.Pay_Level_Compensation with values from CompMax.
- When finished, click Next and then click Connect.
- Visier generates the following business rule:
-
Copy
call augmentingMapping(
    "pay_levels_post_stg",
    Employee.JobPayLevelCode,
    {
        Employee.Pay_Level_Compensation_Maximum -> "CompMax",
    }
) - Click Done.
Example: Let's say you want to replace the property Employee.Location.Location_3 with New_Location_Value, but you don't have an existing lookup mapping to do this.
- In the Connect to lookup dialog, select Create new.
- In Source, select the data source for the lookup to use to replace Employee.Location.Location_3, such as Location.
- Optional: To map EventDate for New_Location_Value, in Map 'EventDate', do one of:
- Select Map from column and then select the EventDate column from the list.
- Select Map from formula and then type dateColumn("EventDate") in the formula box.
- Select Replace and then click Next.
- In Rule display name, type New Location Lookup.
- In Lookup using source 'Location', select a column to be the mapping key, such as LocationCode.
- In Replace, click Select a column and then select New_Location_Value. This tells the lookup mapping to replace Employee.Location.Location_3 with values from New_Location_Value.
- When finished, click Next and then click Connect.
- Visier generates the following business rule:Copy
call replacementMapping(
    "Location_Lookup",
    Employee.Location.Location_3,
    "New_Location_Value"
) - Click Done.
Create a static map lookup
If a mapping's source doesn't contain the values you need for a subject member ID, you can use Connect property to lookup to retrieve the values from a different source through lookup mappings. This process is called a static map lookup. The mapping's source must have at least one property in common with the lookup source to join the data tables.
A static map lookup has these components:
- Subject member ID property: The ID property to populate using a different source.
- Original source: The source that populates the subject member ID property's mapping.
- Lookup source: The source to use to populate the subject member ID property.
- Mapping key: The property in the lookup source that has values in common with a property in the original source; for example, Company Email. This key joins the lookup source's data table to the original source's data table in the static map lookup.
- Target key: The property in the original source that has values in common with a property in the lookup source; for example, Email Address. This key joins the lookup source's data table to the original source's data table in the static map lookup.
- Mapping value: The property in the lookup source to populate the subject member ID property.
Note: If necessary, you can use many static map lookups to traverse through multiple mappings to get the values you need, called a double static map lookup. This is necessary if the original source doesn't have a common column with the lookup source. In this case, you can use an additional lookup mapping to get from the original source to the lookup source through an intermediate source.
This workflow supports up to two levels of lookup, meaning lookup(lookup(column, file, [defaultValue])), but you can alternatively write an extraction rule that looks up more mappings if you need to. For more information, see Visier Extraction Language (VEL).
Select lookup and behavior
- In a mapping, find the subject member ID property to connect to a static map lookup and click the Connect property to lookup button .
- In the Connect to static map lookup dialog, do one of the following:
- To create a new static map lookup, select Create new. Like other mappings, you must select a source. Select the lookup source whose property to use to fill in values for the subject member ID property.
- To use an existing static map lookup, select Use existing. Select the static map lookup whose mapping key is a property that has values in common with the original source and whose mapping value is the property whose values you want to use the populate the subject member ID.
- Click Next.
Configure lookup connection
The following screenshot shows the Configure lookup connection step.
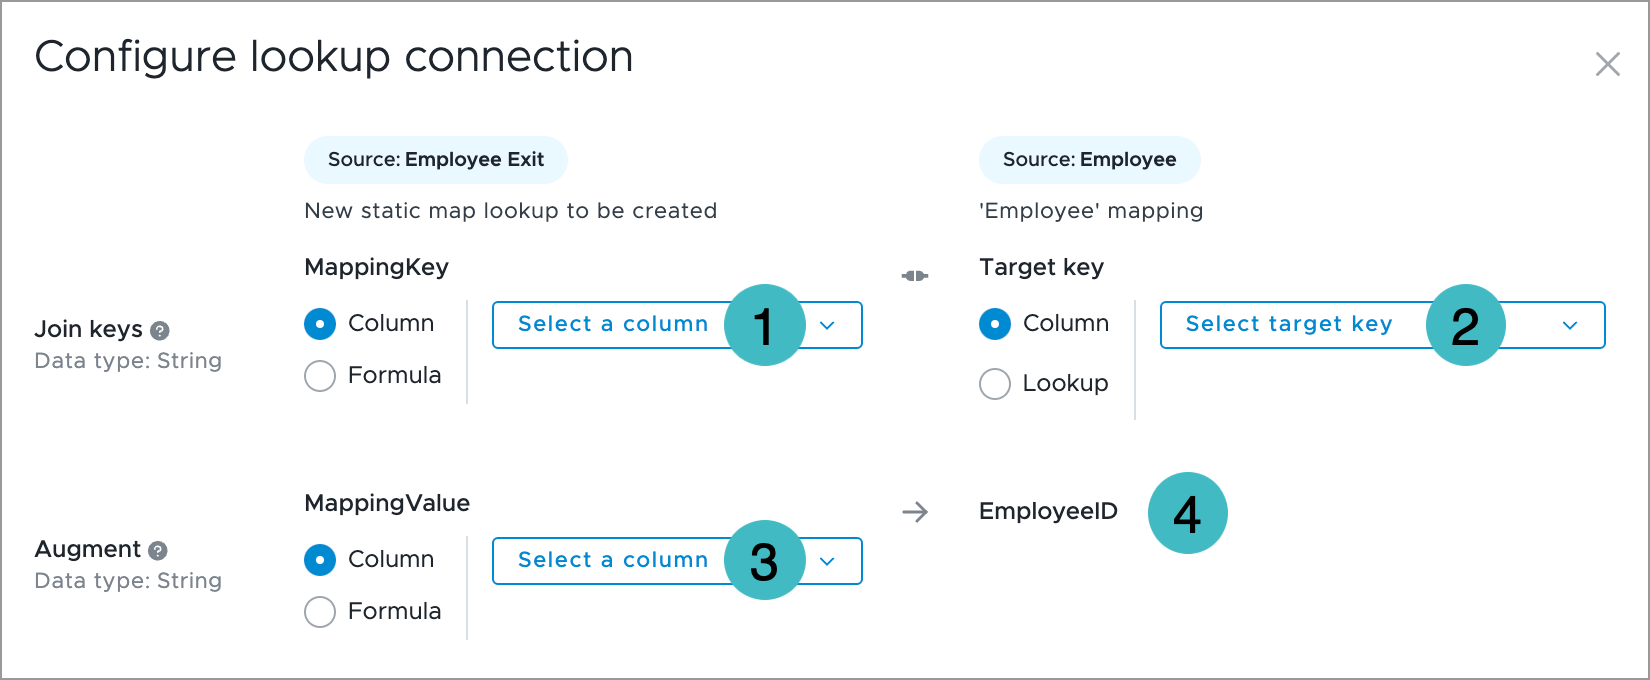
- Mapping key: The mapping property to use as the key. If using an existing static map lookup, this is already mapped. If creating a new static map lookup, select the column or formula that the lookup source has in common with the original source.
- Target key: The target property to use as the key. Select the property that the original source has in common with the lookup source. If performing a double static map lookup, select Lookup to create an intermediate static map lookup or select an existing static map lookup to traverse through to reach the target mapping value.
- Mapping value: The column or formula to retrieve values from for the subject member ID. If using an existing static map lookup, this is already mapped. If creating a new static map lookup, select the column or formula from the lookup source to use to populate the subject member ID.
- Subject member ID property: The property to populate using the static map lookup.
To complete this step, do the following:
- If creating a new static map lookup:
- In the top-left column, map the mapping key. This is the property that the lookup source has in common with the original source.
- In the top-right column, map the target key. This is the property that the original source has in common with the lookup source.
- In the bottom-left column, map the mapping value. This is the property that you want to fill in values for the subject member ID property.
- If using an existing lookup mapping, in the top-right column, map the target key. This is the property that the original source has in common with the lookup source.
- If you select Lookup when mapping the target key, repeat the previous steps to create an intermediate static map lookup. The intermediate mapping must have properties in common with the original source and the lookup source.
- When finished, click Next.
Connect the properties and review the mapping formula
- In Connect data, click Connect.
Result: Visier generates a mapping formula for the subject member ID property and, if you selected Create new in Step One or Step Two, creates a lookup mapping.
- When finished, click Done.
- Return to the subject member ID property. It is now mapped to the mapping formula generated by Connect property to lookup.
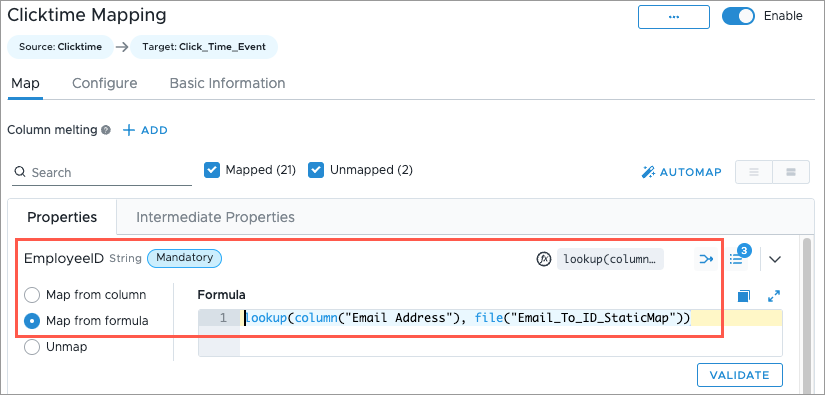
Example: Let's say you have a mapping called Clicktime Mapping. In this mapping, you have an EmployeeID property that you want to populate using the Employee Number column. However, the Clicktime source doesn't have Employee Number.
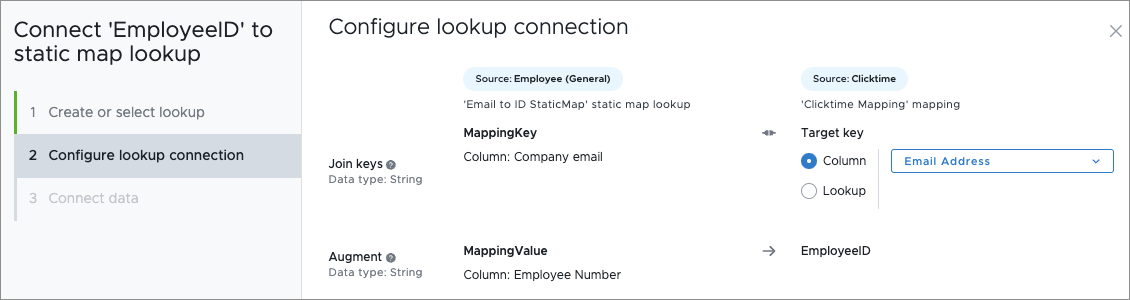
To populate EmployeeID with Employee Number, you can use a static map lookup that retrieves Employee Number values from an existing lookup mapping. You have an existing lookup mapping called Email to ID StaticMap that you can use because Email to ID StaticMap has Employee Number and a column in common with Clicktime Mapping that you can use to join the data tables. The common column is Email Address in Clicktime Mapping and Company email in Email to ID StaticMap.
In this example, the static map lookup has the following components:
- Subject member ID property: EmployeeID. This is the property you want to fill in values from Employee Number.
- Original source: Clicktime. This is the source for Clicktime Mapping.
- Lookup source: Employee (General). This is the source for Email to ID StaticMap.
- Mapping key: Company email. This is the column that has values in common with a column in the Clicktime source.
- Target key: Email Address. This is the column that has values in common with a column in the Employee (General) source.
- Mapping value: Employee Number. This is the property to use to fill in values for EmployeeID.
To create the static map lookup:
- In the Connect to static map lookup dialog, select Use existing.
- In Select static map lookup, select Email to ID StaticMap, and then click Next.
- In Configure lookup connection, in Target key, select Column.
- In the list of columns, select Email Address.
- Click Next.
- In Connect data, click Connect.
Result: The formula lookup(column("Email Address"), file("Email_To_ID_StaticMap")) is generated.
- After the mapping formula generates, click Done.
-
Return to the EmployeeID property. It is now mapped to the generated formula.
Example: Let's say you have a mapping called Jira_Log_to_Clicktime_Mapping. In this mapping, you have an EmployeeID property that you want to populate using the Employee Number column. However, the JIRA Issue Work Log source doesn't have Employee Number.
To populate EmployeeID with Employee Number, you can create a static map lookup that retrieves Employee Number values through another lookup mapping. However, no lookup mapping exists that you can use for this purpose. You must create a new lookup mapping.
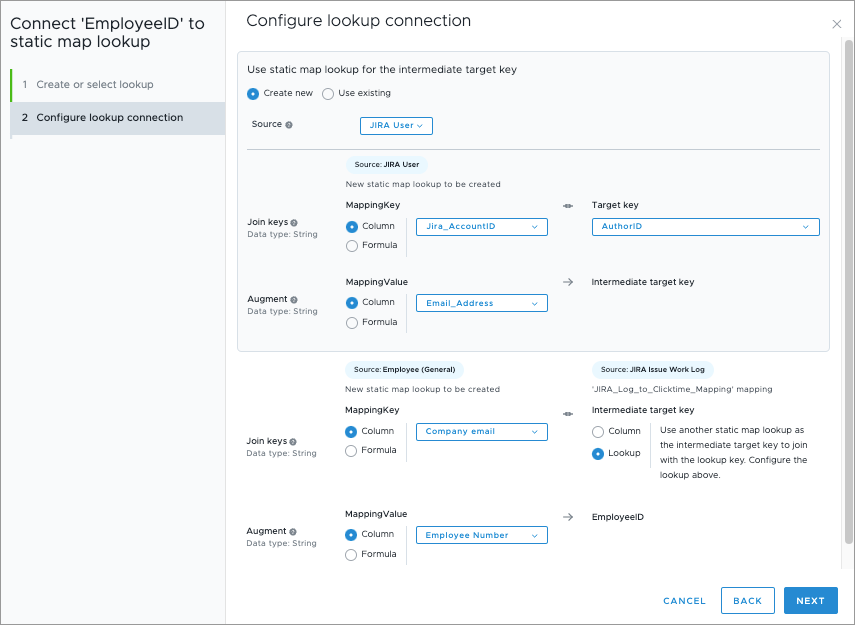
Additionally, the source that has Employee Number does not have any properties in common with JIRA Issue Work Log. As a result, you must create a double static map lookup to get from JIRA Issue Work Log to Employee Number using an intermediate static map lookup.
To create the double static map lookup, you must identify two sources:
- Lookup source: The source that contains Employee Number. This source must also have a property in common with the intermediate source. In this example, you have a source called Employee (General) that has Employee Number and the property AuthorID in common with the intermediate source.
- Intermediate source: The source that has a property in common with the original source and a property in common with the lookup source. This allows you to join the data tables between the original source, the intermediate source, and the lookup source to populate EmployeeID with Employee Number values. In this example, you have a source called JIRA User that has the following properties:
- Jira_AccountID. This property has values in common with AuthorID from the JIRA Issue Work Log original source.
- Email_Address. This property has values in common with Company email from the Employee (General) lookup source.
In this example, the static map lookup has the following components:
- Subject member ID property: EmployeeID. This is the property you want to fill in values from Employee Number.
- Original source: JIRA Issue Work Log. This is the source for Jira_Log_to_Clicktime_Mapping.
- Lookup source: Employee (General). This is the source for the new static map looking you're creating.
- Mapping key: Company email. This is the column that has values in common with a column in the JIRA User intermediate source.
- Target key: Lookup. Because JIRA Issue Work Log doesn't have an email column in common with Employee (General), the target key must be looked up from an intermediate static map lookup.
- Mapping value: Employee Number. This is the property to use to fill in values for EmployeeID.
To create the double static map lookup:
- In the Connect to static map lookup dialog, select Create new.
- In Source, select Employee (General). This is the lookup source to retrieve Employee Number values from.
- Click Next.
- In MappingKey, select Column and then, in the list of columns, select Company email. This is the property that has values in common with a column in the JIRA User intermediate source.
- In MappingValue, select Column and then, in the list of columns, select Employee Number. This is the property to fill in values for EmployeeID.
- In Target key, select Lookup.
Result: The section Use static map lookup for the intermediate target key appears above the new static map lookup you are creating.
Next, you'll create the intermediate static map lookup.
- In Use static map lookup for the intermediate target key, select Create new.
- In Source, select JIRA User. This is the intermediate source to join with the Employee (General) lookup source's data table.
- In MappingKey, select Column and then, in the list of columns, select Jira_AccountID. This is the property that has values in common with the AuthorID column in the JIRA Issue Work Log original source.
- In Target key, select AuthorID. This is the original source property that has values in common with the intermediate source's property, Jira_AccountID.
- In MappingValue, select Column and then, in the list of columns, select Email_Address. This is the property to fill in values for the intermediate target key lookup.
- When finished, click Next.
Now you can connect the data to generate the mapping formula.
- In Connect data, click Connect.
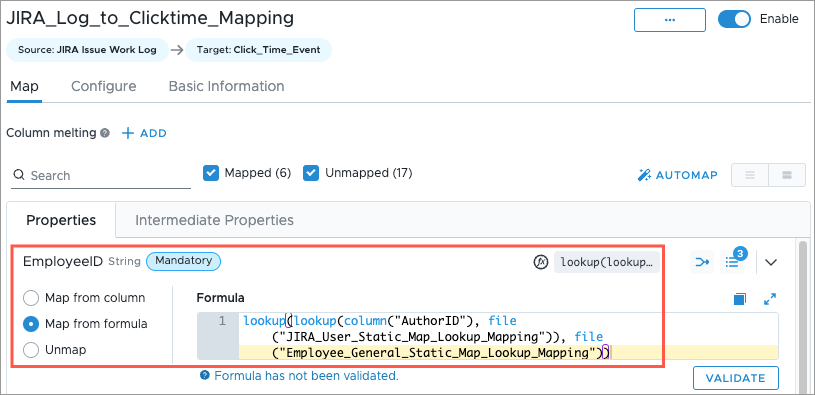
Result: The formula lookup(lookup(column("AuthorID"), file("JIRA_User_Static_Map_Lookup_Mapping")), file("Employee_General_Static_Map_Lookup_Mapping")) is generated.
- After the mapping formula generates, click Done.
- Return to the EmployeeID property. It is now mapped to the generated formula.