
Manage Reported Data Issues
Review, fix, and publish corrections for flagged data issues.
Users can report issues such as incorrect values and missing data in the solution experience for administrators to review.
As an administrator, you can review the reported issues, fix the issue, and then publish the corrections immediately without having to wait for the issue to be fixed in the source data and uploaded back into Visier. Once published, the corrections will be applied each time a data version is generated. Before you perform this workflow, see Data Issues Reported by Users for an overview of this feature and answers to frequently asked questions.
Prerequisites: To perform this task, you'll need full data access.
View reported issues
You can find a list of all reported issues in the Reported Issues tab of the Data room in the global workspace of Studio. To access the reported issues, click Data on the global navigation bar, and then click the Reported Issues tab.
The Reported issues tab
This is where you can manage the reported issues and prepare corrections.
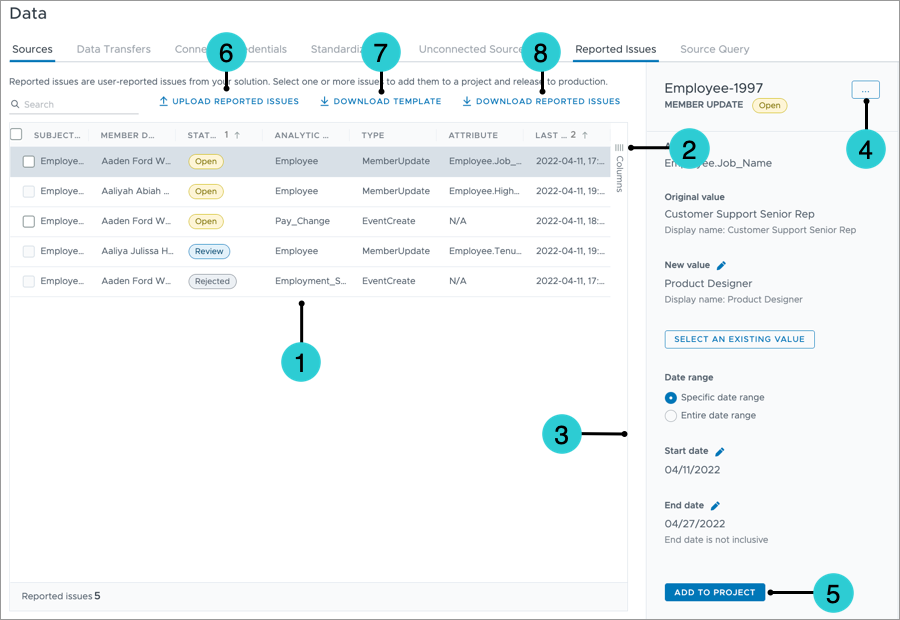
- Reported issues: A list of all issues that have ever been reported. For auditing purposes reported issues cannot be deleted.
- Show/Hide columns: Select the columns that appear in the Reported Issues list.
- The Info panel: Find more information about the selected issue. This is also where you make corrections such as adding new values, changing dates, and configuring attributes for event occurrences.
- More actions: Change the status of the selected issue.
- Add to Project: Move the correction for the reported issue to a project for final review and publishing.
- Upload Reported Issues: Import reported data issues back to the solution in bulk. For more information, see Upload Reported Data Issues.
- Download Template: Export a XLSX file to report data issues in bulk.
- Download Reported Issues: Export a XLSX file listing all the issues that have ever been reported for auditing purposes.
Reported issues statuses
Reported issues can have the following status:
- Open: The issue is ready to be worked on and corrections can be added to a project.
- Rejected: The issue has been assessed and no further action will be taken. Rejected issues can be reopened.
- Review: The corrections for this issue has been added to a project for final review and publishing. The issue can no longer be edited in the global workspace.
- Resolved: The issue has been fixed and the corrections have been published to production. Resolved issues cannot be reopened.
Fix data issues and publish corrections
This workflow starts in the global workspace where you will prepare corrections for the data issues. Once you've filled in all the required fields, you can then add the corrections to a project for final review and publishing.
Step One: Prepare corrections in the Reported Issues tab of the global workspace
Tip:
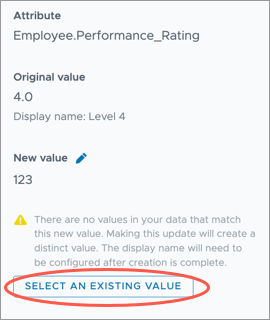
- If a distinct value (a value that does not match any value in your data) is entered, you will be prompted to select an existing value. You may want to look at the existing values to ensure the value you've entered is in the correct format. This also allows you to select values based on the attribute value's display name, which you may be more familiar with.
- When entering a specific date range, the Start date is inclusive and the End date is exclusive. For example, if you want to see the value applied to the employee record at the end of the month (March 31), you would set the correction End date to the first day of the next month (April 1).
- Select an open issue from the Reported Issues list.
- Fill out the required details for the issue type in the Info panel.
- To correct a property value (MemberUpdate), you must enter:
- A new value.
- The date range during which the correction (new value) is valid. Select the Entire date range option if you want the value to be applied to the entire lifetime of the subject member or event occurrence (creation date to present).
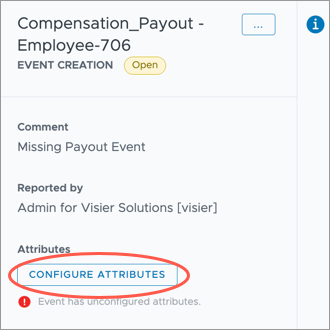
- To create a new event (EventCreate), you must:
- Provide values for all attributes of the event by clicking Configure attributes in the Info panel.
For example, if you're creating a new Compensation Payout event, you must enter the following attribute values: Date, EmployeeID, Pay_Currency_Code, Payout_Amount, Payout_Hours, and Payout_Type.
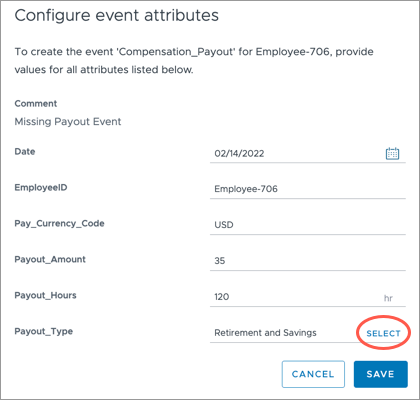
For some attributes you can click Select to choose from a list of existing values.
- Provide values for all attributes of the event by clicking Configure attributes in the Info panel.
- To correct the date of an event for a subject member (EventUpdate), you must enter a new date value.
- To correct a property value (MemberUpdate), you must enter:
- Repeat steps 1 and 2 to correct additional issues.
Step Two: Add corrections to a project for final review before publishing
- When you're satisfied with the correction you've made for the issue, click Add to Project in the Info panel.
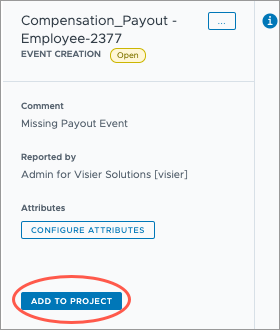
- In the Add reported issue to project dialog, do one of the following:
- To add the correction to a new project, click Create a new project, enter a display name and description for your project, and then click Create.
- To add the correction to an existing project, click Add to existing project, select the project you want to add the correction to, and then click Add.
Result: The correction is added to the project and the Reported Issues room appears. The status of the selected issue changes from open to review.
Tip: To add multiple corrections to a project, select the issues in the Reported Issues list, and then click Add to Project on the Bulk Action menu at the bottom of the list.

Step Three: Review corrections in a project
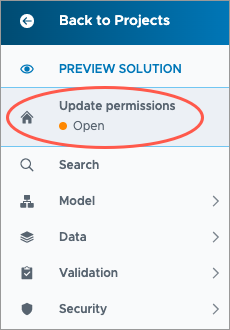
The Reported Issues room in a project is where you can conduct a final review of the corrections you've made before publishing them. It looks very similar to the Reported Issues tab in the global workspace. To access the corrections in a project, click Data > Reported Issues on the navigation bar.
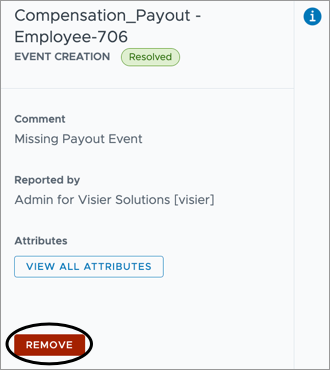
Note: All previously published corrections (resolved issues) will be listed. To roll back a correction, remove the resolved issue from the project and publish the changes to production.
- Select a review issue from the list and check the correction in the Info panel.
- If necessary, make additional changes to values and configurations in the Info panel.
- Optional: If you no longer want to include the correction for the selected data issue in the project, click Remove in the Info panel.
Note: You cannot re-add a correction to a project that it was previously removed from. To publish the correction, you will have to add it to a new project.
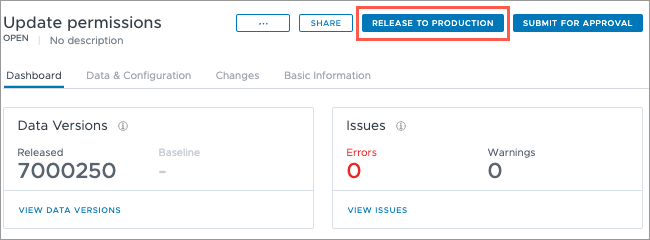
- Generate a data version to preview your corrections:
- Set the data version release behavior to Auto-release latest to automatically apply newly generated data versions. This will allow you to quickly preview the data version after the job completes. For instructions on how to set the release behavior to Auto-release latest in the Data Categories room, see Release Behavior.
- After you set the data version release behavior to Auto-release latest, go back to the Reported Issues room, and click Load Data in the upper-right corner.
In the Run Job dialog, click Run Job.
Result: You'll receive an email notification when the job completes.
- After the data version successfully generates, click Preview Solution on the navigation bar to validate your corrections.
Note:
- If you cannot successfully generate a new data version, contact Visier Technical Support.
- Alternatively, you can publish your corrections to production without running a job (generating or validating a new data version). The corrections will be applied to the next scheduled data version. This means you won't see the corrections until the new data version is published to production.
Step Four: Publish your project
If there are no issues with the data version, you can commit your changes and publish your project to make the corrections available to users. For more information, see Publish Project Changes.
Note: If you changed the data version release behavior to Auto-release latest in the previous step and you don't want to this to be the default behavior, you should remove this change from your project before you publish.
To commit changes as a project revision:
-
In a project, on the navigation bar, click the Home button
 .
.
-
Click the Changes tab in the project home.
- Select the changes you want to commit and then click Commit on the Changes menu.
- In the Commit Changes to Project Revision dialog, type a name and description for the project revision.
- Click Commit now.
Result: A project revision is created and shared with collaborators.
Note: If another user creates a new revision while you were making changes, you'll have to update your changes to the latest project revision before you can commit your changes. For more information, see Merge Project Changes.
To publish a project:
-
In a project, on the navigation bar, click the Home button
.
-
Click Release to Production in the upper-right corner of the project. The project must contain at least one revision before the Release to Production appears.
-
In the Release to Production dialog, type a name, description, and release version, and then click Release now.
Result: A new production version of the solution is created.
Roll back a correction
Remove a published correction that is no longer needed.
- In a project, click Data > Reported Issues on the navigation bar.
- In the Reported Issues room, select the published correction (Resolved issue) you want to roll back, and click Remove in the Info panel.
- Generate a data version to preview your change.
- If there are no issues with the data version, commit your changes, and publish the project.
Result: The status of the issue changes from Resolved to Rejected.