
Automatically Update User Access by Attribute
Reduce manual effort to update data security when a user's role, region, or other attribute changes in your source system.
Overview
Automated org sync (organization synchronization) is the automatic mirroring of user identities, group memberships, and permissions across different platforms or environments. Instead of an IT admin manually changing a user's access in five different apps after a role change, org sync ensures that the source of truth pushes that data everywhere else.
Org sync automates:
- Onboarding: New hires get access to all synced apps on day 1.
- Offboarding: When an employee leaves, disabling them in the source of truth cuts their access to all synced apps. This prevents orphan accounts that pose a major security risk.
- Group and attribute mapping: If a user's department changes from Sales to Success in the HR system, org sync updates their permissions in all synced apps.
This guide describes the tasks to implement automated org sync in Visier and provides a step-by-step example you can follow along with.
Checklist
To implement automated org sync, complete these steps.
- Send access-related files to Visier.
- Set up containers to hold your access data in Visier.
- Create permissions and rules that dynamically assign access.
- Check your work.
This guide assumes that your organization already has a regular data load schedule with Visier that you can add your access-related files to. For more information about sending data to Visier, see Bring Data In.
Send access-related files to Visier
Each source system defines access in different ways. Visier uses permissions to set user access to data. To update Visier permissions based on your source system security:
- Send a population file to Visier: Sets the population access in the dynamic permission or assigns a permission to a user.
- Send a User Group Matrix file to Visier: Defines the user group to receive the dynamic permission. Not required if user group membership is identified in your employee data.
To learn how to format these files, see Map a population using a security file.
This data is used in Visier to define population access, ensuring that users can only see employee data for the organizations they are authorized to support. You can automate the delivery of these files by setting up exports in your source system and including the files in your data load schedule with Visier.
Tip: Each source system has different requirements to generate a compatible file to send to Visier. To generate a population file from Workday, see Recreate the Workday to Visier Security Integration.
Set up containers in Visier
After Visier receives data, the data must be contained somewhere.
- Create a source. Sources are containers that represent the data and its structure (columns and data types) that Visier expects to receive when you send that data again in your next data load. For more information, see Sources.
- Leverage an existing hierarchy or create a parent-child dimension. The hierarchy tells Visier how to represent the parent-child relationship of user access to employee data in your population file.
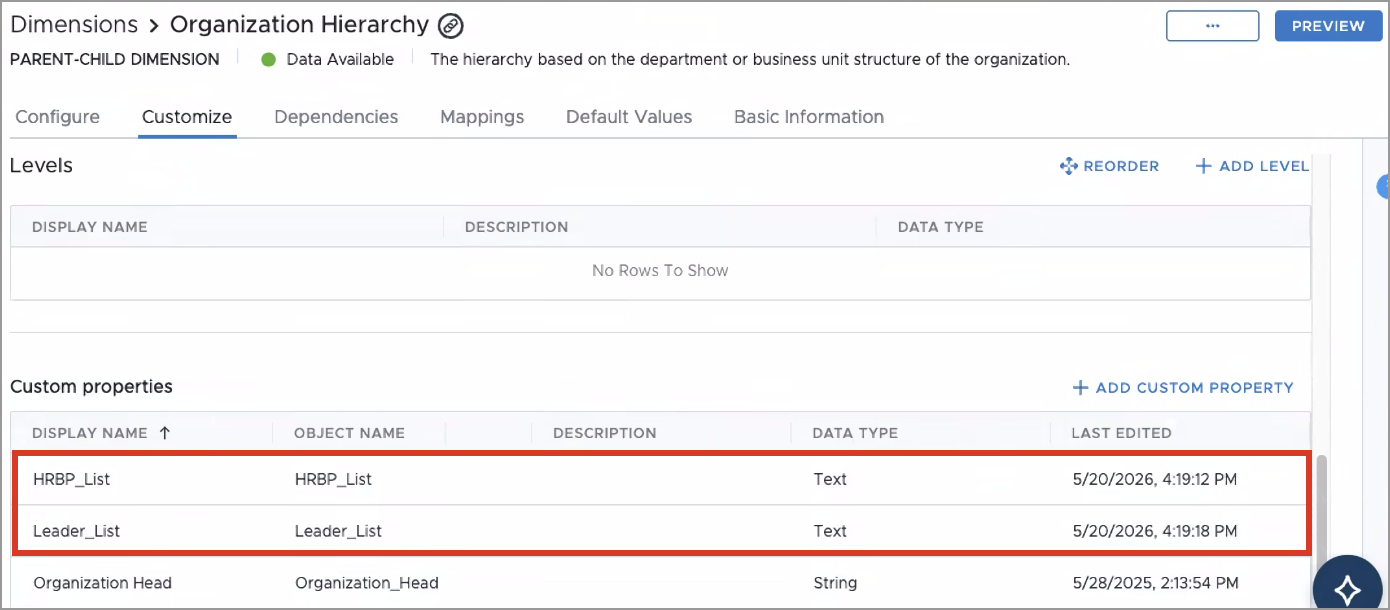
- In the parent-child dimension, create a custom property.
- Give the custom property a display name that ends in _List. This tells Visier that the dimension represents an access list.
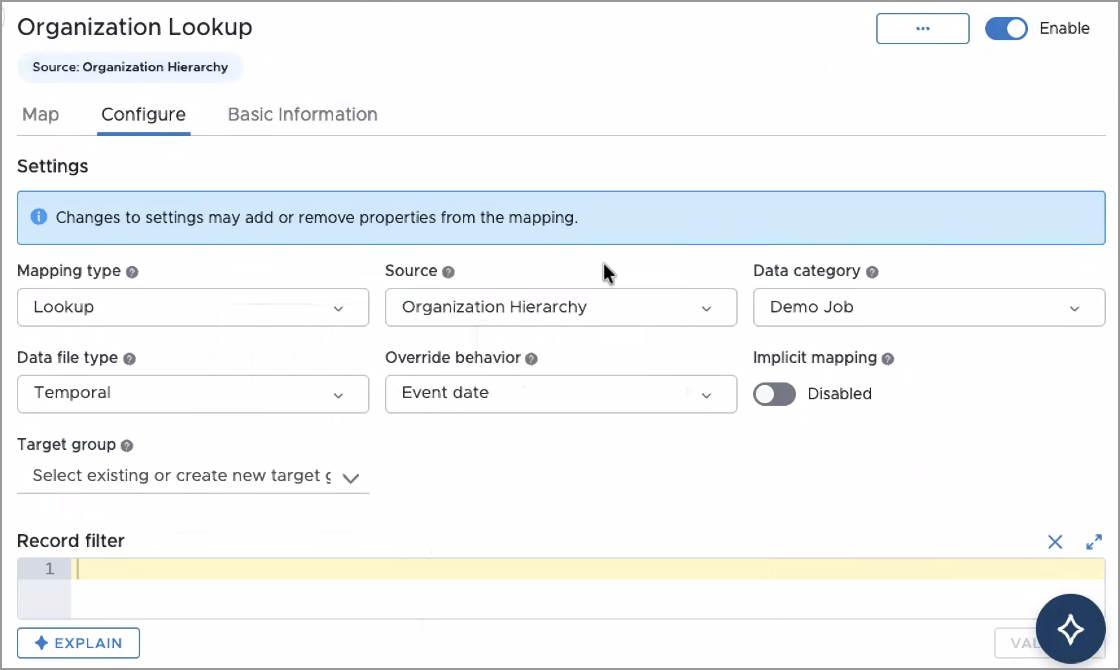
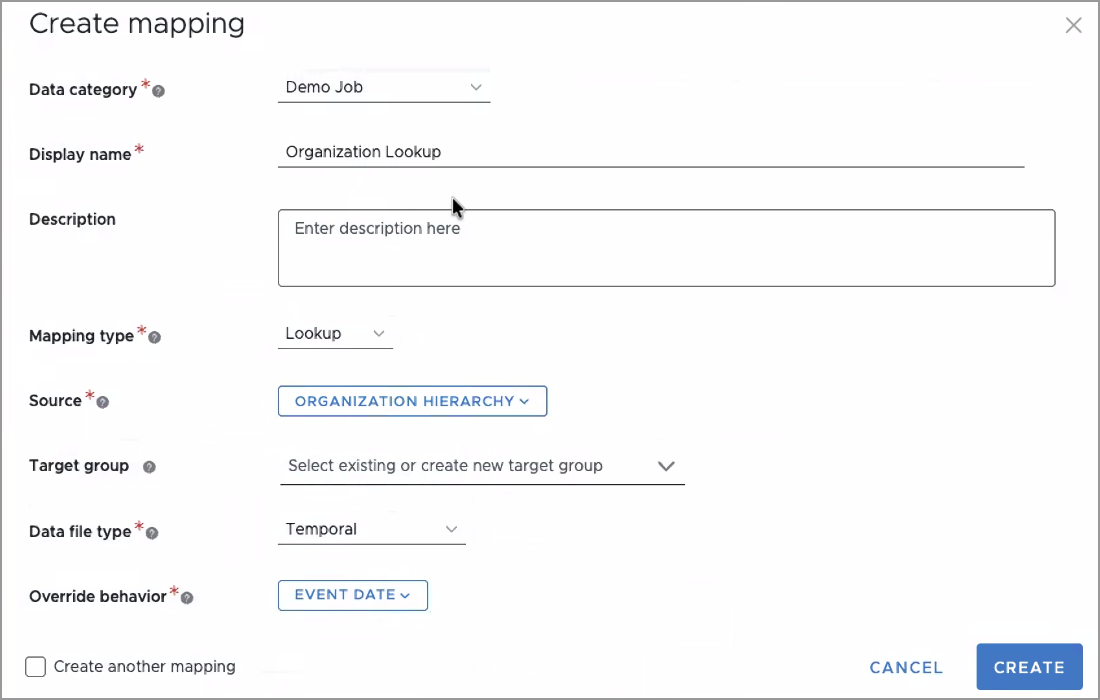
- Create a mapping. This connects the source data to the parent-child dimension. The mapping must have the following settings:
- Mapping type: Lookup
- Data file type: Temporal
Override behavior: Event date
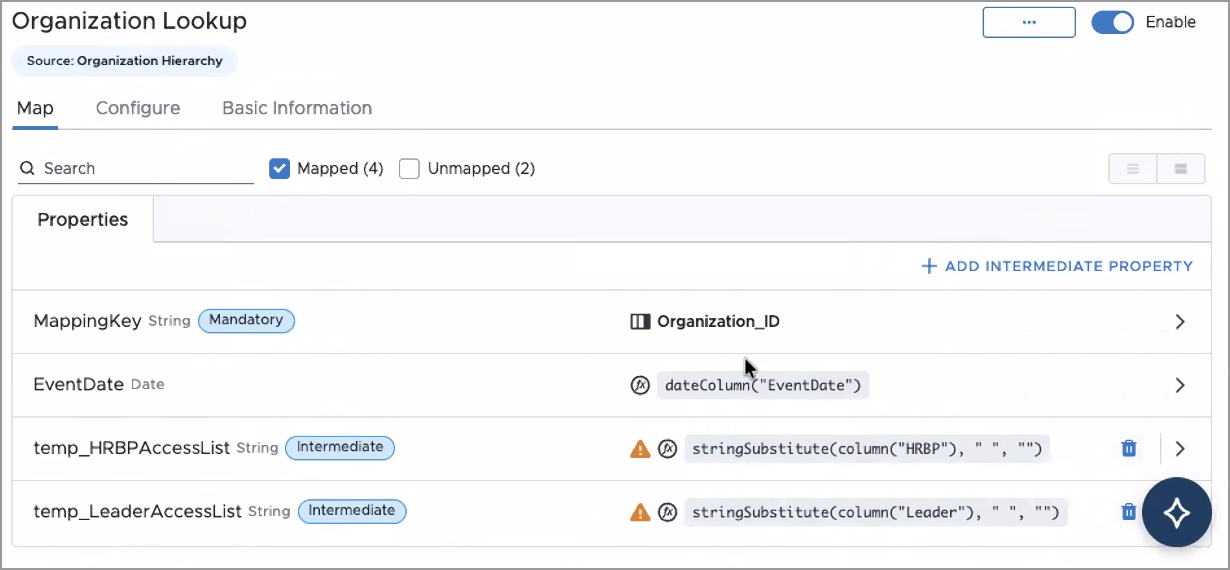
- In the lookup mapping, set the following:
- MappingKey: Map from column. Select a key value from the source, such as Organization_ID.
- EventDate: Map from formula. Use dateColumn("ColumnName") where ColumnName is the date column in your population file.
- Add one intermediate property per role you're creating data access for, then click Map from formula. Add a formula to remove white space so that the data is a comma-separated list; for example:
In additional properties, replace HRBP with the column name for each role.
Create permissions and rules that dynamically assign access
With the data in Visier and connected to objects, all that's left is to make sure your permissions are configured correctly to dynamically assign user access to data.
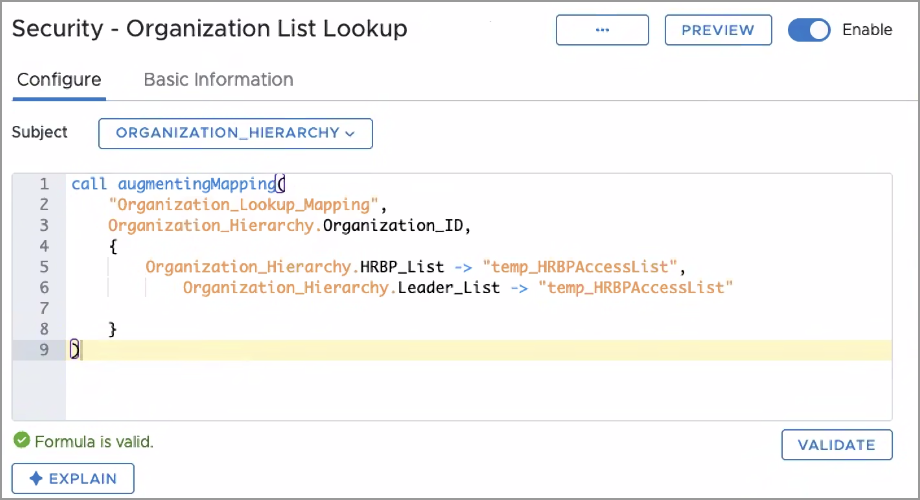
- Create a business rule. The business rule must have the following settings:
- In Subject, select the _List parent-child dimension.
In Formula, type a formula to look up the population file and assign access through the parent-child dimension.
CopySample business ruleaugmentingMapping(
mappingName,
mappingKey,
mappedProperties [,ifUnmapped, filter, ifOutputExists, ignoreIfNoValue]
)For more information, see Business Rules.
-
Create data access sets. This defines the level of access that users should be able to see for different attributes, such as Tenure and Compensation. You might make several data access sets to fit the needs of multiple different access requirements. For example, a permission that should be able to see detailed data for Salary versus a permission that shouldn't see any Salary data. For more information, see Configure Data Access.
- Create a permission. The permission must have the following settings:
- In Data Access, select the data access set you created.
- In Population Access, select Custom.
- In Dynamic Filter, select User to dimension.
- Select the parent-child dimension, such as Organization_Hierarchy.
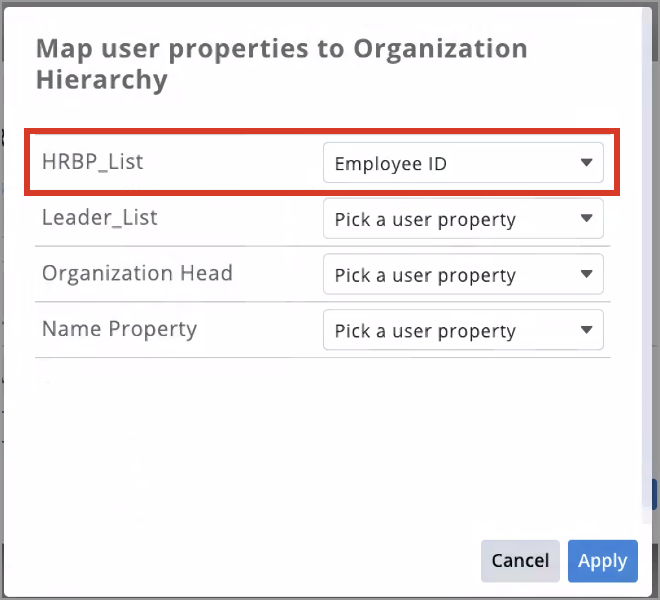
- Map the _List property to Employee ID.
- If needed, define the user group that will receive automated org sync. For more information, see Create a User Group.
Check your work
To make sure the permission works as expected, assign it to a user and preview the data as that user to verify they can see the correct data.
- To assign the permission, see Assign Permissions to a User.
- Generate a new data version so that your project incorporates the new mappings you made. For more information, see Run a Job.
- When the job completes successfully, you can impersonate the user and preview the data. To preview as a user, see Preview the Solution as a User.
- If everything looks as expected, you can publish the project that contains your security changes. For more information, see Publish Project Changes.
Outcome
With automated org sync set up, user access to data will dynamically update every time you send the population file to Visier. Because users change frequently, we recommend a daily data load to ensure user access is correct every day.
Example: I want to synchronize roles in Workday to permissions in Visier
This section provides a step-by-step example to implement automated org sync to update user access in Visier when their role or region changes in Workday. This example shows how to set up user access for an organization that has two roles: HRBP and Leader.
Access requirements
Custom profile with these capabilities:
-
Data (Write, Detailed)
-
Model (Write, Simple)
-
Permission Management (Write, Simple)
-
Security (Read, Simple)
-
User Management (Read, Simple)
Users with this permission capability: Super Admin Permission
Reach out to your administrator for access.
Step 1: Send access-related files to Visier
Workday roles do not have one-to-one counterparts in Visier. As a result, you must set up processes to prepare Workday roles for use in Visier.
To complete this process, see Recreate the Workday to Visier Security Integration.
Step 2: Set up containers in Visier
Next, create the source to hold your population file data. You can generate a source from the data file after Visier receives a population file from your EIB's SFTP delivery for the first time.
Create a source
- In Visier, on the global navigation bar, click Data > Data Transfers.
- In the list of files, find PopulationAccess_SupvOrg.csv. This is the File Name that you set up in "Configure Deliver" of Step 3: Configure the Enterprise Interface Builder (EIB). You might need to filter the Data Transfers list to a longer time frame if the file was received more than a day ago.
- Hover over the row and click the Generate source button
 .
.
Create a parent-child dimension
If your organization already has a security hierarchy in Visier, use that hierarchy. In this example, you'll create a parent-child dimension (hierarchy) to represent the parent-child relationship of user access to employee data.
Parent-child dimensions are created in projects, so create a project.
- On the global navigation bar, click Projects > New Project.
- In Display name, type Set Up Workday-Visier Security.
- In Description, type Create security objects for automated org sync.
- Click Create.
In the project, create the parent-child dimension.
- On the navigation bar, click Model > Dimensions > Create Dimension.
- Select Parent-child.
- Enable the Make dimension shared toggle.
- In Display name, type Organization_Hierarchy.
- Select the Employee object.
- Click Done.
- In the dimension, add a custom property.
- Give the custom property a display name that ends in _List, such as HRBP_List.
- Select the Text data type for the custom property. This is because the population file must use text data to assign access.
- Repeat steps 7 to 9 for every role you're creating access for. In this example, there's one more role for Leaders, so you'll create a custom property named Leader_List.
Create a mapping
With a source and a _List parent-child dimension custom property, you can connect the access data to the property. In Visier, data is connected to objects through mappings. There are a few kinds of mappings, but to assign automated access you want to look up data in the population file to connect it to objects. That means you must make a lookup mapping.
- In your Set Up Workday-Visier Security project, navigate to Data > Mappings > Create Mapping.
- In Display name, type Organization Lookup.
- In Description, type Lookup mapping for Workday population file.
- In Mapping type, select Lookup.
- Select the source that you generated for the PopulationAccess_SupvOrg.csv file.
- In Data file type, select Temporal. This tells Visier that the files contain all the access data at a point in time.
- In Override behavior, select Event date. This tells Visier to only take the latest population file and ignore previous population files when assigning data access.
- Click Create.
Within the lookup mapping, configure the mandatory properties and an extraction rule to remove white space so that the list is comma-separated.
- Click MappingKey > Map from a column > Organization_ID. This is the key value in your population file.
- Click EventDate > Map from formula > dateColumn("EventDate"). This is the date column in your population file.
- Click Add Intermediate Property.
- In Display name, type temp_HRBPAccessList.
- In the intermediate property, click Map from formula.
- Type an extraction rule formula to remove white space so you are left with a comma-separated list. The following example removes white space from the HRBP column.
- Repeat steps 3 to 6 for every column in your population file. In this example, there is one more column for Leader, so you'll make another intermediate property called temp_LeaderAccessList with the property formula stringSubstitute(column("Leader"), " ", "").
Step 3: Create permissions and rules that dynamically assign access
To look up the population file and assign access using the previously-created dimension, create a business rule to perform those actions.
Create a business rule
- In a project, on the navigation bar, click Data > Rules > Business Rules > Create Rule.
- Select the data category that the rule belongs to.
- Select Business rule.
- In Display name, type Security - Organization Lookup.
- Click Subject and select the Organization_Hierarchy parent-child dimension.
- Enter the following formula to look up the access list and assign access to the _List custom properties for each role you're assigning access for.CopySample business rule
call augmentingMapping(
"WD_Security_Role_Lookup_Mapping",
Organization_Hierarchy.Organization_ID,
{
Organization_Hierarchy.HRBP_List -> "temp_HRBPAccessList",
Organization_Hierarchy.Leader_List -> "temp_HRBPAccessList"
}
)
Create a data access set
Next, define the level of access that users should be able to see for different attributes. This is set in data access sets that get assigned to permissions. In this example, you'll create two data access sets for each of the roles you're creating access for.
- In a project, on the navigation bar, click Security > Data Access Set > Add Data Access Set.
- In the New data access set pane, select Employee and then click Next.
- In Display name, type HRBP Data Access.
- Click Create.
- Click the Data Access column.
- In Data view, set the following:
- In Properties, select Detailed.
- In References, select None.
- In Events, select Detailed.
- In Related Objects, select None.
This grants access to all Employee properties and events, but doesn't grant access to related objects like Applicants or Sales Quotas that the HRBP should not have access to.
- Repeat steps 1 to 6, but use the display name Leaders Data Access and set the following Data view:
- In Properties, select Detailed.
- In References, select Detailed.
- In Events, select Detailed.
- In Related Objects, select Detailed.
This grants access to all Employee properties, events, and related objects that a Leader should be able to see for their direct reports.
Create a permission
Next, create a dynamic permission using the parent-child dimension associated with your population file. You'll create one permission per role you're creating access for.
- In a project, on the navigation bar, click Security > Permissions > Add Permission.
- In Display name, type HRBP Dynamic Permission.
- In Data Access, select the data access set you created.
- Click Create.
- In the Data security tab, click Set access and then select HRBP Data Access.
- In Population Access, select Custom.
- In Dynamic Filter, select User to dimension.
- Select Organization > Organization_Hierarchy.
- Select HRBP_List = EmployeeID.
- Click Apply.
- Repeat steps 1 to 10, but use the display name Leader Dynamic Permission, set the access to Leader Data Access, and select Leader_List = EmployeeID.
Step 4: Check your work
To make sure the permission works as expected, assign it to a user and preview the data as that user to verify they can see the correct data. In this example, you'll assign HRBP Dynamic Permission to User 1.
Assign the permission
- In a project, on the navigation bar, click Security > Users.
- Select a user in the Users list. In this example, the user is User 1.
- Click Assign in the Permissions area.
- In the list of permissions, select HRBP Dynamic Permission.
- Click Assign.
Generate a data version
- In a project, on the navigation bar, click Data > Data Categories.
- On the data category you want to create a new data version, click the More button
 .
. - Click Run job.
- In the Run job dialog, do the following:
- In Generate debugging info, select None.
- Disable Use alerts.
- Turn on Enable normalizer cache.
- Click Run Job.
Impersonate a user
- On the navigation bar, click Security > Users.
- Select the user that you assigned the HRBP Dynamic Permission. In this example, the user is User 1.
- Click View As > Preview As User in the upper-right corner.
Result: A preview version of the solution opens in a new tab.
- In the solution, navigate to Explore or Analyses and then change the filters, metrics, and group bys to see what data the user can see.
Publish the project
- In a project, on the navigation bar, click the Home button
 .
. - Click Release to Production in the upper-right corner of the project. The project must contain at least one revision before Release to Production appears.
- In the Release to Production dialog, do the following:
- In Display name, type Workday Security.
- In Description, type Added permissions and mappings for dynamic security.
- In Release Version, type a release number, such as 7001137.
- Click Release now.
Result: A new production version is released that contains your security updates. Every time Visier receives the population file from your Workday integration, user security will be updated.