
Sync Snowflake Data
Connect and synchronize your data warehouse with Visier to transform your data into actionable insights.
Access requirements
Profiles: Data Engineer
Custom profile with these capabilities: Data (Write, Detailed) and Manage Jobs
Reach out to your administrator for access.
Overview
Visier's Snowflake (Beta) connector lets you ingest large volumes of data from your data warehouse into Visier, allowing you to quickly visualize, analyze, and solve your organization's most pressing people challenges. The connector uses Apache Spark to sync data from Snowflake and mirror insert it in Visier.
Prerequisites
- Enable Snowflake (Beta) and table sources. For more information, contact your Customer/Partner Success Manager.
- Create a Snowflake credential with access to the data you want to share. For more information, see Snowflake.
- Configure key-pair authentication with public key assigned to Snowflake user. For more information, see Key-pair authentication and key-pair rotation.
- Allow network and data traffic between Visier and your source system. For more information, see Allow Visier Connections.
- Optional: For more efficient data loads, enable change tracking in Snowflake for each table you want to load in Visier; for example, ALTER TABLE mytable SET CHANGE_TRACKING = TRUE;. This allows delta data loads, which are much faster than full loads. If you don't enable change tracking, each data load in Visier is a full load.
- Set the data retention period for each Snowflake table to complement the sync schedule in Visier, such as loading data once a day in Visier and a Snowflake retention period of 2 days. For more information, see Update schedules. If the time between data extractions exceeds the data retention period, a full load occurs. The default data retention period in Snowflake is 1 day.
Set up your initial Snowflake (Beta) sync
To help you seamlessly onboard your data, the setup experience is split into two parts: the setup wizard and the Studio Assistant. The setup wizard walks you through connecting to your warehouse, selecting tables, mapping data, creating a sync schedule, and initiating a full sync. After that, the Studio Assistant guides you through the remaining steps to complete your setup, with links to the relevant documentation.
- To launch the Snowflake setup wizard, open a project and click Data > Connectors.
- In the Connectors room, click Create Connectors, and select Snowflake (Beta) in the Select data provider dialog.
-
In the setup wizard, do the following:
- Connect to Snowflake by selecting an existing connector credential or creating a new one. If you're creating a connector credential, enter the following information:
Credential
Description
Example
Account Identifier
The unique identifier of the account to retrieve data from.
SAMPLE-ACCOUNT-IDENTIFIER
Warehouse
The warehouse to use. The user must be granted USAGE for the warehouse (or inherited through the Role).
SAMPLEWAREHOUSE
Username
The integration user’s username.
IntegrationUser
Private Key
The generated private key.
-----BEGIN PRIVATE KEY-----
...
----END PRIVATE KEY----
Database (Optional)
The database to retrieve data from. Useful if you want to restrict access to a specific set of tables in a particular database. The user must be granted USAGE for the database (or inherited through the Role).
SNOWFLAKE_SAMPLE_DATA
Schema (Optional)
The schema associated with the database. Useful if you want to restrict access to a specific set of tables in a particular schema. The user must be granted USAGE for the schema (or inherited through the Role).
TPCH_SF1
Key Passphrase (Optional)
The passphrase for the encrypted private key.
Role (Optional)
The database role that provides access to securable objects. If no role is provided, the user's default role is used. The user must be granted USAGE on the provided role or default role.
Tenant Code Column (Optional)
For administrating tenants only. When provided, records from all extracted tables will be automatically distributed to the specified analytic tenants.
Note: When you create a new connector credential, the connector automatically syncs 100 sample records from each table, letting you view the table's columns and preview records to help you decide which tables to select in the next step.
- Select the tables you want to sync from your workspace.
- Decide whether to use AI to automatically create mappings or manually create them later. Mappings define the link between your source data and Visier through column association or formula calculations. For more information, see Add a Mapping.
Note: To automap with AI, your organization must also opt in to AI features. In the global workspace, click Settings > AI Features.
-
Decide if you want to set up a recurring sync schedule.
Note: If you chose to sync all tables for the connector credential, you can enable the Sync all tables (including new tables) option to automatically include new source tables in future syncs. Just remember to sync the schema for the connector credential so new tables can be discovered.
Result: A job runs to sync data for the selected tables.
- After the job is finished, click Continue with Studio Assistant to close the wizard. The Studio Assistant will guide you through the remaining steps to complete your initial setup.
- Connect to Snowflake by selecting an existing connector credential or creating a new one. If you're creating a connector credential, enter the following information:
- Review the AI-created mappings or create them manually. To configure mappings, open the connector by clicking Data > Connectors on the navigation bar. For more information, see Update mappings.
- Configure business rules to transform your data to work with Visier's analytic model. Apply transformations to the data, such as adding, removing, or editing events in the event stream. To configure business rules, on the navigation bar, click Data > Rules. For more information, see Business Rules.
- Run a job to process the synced data and generate a data version for analysis. To run a job, open the connector by clicking Data > Connectors on the navigation bar. For more information, see Sync data.
Update a Snowflake connector
After the initial onboarding, you can modify the mappings, sync schedule, and connector credentials for your Snowflake connector in a project.
Update mappings
-
In a project, on the navigation bar, click Data > Connectors.
- In the Connectors room, click the Snowflake connector.
- Create, review, and update mappings in the Mappings tab. For instructions on how to create and configure mappings, see Add a Mapping.
The Mappings tab has two views: Source and Target. Source view groups mappings by source, which contains the raw data before processing, while Target view groups mappings by the objects in the Visier analytic model that the data is loaded into. Source view helps you identify unused source columns that still need mapping, while Target view is useful for configuring mappings one data category at a time.
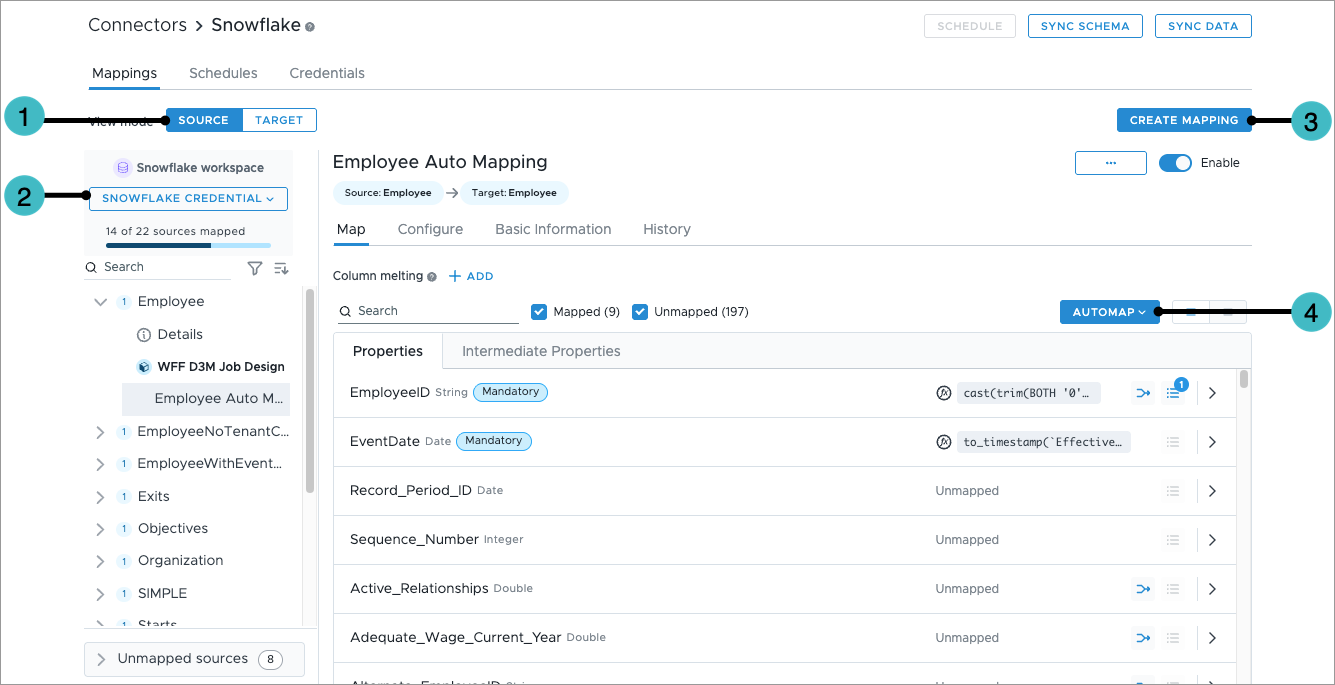
- Switch between Source and Target view.
- Select the connector credential you want to update mappings for.
- Create a new mapping to connect your source data to objects in Visier.
- Automatically connect source columns to data load target properties using AI or string matching.
Note: To automap with AI, your organization must also opt in to AI features. In the global workspace, click Settings > AI Features.
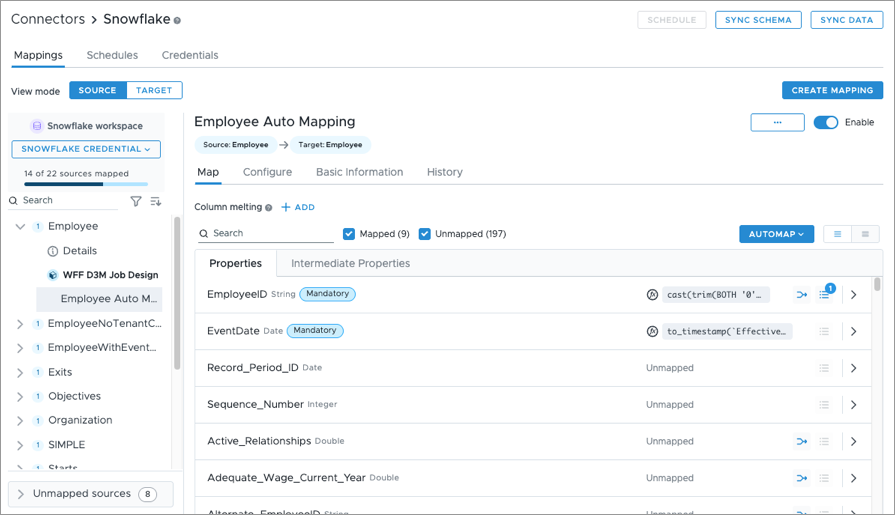
Source view
In Source view, the mappings are grouped by source, which contains the raw data before processing. The number next to each source shows how many mappings it is used in. The Details page provides an overview of the source columns and which mappings they are being used in and allows you to preview the records in the source. Select a connector credential to view mappings that uses sources from your source system.
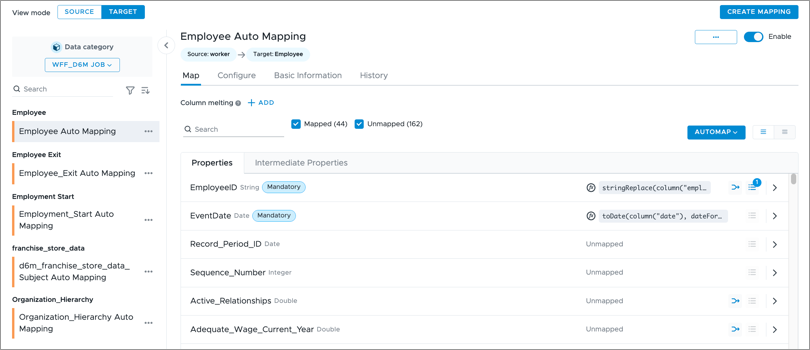
Target view
In Target view, the mappings are grouped by the objects in the Visier analytic model that the data is loaded into, similar to the Mappings room. Select a data category to view mappings that uses sources from your source system.
Update schedules
The Schedules tab is where you can create and update recurring schedules for your Snowflake connector. You can set only one schedule per connector credential.
To create a recurring schedule, you must be in the production project.
- In the production project, on the navigation bar, click Data > Connectors.
- In the Connectors room, select the connector.
- Click Schedule.
- In the Create schedule dialog:
Select the operation:
- To sync data from the selected tables and generate a data version, click Sync and process data.
- To sync data from the selected tables without generating a data version, click Sync data only.
- To generate a data version without syncing new data, select Process data only.
- Select the connector credential you want to create a schedule for. If you chose to sync all tables for the connector credential, you can enable the Sync all tables (including new tables) option to automatically include new source tables in future syncs. Just remember to sync the schema for the connector credential so new tables can be discovered.
- Select the tables you want to sync.
- Select the data category you want to use to generate the data version.
- Set the date and time when you want the sync and job to run.
- When finished, click Schedule.
To edit an existing schedule:
-
In a project, on the navigation bar, click Data > Connectors.
- In the Connectors room, click the Snowflake connector.
- In the Schedules tab, find the connector credential you want to edit, and click the More button
 in the Actions column.
 - Click Edit.
Update credentials
The Credentials tab is where you can reauthenticate to update expired connector credentials and view the current schema definitions.
-
In a project, on the navigation bar, click Data > Connectors.
- In the Connectors room, select the connector.
- In the Credentials tab, find the connector credential you want to edit, and click the More button in the Actions column.
-
Do one of the following:
- To refresh the schema definition so new tables from the source are detected, and existing table structures are updated, click Sync schema.
- To view the current schema definition and preview sample data for the connector credential, click View schema.
- To renew the connector credentials, click Reauthenticate.
Sync schema
Whenever you add new tables or modify existing table structures in your source system, you must also update the schema definition for your connector credential in Visier. This allows Visier to discover these changes so you can successfully sync data.
-
In a project, on the navigation bar, click Data > Connectors.
- In the Connectors room, select the connector.
- Click Sync Schema in the upper-right corner.
You can also sync schema for your connector credential in the Credentials tab. Whenever you add new tables or modify existing table structures in your source system, you must also update the schema definition for your connector credential in Visier. This allows Visier to discover these changes so you can successfully sync data.
-
In a project, on the navigation bar, click Data > Connectors.
- In the Connectors room, select the connector.
- Click Sync Schema in the upper-right corner.
You can also sync schema for your connector credential in the Credentials tab.
Sync data
Get the latest data from your source system and optionally run a job immediately to generate a data version. For more information, see Data Versions.
-
In a project, on the navigation bar, click Data > Connectors.
- In the Connectors room, select the connector.
- Click Sync Data in the upper-right corner.
-
In the Sync data dialog:
-
Select the operation:
- To sync data from the selected tables and generate a data version, click Sync and process data.
- To sync data from the selected tables without generating a data version, click Sync data only.
- To generate a data version without syncing new data, select Process data only.
- Select the connector credential you want to run the job for.
- Select the tables you want to sync.
- Select the data category you want to use to generate the data version.
-
- When finished, click Sync Data. You can monitor the progress of your job in the Jobs room. For more information, see Jobs.