
Create a Leveled Dimension
Learn how to create and configure a leveled dimension.
Access requirements
Profiles: Basic Model Developer
Custom profile with these capabilities: Model (Write, Simple)
Reach out to your administrator for access.
Overview
You might want to create a new dimension when you have new data to analyze in Visier. For example, if your organization started collecting employee data about hair color, you might want to create a new Hair Color dimension in Visier to analyze employee hair color.
To modify the structure of a leveled dimension, such as how many levels it contains or its data type, you can customize a dimension. Customization is done before configuration because it defines the levels in the dimension. After you define the dimension's levels, you can then configure how the levels are displayed, such as reordering the levels or changing their display names.
For a tutorial that walks you through creating a new dimension, see Create New Employee Attributes and Metrics.
Create a leveled dimension
You can create a dimension in the Dimensions room or by selecting a specific analytic object on which to create the dimension.
Model > Dimensions steps
In this workflow, start by selecting the dimension type to create and then select its associated analytic object.
- In a project, on the navigation bar, click Model > Dimensions.
- Click Create Dimension.
- Selected Leveled, and then click Next.
Note: If you are a Visier Cloud Administrator creating a leveled dimension, there are additional steps. For more information, see Create a leveled dimension as a Visier Cloud Administrator.
- Select an analytic object and then click Next.
This is the object associated with the dimension; for example, if you're creating a dimension for your employees' hair color, the analytic object is Employee.
- Type a display name and description.
- When finished, click Create.
Result: The dimension is created and can now be customized and configured.
Model > Analytic Object steps
In this workflow, start by selecting the analytic object and then select the dimension type to create.
- In a project, on the navigation bar, click Model > Analytic Objects.
- Select an analytic object.
- In the Attributes tab, click Create Attribute > Dimension.
- Select Leveled, and then click Next.
Note: If you are a Visier Cloud Administrator creating a leveled dimension, there are additional steps. For more information, see Create a leveled dimension as a Visier Cloud Administrator.
- Type a display name and description.
- When finished, click Create.
Result: The dimension is created and can now be customized and configured.
Create a leveled dimension as a Visier Cloud Administrator
Access requirements
Profiles: Visier Cloud Administrator
Data required: Access to all data such as the Super Admin permission
Reach out to your administrator for access.
You can create a leveled dimension if you want to group and filter the column values from your data files. This is useful for augmenting existing data, for example, if you have a new column in your data and want to create a dimension so that users can group and filter by the new column.
Tip: Watch this video to learn how to create a leveled dimension.
Step One: Select the dimension type and analytic object
-
In a project, on the navigation bar, click Model > Dimensions.
Note: If you already know the analytic object you want to create a dimension for, you can alternatively select the object in Model > Analytic Objects and then click Add Attribute > Dimension.
- In the New dimension dialog, select Leveled.
Recommended: Select Make dimension shared. This allows you to optionally associate the dimension with multiple data objects, such as both Employee and Applicant.
- Click Next.
- Select an analytic object. If the dimension is shared, you can select additional analytic objects after you create the dimension.
This is the object associated with the dimension; for example, if you're creating a dimension for open requisitions, the analytic object is Requisition.
Note: If you started from Model > Analytic Objects, this step is skipped.
- Click Next.
Step Two: Connect data to the dimension
You have three options to connect data to your new dimension. The following diagram illustrates each option with the example of connecting data to Employee.
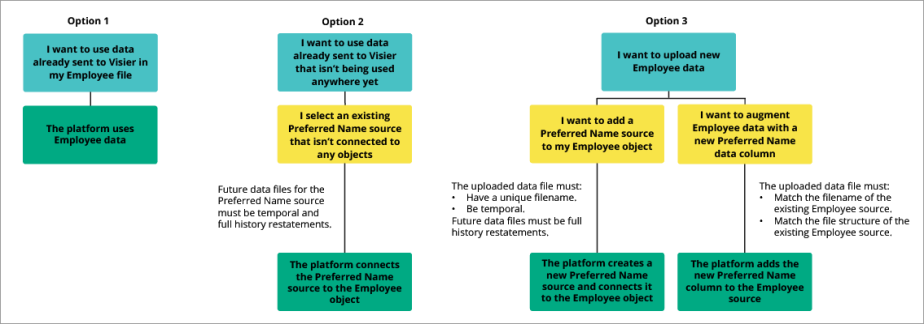
Option 1: Use existing data (connected to the analytic object)
- In the Select data source dialog, click Select Source.
- Select a source from the list.
- Select a source column. This is the column in your data file to associate with the dimension.
- Click Next.
Option 2: Use existing data (not connected to the analytic object)
- In the Select data source dialog, click Select Other Source.
- In the Select other source dialog, click Select a source.
-
Select a source from the list.
Note:
- The platform creates a new mapping for the dimension's analytic object with the selected source. Because there's a new mapping, future data files for the source must be a full history restatement. With administrator-created leveled dimensions, if a new source or mapping is created, Visier overrides all previously-uploaded files after a new file is loaded to allow you to easily add, remove, and update records across all time.
- This list only displays sources that aren't connected to any analytic objects. If you want to use a source that's connected to a different analytic object, try uploading a new data file with a unique filename. For more information, see Option 3: Upload new data.
- Optional: If there are unconnected properties, in the Connect data dialog, select the correct column for each unconnected property.
- Click Next.
Option 3: Upload new data
Note:
- If the data creates a new source, the file must:
- Meet Visier's requirements. For more information, see Data File Guidelines.
- Be temporal. For more information, see Using Temporal or Transactional Data Types to Show Changes in Your Data.
- Contain SubjectID and EventDate columns. These columns must contain values.
- After the initial data upload, you can send data in your regularly scheduled data loads or upload files manually in the Configure tab. For more information about manual data uploads, see Configure a leveled dimension.
- Future data files for the source must be a full history restatement. With administrator-created leveled dimensions, if a new source is created, Visier overrides all previously-uploaded files after a new file is loaded to allow you to easily add, remove, and update records across all time.
- In the Select data source dialog, click Use Other Source.
- In the Use Other Source dialog, click Select a file > Upload Data.
-
After you select a file, click Upload File.
Note: If the new data matches an existing source, the data is connected to the existing source. If the new data doesn't match an existing source, a new source is created. For more information about sources, see Sources.
- Optional: If there are unconnected properties, in the Connect data dialog, select the correct column for each unconnected property.
- When finished, click Done.
Step Three: Create the dimension
- Type a display name and description.
- Click Create.
Result: The dimension is created and can now be configured and customized.
Note: To make the dimension visible to users:
- When finished configuring and customizing the dimension, publish the project to production. For more information, see Publish Project Changes.
- If you added new data, run a data version in production. For more information, see Data Versions.
Errors
The following table lists possible errors and how to resolve them during dimension creation.
| Error | Description | Resolution |
|---|---|---|
| Can't connect data to analytic object | After you select an analytic object for the dimension and try to connect data (Step Two, Option 2 or 3), Visier can't connect data to the analytic object. | The analytic object doesn't have an existing regular mapping, likely because there is no data for the analytic object. The analytic object must have existing data and mappings to create a new leveled dimension. Contact Visier Technical Support to load data for the analytic object. |
| No sources available | While selecting a source (Step Two, Option 1), you can't find a specific source that you're looking for in the list even though you know it exists in your Visier solution. | The source may have multiple mappings, so the platform doesn't know which mapping to surface. Contact Visier Technical Support to fix the source configuration. |
| The source already exists and is connected to a different analytic object | After you upload a data file (Step Two, Option 3), Visier finds a matching source for the file that already has a mapping to a different analytic object. | The data file matches the regex of an existing source, but that source is connected to a different analytic object than the one you selected for the dimension. Change the name of your data file so that it doesn't match the regex of the existing source. |
Customize a leveled dimension
In the Customize tab, you can change the dimension's structure by adding additional levels to the dimension, changing the level display names, and changing the level data types.
Edit analytic objects
If the dimension is shared, you can optionally edit the list of analytic objects that the dimension is associated with.
- To change the analytic objects for the dimension, in Analytic objects, click Edit.
Add dimension levels
Each leveled dimension has one level by default. That level starts with the same name as the dimension. You can add additional levels allow to indicate relationships within the data. Each additional level is a branch below the level above it. For example, the Location dimension has specific levels that follow the order they should appear in (region, country, state, city).
-
In a project, on the navigation bar, click Model > Dimensions.
- Select a leveled dimension.
Note: You must select an administrator-created leveled dimension. Visier-created leveled dimensions cannot be customized.
- In the Customize tab, click Add Level.
-
Select a data type from the list.
-
Type a display name and description.
- Click Add.
- Repeat steps 3 to 6 for all levels.
- Optional: Use Reorder to change the dimension level order.
- When finished adding new levels, run a job to generate a data version in the project. The new data version contains the new dimension levels, allowing you to preview your changes. For more information about running a job, see Run a Job.
Example: Let's say your organization now collects the postal code of employee locations and your CEO wants the data in Visier, but your Location dimension only has Region, Country, State, and City levels. In the Customize tab, you can add a new level called Postal Code to map your data to. When finished, run a job to generate a data version.
Change a level's display name
Each level has a display name to identify it. You can change the level display name in a project.
-
In a project, on the navigation bar, click Model > Dimensions.
-
Select a leveled dimension.
Note: You must select an administrator-created leveled dimension. Visier-created leveled dimensions cannot be customized.
- In the Customize tab, in Levels, select a level.
- In the Info panel under Display name, type a new display name.
Example: Let's say your Location dimension has the levels Region, Country, State, City, but "State" isn't accurate for your company because you're based in Canada. In the Customize tab, you can change the State display name to Province.
Translate a level's display name
You can configure dimension member display names in additional languages. This allows users to see content specific to their locale while maintaining a consistent data structure. For example, the Job Name dimension members will display in French in a visualization if the user has selected French as their preferred language. For more information, see Translate Dimension Members.
Change a level's data type
Each level has a data type to define the data it can use. You can change the data type of any level if the dimension doesn't have data loaded already.
-
In a project, on the navigation bar, click Model > Dimensions.
-
Select a leveled dimension.
Note: You must select an administrator-created leveled dimension. Visier-created leveled dimensions cannot be customized.
- In the Customize tab, select a level.
- In the Info panel under Settings, select a different data type.
Example: Let's say that when you originally created a leveled dimension, the levels defaulted to the String data type, but your data is ordinal. You haven't loaded any data for the dimension yet, so in the Customize tab, you can change the String data type to Ordinal.
Use mapping display name
Map each level's object name and display name using different source columns. If disabled, the same column is used to map both the object name and display name.
Note: This requires columns in the source for the unique key and the display name. To find the required column names, select a dimension level and then, in the Info panel under Settings, find Mapping - Object name and Mapping - Object display name.
A leveled dimension is based on a single source column, so you can decide whether you want to create a dimension using the unique key (typically a number) or the display name. Using the unique key requires you to change the display name when configuring the dimension. Enabling Use mapping display name is more efficient if you can map an additional column per level in the hierarchy to a column that is supplied in the data.
Example: Let's say your data has two columns to provide information about Business Type. One column is an ID for the business type and the other column is a display name for the business type. In the Customize tab, you can turn on Use mapping display name to use the ID column as a unique key (object name) and the display name column as the level's display name.
Configure a leveled dimension
This configuration includes changing the display names for the members at each level and mapping unknown values from the data to the dimension's Unknown Value setting.
Note:
- Value configuration is only available if data is loaded.
- If you change the display name of a leveled dimension in the Basic Information tab, check the Customize tab to update the level display names if needed. If you don't have access to the Customize tab, contact Visier Technical Support to update the level display names.
-
In a project, on the navigation bar, click Model > Dimensions.
- Select a leveled dimension.
- Navigate to the Configure tab.
- If the leveled dimension is Visier-created, do any of the following:
- To set an unknown value, beside Map unknown value, click Edit and select a value from the list. You can Save this selection or Clear it and choose another.
- To change the display name of a level member, click the row in the Custom Name column and type a new display name.
- To reorder the level members, click Reorder. Click the Move button
 and drag the member to the desired position. Members can only be reordered within the same parent level. When finished, click Save.
- If the leveled dimension is administrator-created, do any of the following:
- To change a level's source, under Levels, hover over the level and click the Edit source button
 . You can select a different source or upload a new file. For more information, see Step Two: Connect data to the dimension.
Tip: If you want to manually add data to the dimension, use the Edit source button
to upload a new data file. - To change a level's source column, under Levels, hover over the level and click the Edit column button .
- To reorder the level members, under Values, click Run Partial Job. After the job runs successfully, click Reorder. Click the Move button and drag the member to the desired position. Members can only be reordered within the same parent level. When finished, click Save.
Note:
- A partial job loads a subset of data for testing purposes. The resulting data version is partial and cannot be published to production. If you publish a project that contains a partial data version, the project will publish but the partial data version will not.
- To run a partial job, your data version release behavior must be set to Auto-release latest. For more information, see Set the Data Version.
- To preview your changes, run a partial job and then click Preview.
Note:
- A partial job loads a subset of data for testing purposes. The resulting data version is partial and cannot be published to production. If you publish a project that contains a partial data version, the project will publish but the partial data version will not.
- To run a partial job, your data version release behavior must be set to Auto-release latest. For more information, see Set the Data Version.
- To change a level's source, under Levels, hover over the level and click the Edit source button
Change a local dimension to a shared dimension
Convert a dimension so it is shared among multiple analytic objects.
Tip: If a dimension is shared, it has the Shared icon ![]() , as shown next.
, as shown next.
![]()
Because the object name for the dimension may change, any dependencies for the local dimension will update automatically and appear in the project's changelist. For more information about changelists, see Manage and Commit Project Changes.
Content such as analyses and charts will update to reflect the new object name for your converted shared dimension.
- On the navigation bar, click Model.
- Navigate to a dimension, either through Analytic Objects or Dimensions.
Note: You can convert leveled dimensions or parent-child dimensions to shared.
- In the upper-right corner, click the More actions button
 > Make shared.
 - Select the analytic objects you want this dimension to be shared with.
- When finished, click Make Shared.
Caution: You cannot revert the dimension back to local after conversion.
Troubleshoot "Data is not available"
You may see a "Data is not available" note in the Customize tab. To investigate data availability, check:
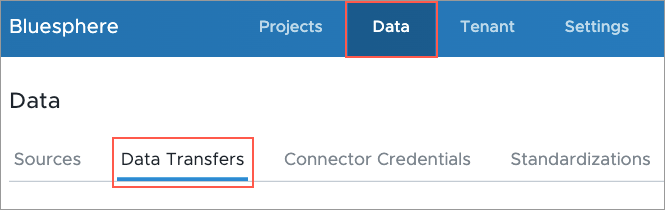
- The Data Transfers room in the global workspace. There must be a data file that contains data for the object.
- The Sources room in the global workspace. The data file containing your object data must be connected to a source. For more information, see Sources.
- The Mappings room in a project. The source that contains your object data must be mapped to the associated property. For more information, see Mappings.
- The data version. After mapping your source data to a property in Visier, you must generate a new data version. For more information, see Data Categories and Run a Job.
Validate a dimension
Access requirements
Profiles: Basic Model Developer
Custom profile with these capabilities: Model (Read, Simple)
Data required: Access to data you're validating
Reach out to your administrator for access.
Previewing your dimension allows you to quickly look at your dimension as a visual to determine whether its components are configured correctly. To preview your new dimension, its associated analytic object must have a default metric. For more information, see Default metric.
-
In a project, on the navigation bar, click Model > Dimensions.
- Select a dimension.
- In the upper-right corner, click Preview.
Publish your changes
When finished configuring and customizing the dimension, publish the project to production. For more information, see Publish Project Changes.
To see your changes, run a data version in production or wait until your next scheduled data load to make the data available to users. For more information, see Data Versions.