
Create a Parent-Child Dimension
Learn how to create and configure a parent-child dimension.
Access requirements
Profiles: Basic Model Developer
Custom profile with these capabilities: Model (Write, Simple)
Reach out to your administrator for access.
Overview
To modify the structure of a parent-child dimension, such as how many levels it contains, you can customize a dimension. Customization is done before configuration because it defines the levels in the dimension and any custom properties. After you define the dimension's levels, you can then configure how the levels are displayed, such as changing their display names.
For a tutorial that walks you through creating a new dimension, see Create New Employee Attributes and Metrics.
Create a parent-child dimension
You can create a dimension in the Dimensions room or by selecting a specific analytic object on which to create the dimension.
Model > Dimensions steps
In this workflow, start by selecting the dimension type to create and then select its associated analytic object.
- In a project, on the navigation bar, click Model > Dimensions.
- Click Create Dimension.
- Selected Parent-child, and then click Next.
- Select an analytic object and then click Next.
This is the object associated with the dimension; for example, if you're creating a dimension for your employees' hair color, the analytic object is Employee.
- Type a display name and description.
- When finished, click Create.
Result: The dimension is created and can now be customized and configured.
Model > Analytic Object steps
In this workflow, start by selecting the analytic object and then select the dimension type to create.
- In a project, on the navigation bar, click Model > Analytic Objects.
- Select an analytic object.
- In the Attributes tab, click Create Attribute > Dimension.
- Select Parent-child, and then click Next.
- Type a display name and description.
- When finished, click Create.
Result: The dimension is created and can now be customized and configured.
Customize a parent-child dimension
Turn on pruning
Note: To enable this feature, contact Visier Technical Support. If the feature is not enabled, configure pruning using Multi-Subject Rules.
Access requirements
Profiles: Data Engineer
Custom profile with these capabilities: Data (Write, Detailed)
Reach out to your administrator for access.
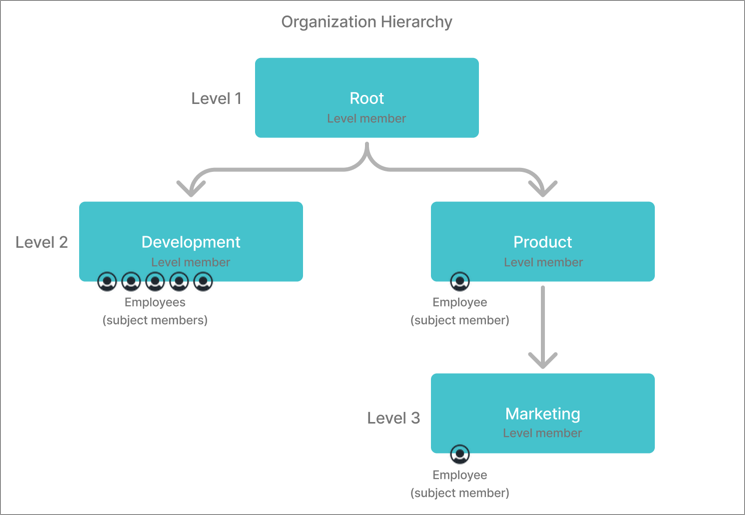
In a parent-child dimension, each level of the hierarchy has level members. For example, the Organization Hierarchy has the levels Level 1, Level 2, and Level 3. Level 1 has the member Root, Level 2 has the members Development and Product, and Level 3 under Product has the member Marketing.
Pruning is an optional setting that removes a level member from the available data if there are no references to that member in the dimension for a given time period, such as having no employees. If a parent level member and its child both have no references, pruning removes both level members. Pruning reflects your data more accurately because it only shows level members that have members during the selected time period.
Example: Let's say that you have three level members in your Organization Hierarchy: Development, Product, and Marketing. During January, all three organizations have employees. In March, there are no employees in Marketing.
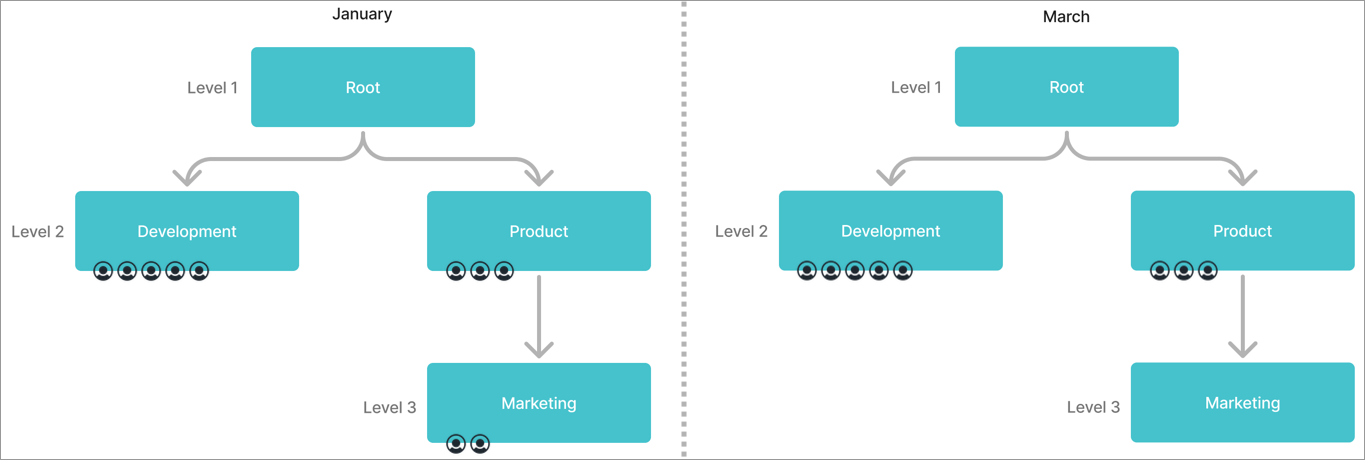
If pruning is enabled, Marketing is removed from the available data in March. As a result, your end users will no longer see Marketing as an Organization Hierarchy member as of March. If pruning is disabled, all level members are available from January onward even if there are no employees.
Pruning can optionally exclude periods where employees were nonactive by turning on Use active period of employees for pruning.
Example: Let's say that you have three level members in your Organization Hierarchy: Development, Product, and Marketing. Employee A reports to Product in January, but is inactive. Employee B reports to Product in January (inactive), moves to Marketing in March (inactive), and becomes active in Marketing in May.
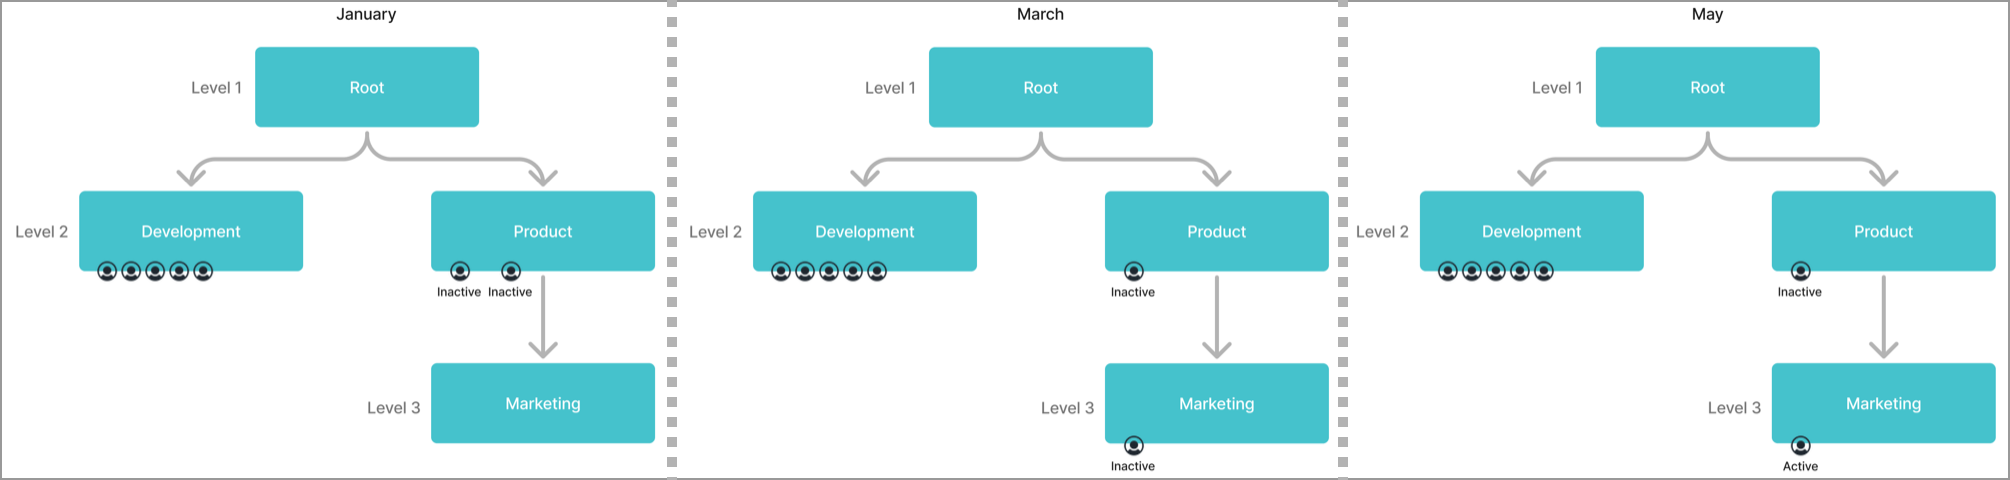
If Use active period of employees for pruning is enabled, Marketing is available in the data from March to May because Employee B moved to Marketing in March and became active in May. Product has the same available data as Marketing because it is Marketing's parent organization. If Use active period of employees for pruning is disabled, all level members are available from January onward regardless of active or inactive periods.
Pruning changes the data that is available to your end users. Some level members may disappear from certain time periods because there are no subject members. Always preview your changes in the solution before publishing changes to production.
To turn on hierarchy pruning:
-
In a project, on the navigation bar, click Model > Dimensions.
- Select a parent-child dimension.
- In the Customize tab, in Analytic Objects, turn on Prune for the analytic objects that you want to use to apply pruning to the dimension. If you turn on pruning for multiple analytic objects, pruning considers whether there is at least one member in any of the enabled analytic objects for the selected period.
- Optional: In the Customize tab, turn on Use active period of employees for pruning. If enabled, this prunes hierarchy members for the Employee subject using only active periods, ignoring any nonactive time periods for employees.
- To preview your changes, run a job to generate a data version in the project. The new data version contains the updated hierarchies, allowing you to preview your changes. For more information about running a job, see Run a Job.
- After the job finishes successfully, on the navigation bar, click Preview Solution. Check the data in the solution matches your expectations for pruning, such as confirming that the Organization Hierarchy in March 2016 doesn't have Marketing.
- When finished, publish your project to production. For instructions, see Publish Project Changes.
Turn on large dimension search
If your parent-child dimension has more than 300,000 members, such as in the supervisory hierarchy, Visier's default doesn't allow searching for specific members to help with performance. You can bypass the default if your hierarchy has fewer than 20 million members by turning on Large dimension search.
-
In a project, on the navigation bar, click Model > Dimensions.
- Select a parent-child dimension.
- In the Customize tab, turn on Large dimension search.
Rename a default level name or add additional levels
Each parent-child dimension has a different number of levels depending on the hierarchy. When viewing a visualization, users can select a specific level of the parent-child dimension to view all attribute values at that level. For more information about parent-child levels in visualizations, see Change the level of the group by attribute.
Each level has a default name, starting with Level 1, Level 2, and so on. You can rename a default level name to a custom name to help users understand what level they are selecting in a visual.
To determine what levels you want to rename, preview the parent-child dimension in the solution, as described next.
-
In a project, on the navigation bar, click Model > Dimensions.
- Select a parent-child dimension.
- In the upper-right corner, click Preview.
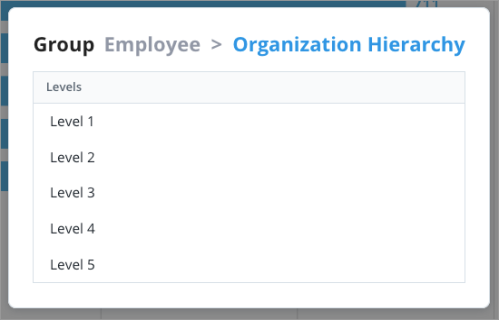
- In the visualization preview, click the Group By picker in the visual title, and then click Select level of.
- In the list of levels, select a level to view its data. The following screenshot is an example of the default list of levels.
Now that you know how many levels the parent-child dimension has and what data each level contains, you can rename the levels by adding levels to the dimension, as described next.
-
In a project, on the navigation bar, click Model > Dimensions.
- Select a parent-child dimension.
- In the Customize tab under Levels, click Add Level.
- Type a display name and description.
- Select a data type from the list.
- Click Add.
Note: The order of the levels in the list determines the mapping of the levels in the hierarchy. For example, the first level in the list is applied as the first level in the hierarchy.
- Repeat steps 3 to 6 for each level you want to rename or add.
- Optional: Use Reorder to change the order of the dimension's levels.
Add custom properties
Add custom properties to modify your parent-child dimension and provide additional information for each member within the parent-child dimension.
Example: In a Cost Center parent-child dimension, use custom properties to include information about who runs the cost center and its location.
-
In a project, on the navigation bar, click Model > Dimensions.
- Select a parent-child dimension.
- In the Customize tab, click Add Custom Property.
-
Select a data type from the list.
-
Type a display name and description.
- Click Add.
Configure a parent-child dimension
This configuration includes changing the display names for the hierarchy and mapping unknown values from the data to the dimension's Unknown Value setting.
To configure a parent-child dimension:
-
In a project, on the navigation bar, click Model > Dimensions.
- Select a parent-child dimension.
- In the Configure tab, do any of the following:
- To set an unknown value, beside Map unknown value, click Edit and select a value from the list. You can Save this selection or Clear it and choose another.
- To change the display name of a member, click the row in the Custom Name column and type a new display name.
Translate a member's display name
You can configure dimension member display names in additional languages. This allows users to see content specific to their locale while maintaining a consistent data structure. For example, the Job Name dimension members will display in French in a visualization if the user has selected French as their preferred language. For more information, see Translate Dimension Members.
Change a local dimension to a shared dimension
Convert a dimension so it is shared among multiple analytic objects.
Tip: If a dimension is shared, it has the Shared icon ![]() , as shown next.
, as shown next.
![]()
Because the object name for the dimension may change, any dependencies for the local dimension will update automatically and appear in the project's changelist. For more information about changelists, see Manage and Commit Project Changes.
Content such as analyses and charts will update to reflect the new object name for your converted shared dimension.
- On the navigation bar, click Model.
- Navigate to a dimension, either through Analytic Objects or Dimensions.
Note: You can convert leveled dimensions or parent-child dimensions to shared.
- In the upper-right corner, click the More actions button
 > Make shared.
 - Select the analytic objects you want this dimension to be shared with.
- When finished, click Make Shared.
Caution: You cannot revert the dimension back to local after conversion.
Troubleshoot "Data is not available"
You may see a "Data is not available" note in the Customize tab. To investigate data availability, check:
- The Data Transfers room in the global workspace. There must be a data file that contains data for the object.
- The Sources room in the global workspace. The data file containing your object data must be connected to a source. For more information, see Sources.
- The Mappings room in a project. The source that contains your object data must be mapped to the associated property. For more information, see Mappings.
- The data version. After mapping your source data to a property in Visier, you must generate a new data version. For more information, see Data Categories and Run a Job.
Validate a dimension
Access requirements
Profiles: Basic Model Developer
Custom profile with these capabilities: Model (Read, Simple)
Data required: Access to data you're validating
Reach out to your administrator for access.
Previewing your dimension allows you to quickly look at your dimension as a visual to determine whether its components are configured correctly. To preview your new dimension, its associated analytic object must have a default metric. For more information, see Default metric.
-
In a project, on the navigation bar, click Model > Dimensions.
- Select a dimension.
- In the upper-right corner, click Preview.
Publish your changes
When finished configuring and customizing the dimension, publish the project to production. For more information, see Publish Project Changes.
To see your changes, run a data version in production or wait until your next scheduled data load to make the data available to users. For more information, see Data Versions.